1-Introduction
I rarely review cameras, but once is not a custom, so this time I will. I will because the G9 is an interesting camera, one worth taking a look at. Notice I said an interesting camera and not a great camera.
I did not because there are good news and bad news when it comes to the G9. The bad news is that it is a point and shoot camera. It may be a “high end” point and shoot, but it is still a point and shoot. However, as we will see shortly, the G9 does have some redeeming qualities and this makes it worthy of attention and of purchase as well.
2 - Rangefinder camera
For now, let us continue with the problematic aspects of this camera. The G9 is a rangefinder camera. A rangefinder can be a fine device when what you see in the viewfinder is equal to what the camera captures. But in this case the G9 viewfinder shows far less than what the camera captures. This means that creating a precise composition with the G9 viewfinder alone is next to impossible. To create a precise composition one must use the LCD screen.
Certainly, you can get used to how much is not shown in the viewfinder. But there is no precision working that way. Eventually, when caught in the moment of capturing an image, you will forget to take these differences into consideration and you will end up composing too tight or too wide. You will either capture too much of the subject or, worse, cut off an important part of the subject, one that you wanted to include in your composition.
One therefore must use the LCD screen to compose the image. This means looking at the camera instead of looking through the camera. This is not something impossible, but it certainly reminds you that you are using a point and shoot camera.
This also means a high battery drain because the LCD has to be on whenever you are taking photographs, or whenever you want to know precisely what you are photographing. Of course, the option is there to use the viewfinder, but then you won’t know for sure what you photographed until you review your image on the LCD screen or later on your computer.
3-Warning: high noise ahead
The G9 features 12.1 mega pixels on a very small sensor. It has a noise level that is excellent at 80 ISO, pretty good at ISO 100 and acceptable at ISO 200. But, the instant you get past ISO 200 the noise level makes you think twice about using a high ISO setting.
The noise level is troubling at 400, unacceptable at ISO 800 and unbearable at ISO 1600. In short, don’t get past 200. Once you do, you are in noise territory and no amount of noise reduction will give you smooth tones and noise free shadows. Just keep high ISO for those instances where gritty is the look you are after, or where noise is the name of the game. Otherwise, if you expect more than that, you will be disappointed. This is a camera with a very small sensor, and when you push it beyond ISO 200 it responds in anger. And anger, in the world of small sensors, is noise.
Below, you can see the noise levels at all the different ISO settings available on the G9. From right to left and top to bottom: ISO 80, 100, 200, 400, 800 and 1600.
ISO 80/100
ISO 200/400

ISO 800/1600
4 - A point and shoot that saves Raw files
You may ask why I bought a G9 if it has all of these problems. The reason is that this camera has qualities as well. The news are not all bad -- there are good news as well.
For one the G9 shoots Raw and that feature alone is worth the cost of the camera because it makes the G9 the smallest digital camera able to save images in Raw format. It also, most likely, makes it the only point and shoot able to save images in Raw Format. Of course, all digital cameras shoot in Raw format, but all point and shoot, except the G9, convert and save photographs in Jpeg format after doing unspeakable things to the Raw files.
5 - Price
The price of the G9 has to be mentioned. In one word, it is very reasonable. At $500 or less the G9 is priced very attractively. If you are used to buying Canon DSLRs and “Red Circle” lenses, chances are you won’t even notice that you bought a G9.
6 - Size
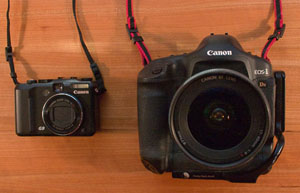
The G9 is small. This is a feature not to be overlooked when one works daily with a pro Canon camera such as the 1DsMk2. The 1DsMk2 is a brick, especially when combined with a hefty (but high quality) lens such as the 24-70 f2.8. Taking such a camera in a car (or anywhere for that matter) means taking a bag to protect it and placing it on the back seat or into the trunk.
The G9 on the other hand is a camera that can fit in the glove compartment of your car something that the 1DsMk2 cannot pride itself upon. You don’t have to put it on the back seat either. It will fit just about anywhere. And, it doesn’t need a bag to carry it in. It can fit in your pocket.
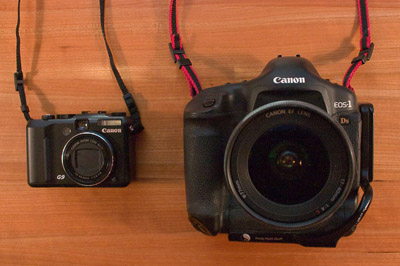
The G9 and the 1DsMk2
7 - Loose the strap
The G9 will fit much better in your pocket if you don’t use the camera neck strap. This strap, when rolled, increases the bulk of this very small camera substantially.
I used the camera with the neck strap at first, but after a single shoot I took it off. The strap was in my way most of the time because I was holding the camera in my hand and not keeping it around my neck. I kept trying to wrap the strap around my wrist to get it out of my way. This was impractical. Eventually, I found that I was better off not having a strap at all.
This means, obviously, that I cannot carry the G9 around my neck. But with such a small camera keeping it in your pocket when you don’t use it is just as practical. Of course, it precludes parading with the G9 around your neck. But who would want to do that anyway? Remember, it is a point and shoot. It is made to be used, not to be exhibited.
8 - Short lens, low shutter speeds
The G9 lens is a 7.5 mm to 44 mm f2.8-4.8. Weird numbers for those used to “real” lenses. What is a 7.5 to 44 mm lens you may ask? Well, that is a small-sensor lens. The G9 sensor is very small, so the focal length is proportional to it. It is more or less the equivalent of a 35 to 210 mm on a full frame 35mm camera.
The very good news is that at 7.5mm you can shoot handheld at 1/15th or even 1/8th of a second without blur, following the rule that, to prevent motion blur, the lowest handheld shutter speed should be equal to the focal length you are using.
High ISO settings may not be practical because of the high noise level. However, the same sensor that gives you high noise levels allows you to use slow shutter speeds handheld. All in all it’s not a bad deal.
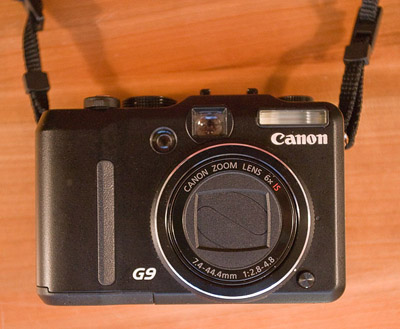
The Canon G9. The lens cap is built in.
9 – Stealth
I can’t tell you how conspicuous you are in a crowd when working with a 1DsMk2, or even with a DSLR such as the Canon 5D for that matter. Not to talk about how heavy and cumbersome those cameras are.
The G9 is nothing like this. It is small and inconspicuous. It is light and easily concealed. It can even be used with one hand. People don’t notice it and when they do they see it for what it is: a lowly point and shoot. Accordingly, they look at you and think that you are a tourist and that you don’t know what you are doing. People don’t see you as a pro when you use the G9, they see as an amateur one step above taking a photo with a camera phone.
10 - Flash
The G9 features a built a built in flash in true point and shoot fashion. I don’t use the flash much, but if I need to it is there. It is practical and it takes no space at all. Why pass on it?
11 - A large LCD Screen
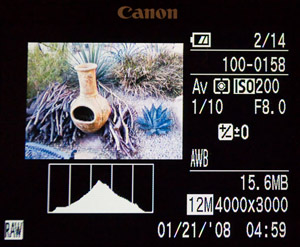
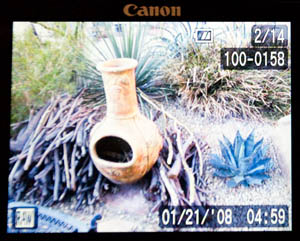
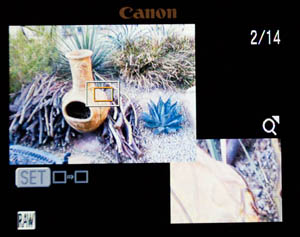
The LCD screen of the G9 is large and bright. Even in full light it is easy to read. Plus, it gives you a wealth of information about the photograph and this makes up for the lack of any information in the viewfinder. Furthermore, the LCD is very large and shows you a nice-sized preview. All the necessary information to expose the image properly is there, you just need to get used to having it all on one screen and you have to learn where it is and what all the icons means. But, once that is done, you can see the histogram, ISO, f-stop, speed and over/underexposure correction all at once on the screen.
That’s great when you have all the time in the world to take the photograph and check all the settings. But what if you want to shoot fast? Well, you won’t be able to check on everything the way you can do it when that information is in the viewfinder. The best in that situation is to preset the camera, use aperture or shutter priority mode, and let the camera make the final decisions. There will be a certain amount left to chance, but when you need to work fast with a G9 that is the only solution.
12 - Different screens for different modes
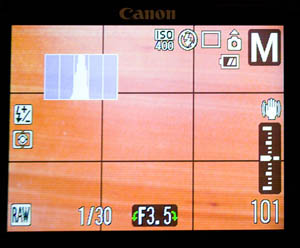
Since the LCD screen is used to set all the parameters on the camera, the screen display changes according to the function mode used. Depending on the function used, one, two or three different screens are available, each showing more or less information. Below are some of the screens available:

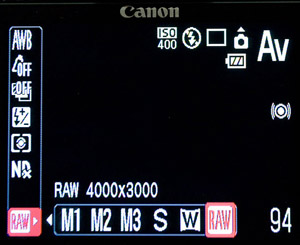
13-Let’s look at the information on the screen
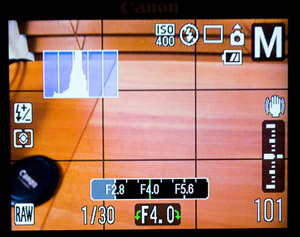
Below is a photograph of the G9 LCD screen display in Aperture Priority mode. We are going to look at what each icon means, starting at bottom left (at the RAW icon) and moving clockwise around the screen.
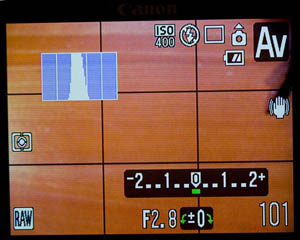
The Raw icon at bottom left tells us we are shooting in RAW mode. The icon above it says we are in evaluative metering mode (the camera also offers Center Weighted Average and Spot Metering modes).
We have set the histogram to be visible (this can be turned off and the histogram hidden away), we are at ISO 400 and the flash is off. The single rectangle tells us we are shooting in single shot mode (continuous frames and timer modes are also available).
The camera icon shows that the photograph will not be rotated. The battery icon shows that the battery is 2/3rds charged and the AV icon that we are in Aperture Priority mode.
The hand icon says that the image stabilization is on continuously. The number 101 at bottom right lets us know that we can shoot another one hundred and one photos in the same format (RAW). The current f-stop is 2.8 and the under/over exposure adjustment is at 0. The shutter speed will be shown when you press the shutter release. For some reason, you have press the shutter release half way to see the shutter speed. Not a big hassle, but something I keep wondering why it was set up that way.
The Function Set screen on the G9.
As its name implies, this screen is used to set the many different functions on the camera.
It gives you access to the rows of icons on the bottom and on the left side. You start by selecting the icons on the left, with the thumbwheel, and this opens a menu on the right side where you can pick the selection you want.
Here I have opened the file format menu and picked the Raw format. Various jpeg quality settings are also available.
Immediately above the File Format menu we have:
• The Neutral Density filter menu (on or off)
• The Metering menu (evaluative, Center Weighted or Spot).
• The flash under/over exposure adjustment menu.
• The bracketing menu (off, exposure bracketing or focus bracketing).
• The My Colors menu (off, vivid, neutral, sepia, B&W, Positive film, Skin tones, Vivid blue, red or green and custom).
• The White Balance menu (Daylight, cloudy, tungsten, fluorescent, flash, underwater or custom).
14 - SD cards
The G9 accepts SD or SDHC cards. I know it can take accept 4gb SDHC cards. It may accept larger sizes as well but I have not tried using cards larger than 4gb. The problem is that my Epson P3000 can only read SD cards up to 2gb, so I didn’t bother trying larger capacity cards. I got a 4gb card only to find out that the Epson couldn’t read it. The Epson P3000 doesn’t have that limitation with Flash cards, only with SD or SDHC cards.
You may want to check how your card downloader handles SD and SDHC cards. Of course, if you download directly to a laptop or desktop computer you don’t have to worry about any of that.
15 - No need to clean the sensor
The G9 sensor is inaccessible. You can’t see, can’t touch it and can’t clean it. That’s because the lens is not removable. A wide angle and a telephoto attachment are available for the G9, but they screw to the top of the lens and do not require lens removal.
This is good news when it comes to dust. Since you can’t open the sensor area, dust can’t go in. Provided the sensor chamber was dust free when it was sealed, it should remain that way for the life of the camera. If it doesn’t it will mean a trip back to Canon since there is no way to access the sensor without taking apart the camera. So far, I have seen no dust on my photographs, so this approach seems to guarantee dust free images.
16 - Movie mode
The G9 can capture low-resolution movies, the length of which is limited by the capacity of the SD card in the camera. How useful is that you may ask? Well, I think it has its use. When I review products, or when I create tutorials, I like to include movies. Often, all I need is a screen-size movie. At 480 x 640, the G9 movies are sized almost perfectly for that use.
Furthermore, the movies are saved onto the SD Card and can be downloaded to a card downloader such as an Epson P3000 or other. This means that long movies can be created. In the case of the Epson 3000, each segment is limited to 2gb, the maximum SD card size that the Epson 300o can read. However, this can be increased easily by acquiring a different card reader.
The G9 can record movies at 640x480 at 30 frames per second. It can also record 640x480 LP and 320x240 both also at 30fps.
At 640x480 G9 movies are roughly 100mb per minute. This means that a 2GB card can store a 20 minutes 640x480 G9 movie. Not bad at all. The G9 saves movies in AVI format. QuickTime and RealPlayer (among other software) can open AVI files.
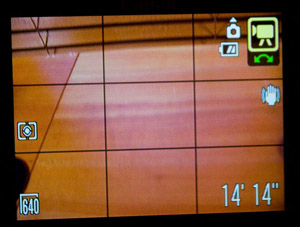
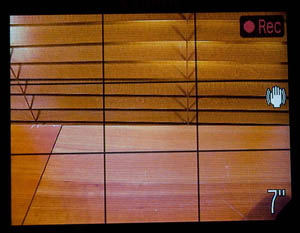
Movie mode LCD screens, ready to record on the left, recording on the right.
The numbers on the bottom right corner of each screen show you, respectively, how much time you can record for and how long you have been recording. In this instance I have enough space on my SD card to record for 14’ and 14” and I have been recording for 7”
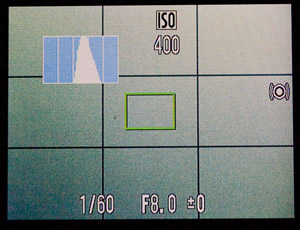
17 - Stitching mode
The G9 has a stitching mode that shows you two frames superimposed to create a panorama. It is practical because it shows you exactly how much overlap you have between the two photographs. The problem is that this stitching mode only works in jpeg format. This means that I won’t be doing a lot of panoramas with the G9 stitching function because I want to have RAW files. If I do want to do stitching, I’ll capture several frames without the help of the stitching function, just so I can have these frames in RAW format.
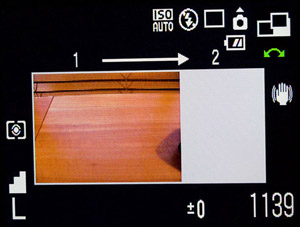
Stitching mode LCD display
The L at bottom left indicates that the images will be saved in Large Jpeg Format. The stair step icon indicates that the lowest jpeg setting will be used. While the jpeg setting can be changed, the fact that the images are saved as jpegs cannot be changed.
This is a shortcoming of a function that otherwise would be rather practical. I wish this stitching function allowed the images to be saved in RAW format.
18 - Image stabilization
The G9 is equipped with image stabilization that is on continuously. This is a welcome change from the lens-dependent image stabilization that I have become accustomed to with Canon’s DSLRs. You can set the stabilization to be on when you turn on the camera, or on only when you press the shutter. Setting it so that it is on only when you are taking photographs saves battery life so I have it on that setting permanently.
19 - Battery
The G9 battery is small. This means lightweight which is good but it also means short battery life which is bad. This means that you must have a spare battery with you at all times. You should also have more than one spare if you photograph for long periods of time.
How fast does the battery go down? I didn’t make formal tests but I photographed for an afternoon with a single battery one day and I had power left after I went back home. As I mentioned the LCD is what is draining the battery, so using the LCD wisely will extend battery life. The less you use the LCD, the longer the battery will last.
The battery charger is also very small, without a cord as it plugs directly onto the wall outlet. It can only charge one battery at a time but its small size means that it can be carried with you easily to recharge batteries on the go. I always keep an AC to DC converter in my car for this purpose, one that plugs directly into the power outlets (previously known as cigarette lighter outlets). Those adapters are very small and can be kept in the glove compartment at all time, one in each vehicle.
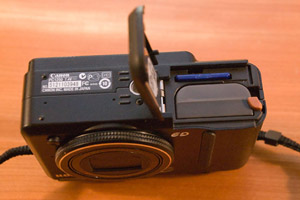
Battery and SD card location on the G9
20 - USB and Audio Connector
The G9 features a USB connector for direct connection to a computer. It also features an audio connector to listen to the sound in movies or in audio recordings since the G9 can record audio either as audio-only files or in movies.

USB and audio connectors’ location
21 - How does the G9 perform in the real world?
This is all nice and dandy, but eventually specs and features alone don’t make a good photograph. Image quality also comes from how well the camera can perform in real life situations.
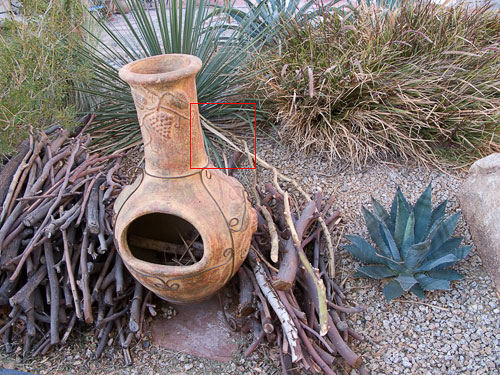
Below are 2 photographs taken with the G9, one of an Agave and one of a sports car. I chose the two subjects to show how the camera performs with natural and man-made subjects.
In my opinion the camera works quite well for professional work, provided you use a low ISO (80 or 100, preferably 80 since there’s hardly anything to gain by going to 100), that you compose with the LCD screen, and that you control the exposure carefully through over or under exposure. In practice, I almost always use the Aperture Priority mode and control the exposure through the over and under exposure adjustment.
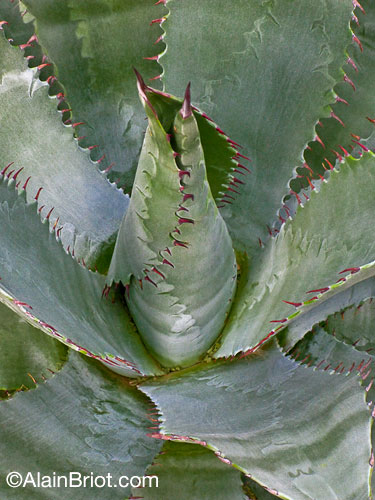
Agave, Arizona
This photograph was taken hand-held, as were all the photographs I have taken with the G9 so far.
Although it has a tripod screw, it makes little sense to use the G9 on a tripod. First, the tripod will outdo the weight and bulk advantage provided by the G9. If you are going to carry a tripod, you might as well carry a DSLR or larger, not a point and shoot.
Second, the positioning of the tripod screw on the G9 means that if you mount a tripod quick release plate (something that’s indispensable for me since all my tripods have quick releases), it will partially cover the battery and SD card door and you will have to take off the plate to change the battery and/or the SD card. Forget about it.
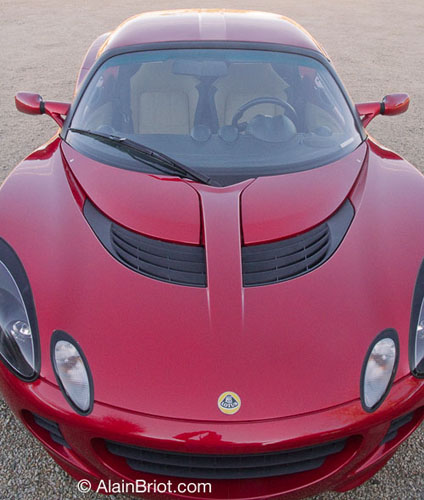
Canyon Red Lotus Elise, Carefree, Arizona
I was somewhat concerned with the wide angle on the G9 zoom lens. I thought it wasn’t going to be wide enough.
In practice it is not bad at all, as shown by this photograph taken inches away from this vehicle. This is a shot I like to do with sports cars, and although I could have taken the whole width of the car with a wider lens, it did work nicely with the G9. Of course I could have backed up a little, but that would have changed the perspective and affected the stretched look that hovering over the car gives me.
Both photographs were taken at the smallest aperture available on the G9 at any focal length: f8.
Keep in mind that the wide angle is a 7.5 mm and that at this focal length f8 will give you an image that is sharp from inches away up to infinity. And no, there is no depth of field preview on the G9.
22 - Conclusion
Should you get a G9? If you have enjoyed reading this review and if it sounds like you want one, why not. It won’t break the bank and it certainly opens opportunities to take a raw-file-capable camera to locations and events where you wouldn’t take a DSLR. It’s a point and shoot that can do more than other point and shoot.
On the other hand, the high noise level, the lack of a practical viewfinder and the need to fuss with the LCD screen to set f-stop, shutter speed and exposure adjustments may be too much. I know it is for me at times, and I would much better prefer to do all that in the viewfinder. I wish Canon would price the G9 a couple hundred dollars higher and give us a viewfinder worthy of that name. After all, the G9 can give us Raw files, why can’t it give us the information we need in the viewfinder? Let’s make it pro all the way, not just part of the way!
On the other hand, as it is now, the G9 does fill a need. In film days, when shooting 4x5, I always carried a Leica or a medium format rangefinder in addition to my 4x5. I did because I could use these cameras handheld and quickly. They had built-in light meters, could be focused quickly, and had reliable viewfinders. They allowed me to capture photographs that would have otherwise eluded me because it takes so long to set up and shoot a 4x5.
The G9 serves the same purpose in a way. It fits in my camera bag almost unnoticeably and I can carry it along with a 4x5, or with the 1Dsmk2, without even knowing it is there.
One always needs at least 2 cameras because no camera does everything and because cameras always break at the least opportune moment. The G9 can be just what you need at such times.
Alain Briot
February 2007
Alain Briot is a full time fine art photographer, the author of Mastering Landscape Photography (Rocky Nook, 2007) and a DxO Image Master. Through his website, beautiful-landscape.com, Alain offers fine art prints, workshops, DVD tutorials and more.
You can learn more about Alain’s work on his website at www.beautiful-landscape.com You can also subscribe to Alain’s Newsletter and receive over 25 free essays in PDF format when you subscribe. Alain welcomes your comments or questions on this and on his other essays. His email address is alain@beautiful-landscape.com.