4/27/2009 G1 and HDR
As mentioned before the G1 is not optimal designed for HDR:
- maximal EV steps are only 2/3 EV
- Slow frame rate makes freehand HDR difficult
But of course complaining does not help much. If you want to do HDR with the G1 it works quite ok. From tripod we use the 7 shots at 2/3EV spacing option (range is -2EV to + 2EV). Freehand we use only 5 shots at 2/3 EV spacing (range is -1 1/3 EV to +1 1/3 EV). During processing we actually may skip some of these shots and only use the middle and extreme exposures. If you work freehand watch for motion blur in your longest exposure.

7 shot from tripod
5 shot freehand
We even initiated a Flickr group "Panasonic G1 HDR Photos" and this group demonstrates that you can do nice HDR photos with the G1.
Still we hope that Panasonic is listening and improves the AEB features for the next model or even firmware.
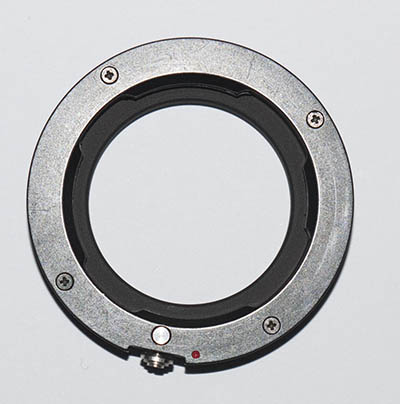
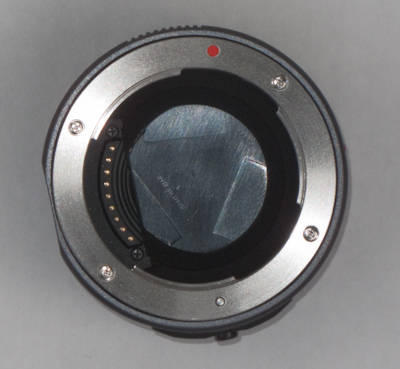
4/2/2009 Using M mount lenses update
We got now a second m4/3 to M adaptor made by Rayqual:
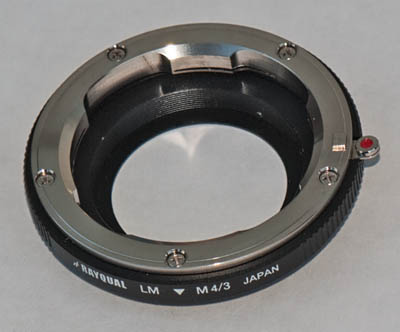
This is an excellent adapter. We like it slightly better than the Novoflex adapter. Both do their job well. You can get the Rayqual adapter from here.
Note: We have now two adapters and would like to sell one of them (at our cost + shipping). Please contact us at uwe@outbackphoto.com.
Unfortunately using M lenses on the G1 is not without issues:
We heard on the web that there are issues using wide angle M lenses on the G1. We only had used so far our Leica 50mm Summicron and love this combination. We also now tried the Leica 28mm Elmarit and have to report that this combination is not usable at all. The corners are just horrible.
This is likely due to the light angle hitting the sensor. M4/3 sensors are made so that the light hits nearly vertical the sensor.
Conclusion: You need to test the lenses on your G1. This means buying new lenses for the G1 makes only sense if you test it carefully. Lenses with a focal length of 50mm or longer seem to have no issues. Still it can vary lens by lens.
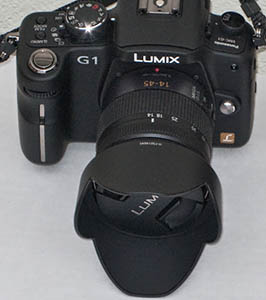
2/6/2009 G1 goes Zeiss ZM lenses
Zeiss offers a line of very fine ZM lenses that use the classic Leica M-mount. These lenses are by no means cheap but quite a bit less expensive than the Leica equivalent.
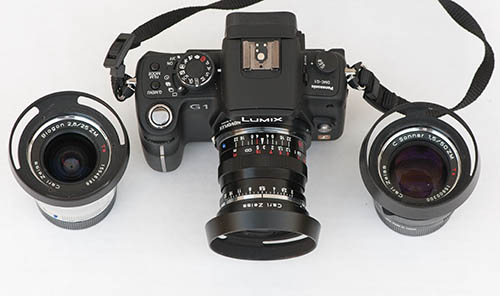
G1 with 35mm lens mounted and the 25mm and 50mm f/1.5 ZM lenses
We love to use Leica M-mount lenses on the G1 in manual focus. The ZM lenses are no exception. We would really like Zeiss to make lenses with a native m4/3 mount. These lenses could be tiny and maybe also less expensive. We used the Novoflex adapter for the Zeiss ZM lenses. Feeling these kinds of lenses is a joy.
The G1 really needs some lenses that offer at least f/2.0. Of course we would not mind having these lenses autofocus either. For now prime lenses like the Zeiss lenses show the potential of the m4/3 concept. We hope more to come soon.
2/5/2009 Bags for the G1
We feature two bags by Think Tank Photo that we use for our G1 here.
1/29/2009 Note on future G1 lenses
We joined a Panasonic event. While at the event Panasonic did not make any announcements about the new G1 HD version the the planned lenses (announcements will likely happen close to PMA 2009) we got a view on some mock-up versions of the planned lenses. These lenses are really small. If the optical quality will be good and the the prices are reasonable then these lenses could be a hit (especially the 7-14mm f/4). Here are photos of the mock-ups (we hope these mock-ups show the real dimensions).
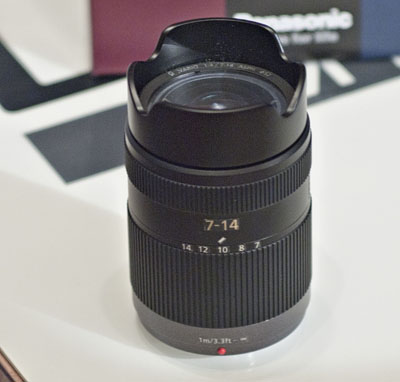
7-14mm f/4
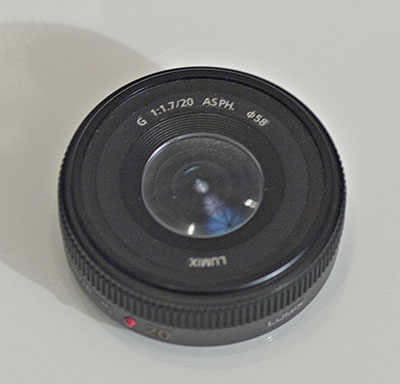
20mm f/1.7 pancake
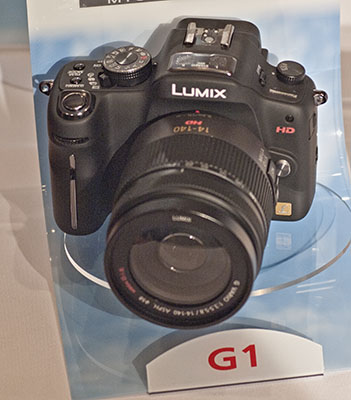
14-140mm mounted on a G1 HD version mock-up
1/6/2009 DOP G1 Gallery
We have used the G1 now for over 45 days. No camera has ever been with us that often. A special fun is using the G1 with manual Leica lenses (see below). For shots with these manual lenses the extra information shows a focal length of 0 mm.
We posted our G1 gallery on our Flickr account so that you can check the data and also comment.
DOP Panasonic G1 Gallery
12/28/2008 Leica M Lenses welcome
We got our hands on one of the first Novoflex "Micro Four Thirds to Leica M" adapters.
We know the German company Novoflex for over 40 years. Novoflex is a company that often created camera specialty products. The adapter seems well crafted.
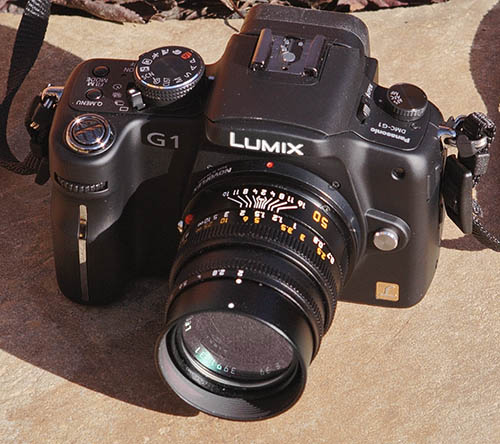
"G1Leica" with Summicron-M 50mm f/2
To use this combination you have to enable "Shooting without lens" in the G1. Then everything is working quite easily.
- Set f-stop at the lens
- Set G1 to MF
- Have the latest G1 firmware installed (before MF magnification would stop after 10 seconds)
- Click "left" button and then "ok"
- Viewfinder shows a magnified crop
- Use the lens focusing ring to get crop in focus (ideal would be to open up the lens first and then stop down)
- Set the f-stop on the lens
- Set camera to aperture priority
- Half press the shutter
- Have live histogram enabled and change EV correction for optimal exposure (to avoid clipped highlights)
- Compose and take exposure
The Leica Summicron-M 50mm f/2 lens (angle of view about the same as a 100mm lens for 35mm full frame systems) is the the first lens that showed us the full potential of the G1. And we really love what we see.
Disclaimer
We are not sure the test we used (see next) can show the difference between the kit lens and the Leica lens. There are too many factors in play:
- Scene
- Light (contrast, ...)
- Colors in the scene
- Processing (never know whether different processing could equalize differences)
We think (looking at more images) the Leica lens shows more micro contrast and also better color contrast (natural saturation). We don't want to encourage our readers to buy Leica lenses for the G1 (this is expensive). But if you own Leica lenses the Novoflex adapter is a good way to try them on your G1. You may like the results (we actually do).
We show the test we shot anyway.
Note: The kit lens maxes at 45mm and the Leica lens is 50mm. That is why we see different magnifications.
Processing of both images identical:

with Kit Lens (at 45mm)

with Leica Summicron-M 50mm f/2

100% pixel crop with Kit Lens (at 45mm)

100% pixel crop with Leica Summicron-M 50mm f/2
We have to say that the kit lens holds its own.
Also the Leica lens costs about twice as much as the full G1 camera kit. It would make sense to try some of the excellent Voigtlaender lenses at about 1/3 of the price.
Overall we have no real problem using the Leica lens with the G1. But there are some things to consider:
- No image stabilization: we would like to have a G1 with in camera image stabilization. Right now it is even easy the get slight motion blur at 1/100 second with the 50mm lens.
- We could imagine a different way to perform MF in the G1
- Dedicated button for MF activation (right now we need to hit 2 buttons)
- Show the full frame and super impose a magnified section inside the frame
- Manual focusing is an error prone process if you shoot freehand. E.g. you move your body after you finished focusing.
You can download the original RAW file from here (images 291,292 about 28 MB).
Note: Remember that the service we provide is financed
by selling our ebooks and PS
tools. Also direct donations are welcome.
Sample Photos with the Summicron-M 50mm f/2
San Juan Bautista Stable
inside the Stable (*)

San Juan Bautista Mission Wall
(*) We did this shot quite a few times before with top DSLRs (freehand) and this G1 shot hold up very well.
Conclusions
- The Novoflex adapter works very well
- Using Leica lenses is much fun
- Panasonic and Olympus please give us Micro 4/3 lenses that
- come close to the Leica lenses
- enable AF
- support image stabilization either in camera or in the lens
- Good lenses matter a lot
- If we get top lenses the future of the Micro 4/3 system maybe very bright
Till then we enjoy to use the Adapter and the Leica lenses. The G1 with kit lenses is a nice camera. But with top lenses it can be a great camera.
Note: We currently test DSLRs with over 20MP resolution. To be honest nothing is more fun than the G1 with the Leica lenses.
12/16/2008 New Firmware 1.1
As always with Firmware updates you need to follow the instructions closely. Seemed to work on our G1 just fine. You can download the firmware from here.
12/8/2008 Note on Silkypix
The G1 comes with Silkypix SE as a RAW converter. We judge Silkypix at two levels:
Image Quality
We would say that Silkypix can deliver very fine quality images and holds its own against all other RAW converters in the market (here is our review of V2, keep in mind the new version has much improved). The learning curve is a bit steep. We recommend you get the good and very inexpensive e-book by John Nevill.
Workflow
The workflow is no match to Lightroom and Aperture but then it comes free with the G1.
12/3/2008 Panasonic DMW-MA1 Mount Adapter Micro FourThirds
Just got the Panasonic DMW-MA1 Mount Adapter Micro FourThirds adapter:
It allows to mount 4/3 lenses (e.g. from Olympus) on the Micro 4/3 mount of the G1. Here are some combinations:
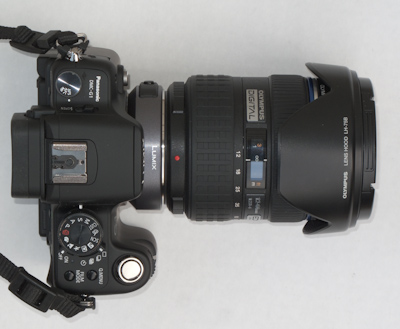
with Olympus 12-60mm lens
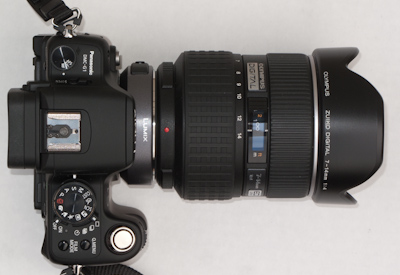
with Olympus 7 -14mm f/4 lens (cost more than 2x of the camera)
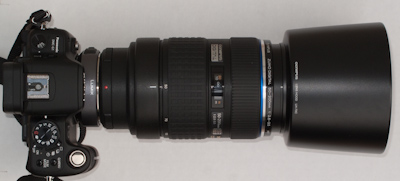
with Olympus 50-200mm lens (lens holds the camera :-))
All three Olympus lenses are very good zooms and outperform the G1 lenses. But there are severe limitations:
- Work only in MF on the G1
- No image stabilization (Olympus uses an anti-shake sensor)
Conclusion
The adapter works fine and seems very well built. In the longer tele range we clearly miss image stabilization. We hope that Olympus will develop a Micro 4/3 camera that uses an anti-shake sensor. This would also be a good strategy for Panasonic. The camera would then support many lenses that don't use the Panasonic O.I.S. in lens stabilization. Looks like we have to wait a bit till we get more advanced lenses for the G1 that are faster than the current lenses (read below) and also solve the issue with image stabilization.
11/30/2008 G1 Lenses and Software Lens Corrections
The promise of the Micro 4/3 system is smaller and lighter lenses.
Right now there only exist two Micro 4/3 lenses made by Panasonic
- 14-45mm f/3.5-5.6 Mega O.I.S. (kit lens that comes with the camera)
- 45-200mm f/4.0-5.6 Mega O.I.S. (we bought this extra, about $360)
Here is a picture of this set:
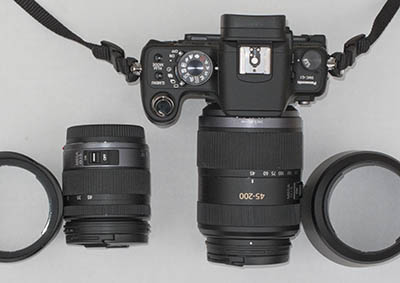
This is indeed a very compact set (the 45-200mm lens covers the range of an equivalent 35mm lens 90-400mm). In our work we often use the 70-200mm range and even the most compact are quite more heavy, big and expensive. The extra range to 400mm (equivalent) is of course very welcome. Would be nice to have more overlap in the focal range. Why not a 35-175mm lens?
How good are these lenses?
This question is not that easy to answer but we try our best.
- Both lenses feel well built and come with lens hoods
There are a few aspects that are a problem with slow lenses:
- Hard to get nice blurred backgrounds
- Consumer grade lenses (and these clearly are such lenses) hardly show the best performance wide open. This means f/8 or more would be often optimal for best image quality.
- Not very good for low light and handheld photos because we have to resort for higher ISO and this means more noise. We like to use the G1 at maximum ISO 400. The noise at above ISO 800 is not bad but we don't like the graininess at higher ISO.
Here it gets even more interesting. As others reported the G1 + these lenses seem to deliver sharp images with low CA (lateral chromatic aberration) and low distortions. Actually to a level that is unusual for kit and consumer grade lenses.
What influences image quality?
- Sensor
- Resolution Power
- Noise
- Color fidelity
- Lens quality
- Sharpness
- Contrast
- Flare
- CA (or better lack of)
- Lens distortions (e.g. barrel, pincushion or more complex distortions)
- Image processing software
Note: This is by no means a complete list
The third element is often forgotten. Like some Nikon SLRs the Lumix G1 corrects CA and some lens distortions inside the camera.
In camera corrections are for JPEG and we always shoot RAW, right?
Silkypix SE performs about the identical corrections for the RAW files. How do we know?
- Following discussion in news forums
- We compared the results to the output of a 3rd party RAW converter that does not do any corrections for CA and lens distortions (e.g. dcraw or a soon to be released version of RawDeveloper).
The 45-200mm lens can actually show quite a bit of CA in the original RAW file (without any CA corrections):
3rd party RAW converter (45-200mm @ 200mm)

Silkypix with CA corrections
Note: The crops don't match because also the lens distortion is to some extent corrected too.

3rd party RAW converter shows some minor distortions (45-200mm @ 140mm)

Silkypix with less distortions
What we see is not really the lens/camera performance but the system performance of lens/camera/software.
Conclusion
In the end for us the final image counts and we are quite pleased with the system performance of the G1 using consumer grade zooms (that small and light). Automatic corrections for CA and lens distortions are the future. This is actually the major selling point for the DxO RAW converter and we like DxO for this (no G1 support as of now).
Would be interesting to see how big top quality f/4 zooms would be for the Micro 4/3 system. We need to wait a bit till Panasonic, Olympus, Sigma and maybe Leica may give the answer. Right now he following lenses are planned by Panasonic:
- 7 - 14 mm f/4 (14-28mm equivalent) Note: Will be interesting to learn the price
- 20 mm f/1.7 (40mm equivalent) Note: Interesting at lower light levels
- 14 - 140 mm f4.0-5.6 (28-280mm equivalent) Note: 10x zooms tend to be a compromise at best
But we also believe that the lenses are likely not showing the full sensor/camera potential.
We ordered the "Panasonic DMW-MA1 Mount Adapter Micro FourThirds" and plan to check the performance of the G1 using good Olympus zooms.
Then maybe early next year we may even use the G1 with top Leica M lenses (adapter is in development). Actually the Micro 4/3 system has an enormous potential to use manual focus lenses from other systems because no other lens mount is that close to the focal sensor plane.
In the meantime we use our two consumer lenses and enjoy the compact and light camera set.
11/24/2008 Camera Raw 5.2 now works with G1 images
11/19/2008 Diary Start
Because we find the Lumix G1 such an interesting camera we decided to buy one and not to wait any longer for Panasonic to send us a review sample.
What is so special about the G1? It is the first Micro FourThirds camera. We try to explain why we find this development really exciting.
Lets start with the existing FourThirds cameras. Olympus created some years ago a standard for a new type of digital SLR based on a sensor that has a 2x multiplier (means smaller than the APS-C sensors). The Olympus E-3 is currently the top of these FourThirds cameras. Later some other companies joined. Active are right now: Olympus, Panasonic, Leica and Sigma. In the market the FourThirds DSLRs did not make major impact in the DSLR market.
FourThirds DSLRs are still not that small or light. What is in the way to get more compact lenses and cameras with the FourThirds system?
Mirrors cause a lot of trouble
Mirrors in SLRs were a useful trick but also show very nasty side effects:
- Introduce shake
- Are noisy
- Require special retro-focus lens design
Panasonic and Olympus realized the need and market for a new standard. Because they wanted to keep the sensor size (smaller than APS-C but much larger than in P&S cameras) and allow for interchangeable lenses. The Micro FourThirds standard was born. Essentially keeping the sensor size of the FourThirds system and removing the need for a mirror box. This means such cameras can only use the LCD or EVF (Electronic Viewfinders) for framing and focusing.
The Size
Here are first size comparisons:
1. Compared to a Canon G10 (quite a big P&S camera using a small sized sensor)
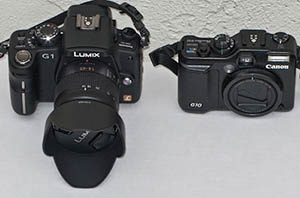 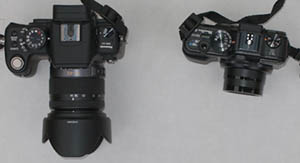
This shows that the G1 is not a pocket camera but also quite small.
2. Compared to an Olympus E-3
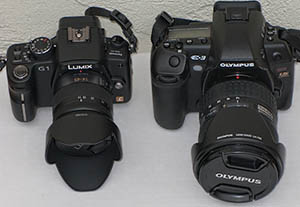 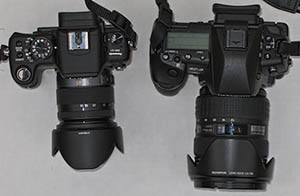
Shows that the G1 is quite a bit smaller (and lighter as well) than a typical digital DSLR. Unfortunately we only know the size of the Panasonic kit lens (14-45mm f/3.5-5.6 or 28-90mm in 35mm equivalent). This zoom is not a low light lens. So we don't know the size of f/2 to f/2.8 lenses yet.
First impressions on feel and handling
- Handles well
- Feels well built
- Swivel LCD is very good (any live view cameras needs a swivel LCD, we hope Nikon and Canon listen)
- Even the kit lens has a metal mount, comes ready with lens hood and feels good
- On EVF see next section
EVF (Electronic View Finder)
We are old school and don't like to compose a scene (at least not freehand) via LCD. We want and need an eye level viewfinder. The Lumix G1 has an EVF that we find usable. Not as good as optical viewfinders but a big improvement over older generations of EVFs. For manual focusing this is even much better than any optical viewfinder (see below). The colors look somehow more muted when the sensor is live. Overall this is the first EVF we may get used to.
Contrast Autofocus
The usual way to perform autofocus without a mirror/AF system is to use contrast detection. As we experience with P&S cameras and some live view DSLRs this can be painfully slow. The G1 AF is likely not ready for fast action but again a big improvement compared to other contrast AF systems.
Manual Focus and EVF
This bears the question why we use autofocus in the first place:
- Fast action
- Fast tracking
- Optical viewfinders (even the best) are hard to use for manual focus (especially freehand). This is more a problem if you eyes get older and weaker.
From tripod is shows that live view can help at large magnification to improve manual focus (please give us swivel LCDs for all cameras using live view). The G1 EVF mirrors the LCD live view in the EVF image (you have an option that the LCD turns off if you view through the viewfinder). If you now switch to manual focus (MF mode) the LCD/EVF shows a MF assist view with parts of the scene magnified. Because you use this feature at eye level in the EVF you can use manual focus also freehand. We most often photograph static scenes and here this way of MF assist could become our favorite method. Maybe even AEB (Auto Exposure Bracketing) sequences could speed up because there is not need to focus for the camera).
The Kit Lens
This is likely not bad for a kit lens. But on the other side we would like to use the best possible zooms for maximum image quality. We try to get a FourThirds to Micro FourThirds adapter and use some of the excellent Olympus zooms. Otherwise we have to wait till the the future line of Micro FourThirds lenses shape up.
Image Stabilization
Here we are not sure that Micro FourThirds is a clean standard. Panasonic implements its own lens OIS system while Olympus uses anti shake sensors in the camera. At least for the FourThirds system it meant that the Olympus cameras cannot control the OIS of Panasonic/Leica lenses but can use their body anti shake system instead. If you use Olympus lenses (and this is the most complete quality collection so far) on a Panasonic body there won't be any image stabilization at all. Let's see what happens with the lenses for Micro FourThirds cameras.
Los Gatos test shots

Ristorante @ISO 100

Crop @100% magnification
We used for this test the kit zoom (14-45mm, equivalent to 28-90mm in 35mm terms). The results look very nice using Silkypix.
You can download the original RAW file from here (about 12.5 MB).
Note: Remember that the service we provide is financed
by selling our ebooks and PS
tools. Also direct donations are welcome.
Missing Antique Store photos
For quite a few years we photographed as part of our test a small antique store in Los Gatos. The scene is now gone and the store is sold.
ISO Test
We converted with Silkypix SE with mostly default noise and sharpening settings and used also a low amount of EasyD Plus Detail Resolver 1.0.
Note: EasyD Plus Detail Resolver shows both more detail and more grain. This way we can see how much real detail is available.
Bear Coffee Shop
Panasonic Lumix G1 |
| |

ISO
100 |

ISO
200
|

ISO 400 |

ISO 800 |

ISO 1600 |

ISO 3200 |

ISO 3200 (same as above but treated with Nik Software Dfine 2.0 **) |
All these shots are with luminance noise removal off in camera
(as much as the user can control this) and Silkypix SE was set to defaults. ISO 100-200 very smooth. ISO 400 some sort of fine grain which won't show much in reasonable large prints. Even ISO 800 can be usable (with some extra noise cleaning). From ISO 1600 the image falls apart. FourThirds sensors never have been especially strong at high ISO settings. Overall they work very well considering their size (smaller than APS-C). We also think that Panasonic has slightly improved in the last generations.
**: We treated the ISO 3200 shot with some noise removal in Nik Software Dfine 2.0 as a last step. Normally we would apply it earlier in the workflow chain. We offer discount codes for quite a few software products including all Nik Software plugins.
Note: Because we use now also the DOP EasyD Plus Detail Resolver (at moderate levels) noise actually is even more visible than in the past.
With most cameras today ISO 100-400 define our comfort zone. This means we use this range without any further thought. With the Panasonic Lumix G1 we will continue to use mainly this range. In some rare cases we even may risk using ISO 800.
Note about high ISO noise: Many people ask why they should worry about noise at ISO 800 or more if they only use 400 ISO at max. This is of course a good question. In the past we did not care either. Then we changed our photographic style and make now often use of Tonemapping (learn more about HDR and Tonemapping). During this process we brighten the shadows and this brings out the noise otherwise seen at way higher ISO. It often starts to matter with even ISO 200 photos.
Note about frame rate: We hardly photograph action and still we find the high frame rate very important. Why? We shoot high speed exposure brackets freehand. Please read this article for our motivation behind high speed brackets. We find that the Canon Lumix G1 at about 3 fps is very slow and have to check with real projects whether this camera is fast enough for our technique.
First conclusions
- Camera points into the future
- Handles and feels very well
- EVF is useful, while not a match to an optical viewfinder.
- EVF and manual focus work well together
- Camera and zoom are smaller and lighter
- Low sound noise and shake due to missing mirror
- Light cameras always have the problem that they are more prone to our body movement
- Lots more ore to learn ....
Our wish list
- AEB (Automatic Exposure Bracketing) with EV steps up to +/- 2EV. Right now it allows only steps of +/- 2/3 EV unless you shoot more than 3 shots. Not sure who got that idea.
- At least 5 fps speed (should be possible with manual focus)
- It should not be possible to insert the battery in a wrong way. On the net people reported possible damage to the camera.
|