| |
Printing
Insights #013
Alain's Epson 9600 Diary
Size Matters (9600 vs. 1270)!
A diary review by Alain Briot |
| |
| |
| |
| We are very pleased that Alain Briot shares his
experience with his new Epson 9600 printer. Alain is a very well known
professional landscape photographer. Alain lives in Arizona.
Email
Alain
Visit
Alain's porfolios |
| |
| Note: Alain owns an Epson 9600. But as the 9600
and 7600 share the same print engine most of the findings also hold for
the 7600. |
| |

Improve your Digital Workflow
Testimonial
"If
you are just now venturing into the world of fine art digital photography
you can immerce yourself in new knowledge about almost every aspect
that I can think of. The photographs on the Outback Photo site
are stunning, to say the least! The books and handbooks offer a
true wealth of knowledge because they are so well thought out and
organized in a concise manner, with numerous examples. There are
vast quantities of other resources available as well, through linking
to other sites. There are interesting and provocative stories and
essays written by both Uwe and Bettina Steinmueller and many others.
I first found the site while checking reviews of the Canon Digital
Rebel and I haven't stopped exploring ... where do Uwe and Bettina
find the time to give so much? They are excellent teachers." Eleanor
T. Culling 2/25/2004
If you work with Photoshop
CS our e-books
DOP1009 or DOP2000 are the right choice for you. DOP2000
is the more complete handbook.
|
| |
| The diary always has the latest entry on top |
| |
|
| |
|
| |
| 11/26/2003 Printing problems when running Mac OS X
Panther and Photoshop CS |
| |
| Have you upgraded to Mac OS X Panther? Have you had
problems printing with your 7600 or 9600 from Photoshop CS after this
system upgrade? If yes, you are not alone. In the past few days I have
received several reports of users having severe problems printing on
Epson wide format printers (including previous models such as the 9000
and other machines) using PS CS and Panther.
The problems include slow printing times and inacurrate colors. The
solution is no doubt on its way but is not available yet. The cause
seems to be the way Apple is implementing printer drivers in Panther.
OS X is still "a work in progress" and Apple and Epson are
not communicating effectively in the development process. These printing
problems affect mostly large files.
Epson will no doubt release a Panther upgrade to their wide format
printer drivers. However, what do you do in the meantime?
I recommend you go back to OS 9.2.2 and print from there using Photoshop
7 (PS CS only runs on OS X). I personally use several Macintosh computers,
therefore doing so is not a problem. However, you have to transfer
your files from one Mac to the other, over a network connection, and
this extra and unecessary step is a hassle.
In short, use Panther and PS CS to prepare your files then print them
from OS 9.2.2 and PS 7 from a different machine. You can also print
from the same machine running Mac OS Classic (I have not tested this
configuration though).
The good thing about using two computers is that you can work on a
new image while the previous one is printing. The bad thing is you
wonder why you bought a new computer in the first place :) At any rate,
this is another good reason not to sell your old computer or trash
your old version of Photoshop.
After writing the entry for PS CS and OS X Panther problems I received
this possible solution for Richard Cover:
Richard experienced similar problems and noticed that his printer
connection in the printer setup utility was set for "USB".
He changed this to "Epson USB" and everything went back
to the way it was with OS 9.2 and Photoshop 7.
If you are having these problems try Richard's solution and see if
it works for you. If it does, or if you find another solution, make
sure to let me know by email at:
alain@beautiful-landscape.com |
| |
|
| |
| 9/23/2003 The future of the Epson 9600-7600: are there
new wide format Epson printers on the horizon? |
| |
It has been roughly 15 months since the Epson 9600
and 7600 were made available in June 2002. Already, rumors have started
to emerge regarding the next wide format Epson printer. I am receiving
emails regularly asking me what I think will happen and whether or
not this is a good time to buy a 9600. Here are my answers.
Should I buy an Epson 9600 now (late September 2003)?Yes. We know
it is a good printer, we know it can do beautiful fine art prints
with nearly no metamerism, and we know it has a very good color gamut.
Get one now, use it as much as you can, and plan on recouping your
investment within 6 months to a year.
When will the next wide format Epson printer come out?My guess (don't
hold me to it, I have no insider information) is that the next wide
format Epson printer won't come out until mid-2004.
Why? Because first, we usually hear rumors about the next version
of a printer up to 6 months prior to its introduction, and second,
because these rumors are followed by a significant price drop on
the printers up for replacement. So far neither has happened.
What will this next generation 9600 (9700?) look like? My guess
is that the next "9600" will be an 8 color printer.
We may actually get a printer with more than 8 inks as well. This
next printer may be based on the ink technology of the just-announced
Epson 4000 (the replacement of the Epson 3000 and perhaps 5000).
The new 4000 is an 8 color printer. There is speculation as to what
the 8th ink is. It may be a 3rd black. For example, the 4000 may
offer the possibility of having both blacks (photo and matte) installed
at the same time. Users would then be able to choose photo black
or matte black based on their needs without having to swap cartridges
and waste a large amount of ink unnecessarily.
Will Epson fix the ink waste caused by changing from one black ink
to the other? Certainly the biggest gripe about the 7600 and 9600
is the ink waste caused by swapping black ink cartridges. While the
possibility of using 2 different black inks, each optimized for either
glossy or
matte papers, is endearing, in effect doing so is both impractical
and expensive. Solving this problem, so that black ink changes can
be done "on the fly", should be one of Epson's priorities.
This is why I both hope and expect that we will see a dual "matte
and glossy black" version of the 9600.
How will this work? There will be three black inks installed in
the printer at all times: matte black, photo black and light black.
When a print head test is made all three black will print, and if
the printhead needs to be cleaned all three black heads will be cleaned.
However, when printing, only one of either the photo or matte blacks
will be used. How is this done? simply by not having one of the printheads
fire, just like certain print heads do not fire when a certain color
is not printed. For example, suposing you are printing a solid magenta
color, no other printhead will fire except magenta. Epson knows how
to do this and need to implement it so it works with matte black
and photo black.
How will this affect me?Well, as far as print quality is concerned,
a dual black version will not improve print quality. It will only
make black ink changes fast, easy and inexpensive. If you have a
9600 or 7600, and don't change black ink, don't give it a second
thought. If you change black inks a lot, and already have a 9600
or 7600, you may be able to pick up a second 9600, or a 7600, at
a discounted price :) and use two printers, one with matte black
and one with photo black. Of course, if space is a concern (those
printers are big!) you may want to get the latest version.
What if the 8th ink isn't black ink? This is certainly a possibility.
Since the 9600/7600 already have 2 blacks, 2 cyan, and 2 magentas
my guess is that the additional color
ink will be light yellow. I don't know how much light yellow will
improve print quality since a second yellow will essentially enlarge
the orange gamut. It will certainly help the color gamut of warm
tones and sandstone canyon walls ;)
Can there be more than 8 inks in the next wide format Epson printer?Certainly.
In fact, there are already wide format printers running more than
7 or 8 inks. Some have 12 inks: 3 densities of ink for each color
(regular, light, super light). Some have more than 12 inks. Increasing
the number of inks is an effective way to increase color gamut. However,
this approach makes running a printer much more expensive since there
are both more cartridges to replace and more spare cartridges to
stock.
Can we have a second yellow and 3 blacks for a total of 9 inks?I
see no reason why not. In fact, having it all is nice. However, the
issue here is cost versus color gamut. We know there will be an added
cost because of the additional ink colors. But, at this time we don't
know if there will be a significant color gamut improvement. The
same remark holds true for a 12 ink Epson, one with 3 shades for
each color. At any rate print quality improvements in inkjet printing
today are linked to increasing the number of colors. |
| |
|
| |
| 9/21/2003 Power Cleaning |
| |
If the normal cleaning cycles do not do the job
(the ones you control via the printer dialog box on your monitor),
try a hardware power cleaning, via the printer control panel (on the
printer). Here are the steps you have to go through on the control
panel:
1- Ready
2- Selectype
3- Printer Setup
4- Scrool down to Maintenance
5- Selectype
6- Power Cleaning
7- Selectype
8- Exec
9- Press Eject
This tip was provided by Jon Dokken. |
| |
|
| |
| 9/17/2003 The 9600 and 7600 Paper Sensor |
| |
.
The Epson 9600 and 7600 use a light-sensitive paper sensor which allows
the printer to find out where the edge of the paper is. This sensor
is what permits these printers to load paper precisely in the printer.
The problem is that this sensor is very sensitive to extraneous
light. If you have direct light shining into the printer, either
from above or through the tinted plastic cover on the front of the
printer, this sensor can be "thrown off" and unable to function
properly.
If you are having difficulties with issues related to loading paper,
or ejecting paper properly, check if there is direct light shining
into the printer, either from an overhead light or from a window.
If there is, move the printer to a different location, turn off this
light when you are printing, close the blinds, or take any other
action to block off this light source.
I cannot provide you with a photograph of this sensor because it
faces the paper and is located behind the printhead. To clean it,
if cleaning is necessary, you need to use either compressed or canned
air.
Digital Fine Art Photographers Summit
Do you know that our sponsors are offering 100's of dollars worth
of discounts and free software and that those discounts actually
total more than the actual cost of the Summit? If you don't, and
if you are planning to purchase (at regular prices) the products
offered by our sponsors, you are missing out on an incredible opportunity
to get the best and latest digital imaging software "for a song"!
Click here and find out all the "deals" you can get by simply
attending the 2003
Digital Fine Art Photographers Summit in Phoenix, Arizona, this fall! |
| |
| |
| |
|
| |
| 9/15/2003 Using Roll paper on the 9600 and 7600 |
| |
Here is a better way to avoid wasted paper when using roll paper on
the 9600 and 7600:
1- Set printer control panel to "Sheet"
2- Load your roll paper in the printer.
3- Once the roll paper is loaded, and the printer says "Ready" (status
light is green and not blinking) select "roll paper instead of "sheet" on
the printer control panel.
4- Select "Sheet paper" in the Epson printer driver
5- Select "custom paper size" and enter the size of your
photograph, plus a 1/2 or 1 inch border all around the image as the
page size. That way your image will print on the side of the roll,
instead of the middle of the roll.
6- If you want you can tile several images together and print on the
full width of the roll.
7- Print. The roll paper will not unwind past the length of the custom
paper size you have indicated in the driver.
Digital Fine Art Photographers Summit
Have you signed up for the digital Fine Art Photographers Summit?
If not, it is not too late yet! If you are using the Epson 2200,
7600, or 9600 printers this Summit is for you! Uwe Steinmueller,
Michael Reichmann and myself will give you detailed information about
how we create our prints. Plus, if this is not enough, you can ask
us any question personally!
You will also be able to see actual prints with your own eyes. We
will have an exhibition of our most exiting work, accessible to all
at no extra cost, during the summit. I personally will be exhibiting
very large prints of images created from 4x5 originals. The quality
is "out of this world"! Some of them will be on canvas, others
on various papers.
You will witness years of testing and experience in one weekend! This
alone will save years of trying to do it all by yourself. Plus, our
sponsors are giving you numerous unique special offers. The money you
will save with these special offers will more than pay for the cost
of attending the Summit! Don't delay.
You can read all the details of the summit here and download a faxable
order for right now. See you in Phoenix in October! |
| |
|
| |
| 7/18/2003 Epson Wide Format Yahoo Group Email List |
| |
If you have questions about your 9600, or about other Epson wide format
printers, an excellent resource is the Epson Wide Format Yahoo Group email
list. You can subscribe to this list by clicking here:
http://groups.yahoo.com/group/EpsonWideFormat
From there you can choose to receive either individual messages or daily
"digests". The digest version includes all the messages sent
to the group in a 24 hour period. I strongly recommend subscribing to
the digest version because you will only get one email a day instead
of 10's or 100's of emails (depending on how active this group is) if
you choose the individual message option.
You can also search the archived list files at:
http://groups.yahoo.com/group/EpsonWideFormat/files/
This will give you a good idea whether or not the topic you are interested
in has already been covered. It is usually faster to find the answer
to your question that way instead of posting a message to the list.
Fall 2003 Digital Fine Art Photographers Summit
If you want to learn more about using your printer for fine art consider
attending the Fall 2003 Digital Fine Art Photographers Summit.
http://www.outbackphoto.com/summit/summit2003/summit2003.html
If you are a photographer, are printing digitally, and want to meet
top people in the industry today, find out all the details on the latest
product and software, listen to in-depth presentations on a variety
of topics related to digital photography and get your work reviewed
by professional photographers then you cannot afford not to be there
for this unique event! Find out all the latest details here, download
a pdf registration form and fax it back today! |
| |
|
| |
| 5/19/2003 Ultrachrome printing costs |
| |
Keep in mind that this table does not take into account the cost of
ink used during printhead cleaning. Although it is hard to quantify
how much ink is used during head cleaning I have heard that the printer
uses 16ml on average for each cleaning. This must to be added to the
cost of each print.
There are a number of other issues regarding ink use and several of
these are mentioned below the table. Make sure to read these footnotes. |
| |
|
| |
| 5/18/2003 9600 maintenance tank reset update |
| |
| My Maintenance Tank reset entry generated a lot of positive
feedback. One question keeps coming up so I thought I would address it
here. A lot of readers want to know either
1-What did you use as an absorbent replacement for whatever epson uses
in the tank?
2- what did you do with the "old" tank?
The answer to both questions is "Nothing"! I just left the
tank, and the pads in it, exactly the way there were before the reset.
I didn't change the pads and I didn't change the tank. The whole idea
here is to not change anything and instead continue using your old tank.
In my case the tank is not truly full although the printer says it is
full. In fact, the pads in the tank are not even soaked with ink at
all. A lot more ink can be absorbed by the pads before the tank overflows
and ink starts to spill outside.
Obviously Epson is playing on the safe side here just as it was playing
on the safe side regarding "empty" ink cartridges before it
released a software update late last year. In my view Epson should release
a software update for the maintenance tank as well. But, if this doesn't
happen, we now know how to reset the maintenance tank so we can continue
using the same tank until it is really full.
In fact the presence of a reset -clearly hidden in the printer's control
panel sofware- shows that Epson knows that the maintenance tank may
not be full when the printer says it is full. Otherwise, why would this
reset be there? |
| |
|
| |
| 5/17/2003 Power Head Cleaning |
| |
| If you have tried to "clean a clog" on your
print head from the print driver or from the printer control panel both
without success you may want to try this third possibility which Epson
calls the Power Head Cleaning:
This operation is done from the Epson Printer Service Utility software.
This is the utility which is used to upgrade the firmware on the printer.
It is available as a free download from the Epson
site. Look for my "software update" entry in this diary and
you will find a link to the download page.
Here's how to do it:
1- From the Printer Service Utility main menu select click on "Printer..."
and select your printer in the chooser.
2- From the function drop down menu in the Printer Service Utility
software select "Power Head Cleaning."
3- Click "Next" to continue
4- Click "Start" to run a power head cleaning. This cleaning
will run for approximately 2.5 minutes and will use more ink than a
regular print head cleaning. For this reason it should be used only
after you tried to clean the print head through the control panel.
5- During the Power Head Cleaning "Wait" will be displayed
on the printer's LCD control panel and the "pause" led will
be blinking
6- Click home to return to the printer service utility main menu or
quit to exit the Printer Service Utility program.
This information is provided by Epson's technical information "pro76ups.pdf".
It was tested on a Macintosh G4 running OS 9.2
Print of the month #5 now available: I have just released my fifth
print of the month. It is available here. Proceeds from
this special offer allow me to continue writing this diary and help
support outbackphoto.com. Thank you to all who have ordered or will
order a "print of the month"! |
| |
|
| |
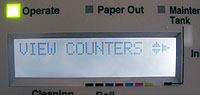
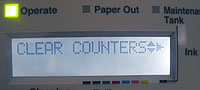
| 5/12/2003 Reset -don't replace- your 9600/7600 maintenance
tank! |
| |
| Here is how you can reset the maintenance tank on your
9600. I tested it, because my maintenance tank was nearly "full"
(the red light was blinking) and it works like a charm. Try it, you'll
like it. It will save you the cost of a new maintenance tank plus shipping,
sales tax, and the time spent finding one. This tip was posted to the
EpsonWideFormat list by Jesus Gomez.
-turn off your printer
-press PAPER SOURCE+PAPER FEED+CUT/EJECT buttons at the same time and
keep them pressed
-turn on the printer
-you can release the buttons
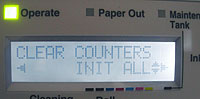
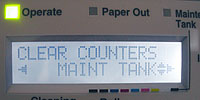
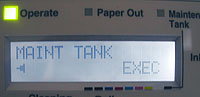
-A new hidden menu does appears
-press DOWN, CLEAR COUNTERS option should appear
-press RIGHT
-press UP, MAINT TANK should appear
-press RIGHT
-press ENTER (CUT/EJECT button)
-et voilà!
Here are photos of the different screens you will see as you go through
this process. The photos are in chronological order.
|
| |
|
| |
| 4/24/2003 Using roll paper with "sheet paper"
option selected |
| |
| One of my recent diary entries dealt with avoiding wasting
roll paper by simply selecting sheet paper while roll paper was actually
loaded in the printer. I forgot to explain how to avoid having the whole
roll unwind itself when the print is done. This is what you need to do:
When the paper starts to come out of the printer it will pour out until
the entire roll is unwound. This is because the printer thinks there
is a sheet of paper in there and is waiting to "see" the end
of the sheet. Since there is actually a roll of paper it will unwind
the whole roll.
So, watch the print come out (you'll have to stay near the printer
so you don't miss it) and when the print is completely out of the printer
simply lift the paper loading handle up. This is the big grey handle
on the top right of the printer (at least in the 9600). The paper will
stop unrolling right there and then! Cut the paper off then push the
handle back down and press the pause button. The paper will then be
reloaded to the starting position for printing.
Usage reports
Also, for those curious to know all the details about ink and paper
consumption InkjetArt has a link to a tutorial showing you how to print
a paper and ink usage report on your 9600 and 7600:
http://www.inkjetart.com/pro/7600_9600/status_and_job_info.html
Before you launch into printing this report keep in mind that a detailed
report on ink and paper consumption is printed each time you do a print
head test. Personally, this is plenty enough information for me. This
automatic report also indicates how much ink is left into the ink purge
maintenance drawer. This last bit of information is indicated as a percentage
of remaining space. For example 11% means that the drawer is actually
89% full. |
| |
| |
| |
|
| |
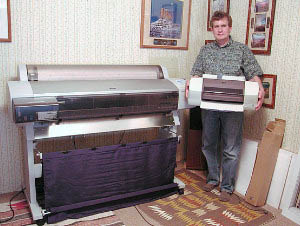
| 4/18/2003 Proofing |
| |
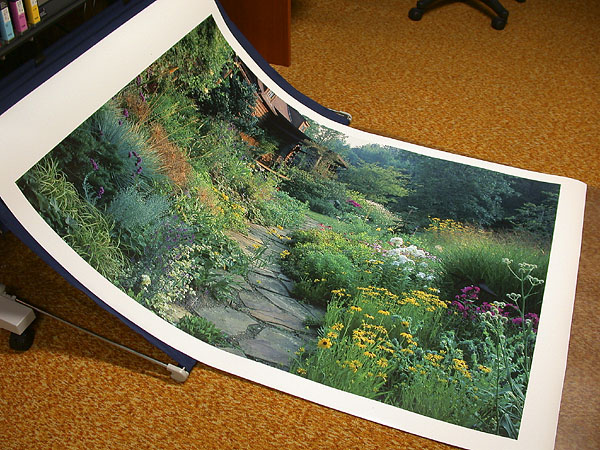
| I just completed a new series of images created in February
and March of this year. In a new approach to proofing I proofed all 33
new images at once on the 9600 by ganging them on a 44" wide file
and printing them all at once. Here is the result of this process:
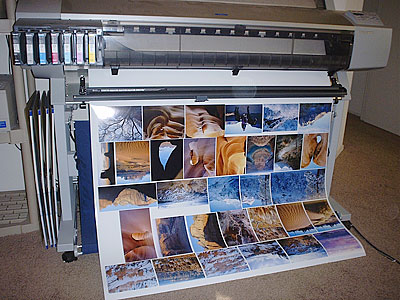
After printing was completed I cut, double matted and signed each photograph.
Each image is visible on my site at
http://www.beautiful-landscape.com
You can compare the real image to those coming out of the 9600.
Because my system is entire profiled, from my scanner to my monitor
to my printer, I was able to get beautifully pleasing results from the
very first print. In fact, only one proof was made as no further adjustments
are necessary. What you see is all I printed so far. Now, I am ready
to print larger images. |
| |
|
| |
| 3/19/2003 |
| |
| Yesterday I received an email asking about how to handle
roll paper waste on the 9600:
"The 9600 tends to forward too much paper from a roll and every
new printing job has almost 10" of white paper wasted in front.
How did you manage to solve that?"
Roll paper waste can be a serious problem. My solution when I use a
roll of paper but want to minimize paper waste is to choose "sheet"
paper in the print dialog box. Then I go to "customize paper size"
and I enter a sheet size the size of my Photoshop canvas (basically
the size, in inches, of my file or my tiling of several images on one
sheet). Then I close the "customize" box and proceed with
printing as usual.
In the main print dialog box, the one where you choose which profile
to use, there is a paper size indicator in the top left corner. This
thumbprint shows the size of the file you are printing and the size
of the custom paper size you just created superimposed onto one another.
This helps visualize if your custom paper size is the appropriate size.
If it is too big you will have large white borders all around your image.
If it is too small your image will be cropped. In this last instance
the printer driver will alert you that "part of the image will
be cropped out" when you attempt to print. I found that making
the custom paper size 1" larger than the canvas size is a good
idea. This results in a 05" border all around the image leaving
enough room to safely trim and handle the rpint.
This approach basically fools the printer into thinking that there
is only so much space to print on and results in an efficient use of
the paper. The printer does not advance the roll 10" forward because,
unlike on a 100ft roll, there is only so much paper surface to print
on!
I do use the Epson manual paper cutter so using roll paper and cutting
it on the printer is not an issue. However, you can also cut rolls on
the printer by hand using a utility knife. See my previous diary entry
on this topic.
Try it. You might like it!
|
| |
|
| |
| 3/18/2003 Epson UltraSmooth Fine Art Paper |
| |
| Epson announced several new photographic inkjet
papers at PMA earlier this month, among them UltraSmooth Fine Art Paper.
Michael's Reichmann's preliminary review is now online and t is the
first review of this paper in print anywhere in the world. Click on
the url below to read Michael's review and find out the answer to his
question "Is this the paper we've been waiting for?"
Review
Note at Luminous Landscapel
At this time Michael's review gives you all the information available
about this new paper. I do not have samples of this paper at this time
and so cannot do a print test myself (samples were distributed at PMA
2003, in Las Vegas, but I did not attend it). However, I plan to use
the 500g, 24" x 30" sheets in the 9600 when they become available
in April. If I like the print quality (and from the look of it it appears
that I will) I may decide to do one of my Print of the Month releases
on UltraSmooth Fine Art. Stay tuned!
By the way, if you have not taken a look at my third Print of the Month
now is a good time to do so. This month's print is one of my all-time
favorites, one that Steve Kossack calls "My signature
image." Check it out now by clicking
here . |
| |
|
| |
| 3/12/2003 Firmware update results in minimal ink waste
in 220ml cartridges |
| |
As I reported before the 9600 firmware
update results in a much lower, almost insignificant, ink waste. I noticed
a much reduced ink leftover level in empty cartridges in my last cartridge
change but, unfortunately, I forgot to take photographs of the empty
cartridge. Well, this has been remedied by Ian Adams who just emailed
me two jpegs of a light cyan empty 220ml cartridge. As you can see,
almost no ink is left in the cartridge. This is very good news and will
put to rest worries about wasted ink.
|
| |
|
| |
| 2/12/2003 Printing the Prints
of the Month |
| |
| I am in the process of printing "Yucca at Sunrise,
White Sands National Monument" for my second special "Print
of the Month" offer. This image is printed on Epson Glossy Paper-Photo
Weight, a paper which I have only briefly tested last year.
I have to say that right now "Yucca at Sunrise" looks wonderful
on this paper. The paper is not a fully glossy paper but instead has
a slight texture to it, visible if you tilt the paper towards the
light, and this texture is somewhat irregular, as if you could see some
of the paper fiber but ever so slightly. More glossy than Parrot Ultra
Luster, but with a texture less uniform than Parrot
Ultra Luster. As usual, describing the "feel" of a paper is
a challenge!
I chose this paper in contrast with the one I chose for "Antelope
Light Dance" so that you can see the effect that two different
papers can create. Many of you have ordered both prints which I think
is wonderful. In fact, the print of the month offer is a great success.
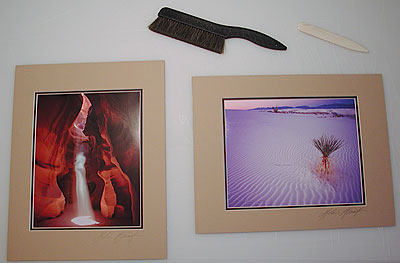
Here is a photo of the two "Prints of the month" on my matting
table. This shows you the matting style I chose for these two prints,
a double mat with "desert sand" and "espresso" colors.
These soft beige tones make the print really stand out since the brightest
area is in the image and not in the mat. However, if you prefer a standard
double white mat presentation, this is available as well. Make sure
to email me separately if you want a white matting at
alain@beautiful-landscape.com
otherwise you will be shipped a beige mat. |
| |
|
| |
| 2/7/2003 Much less ink waste |
| |
| First empty 220ml ink cartridge using Epson's Firmware
update
Yesterday I emptied my first 220ml cartridge installed after performing
Epson's firmware update on my 9600. This "event" was something
I have been waiting for since some time in order to compare how much
ink would be left in the cartrige with how much was left in 220ml dartridges
installed with the old (original) firmware.
The great news is that very little ink was left in the "empty"
cartridge. I did not measure the ink but I can report that it was approximately
one fourth to one fifth of what was left in a 220ml
cartridge prior to the firmware update.
I unfortunately forgot to take a photograph of the empty cartridge
showing how much ink is left. But I did open the cartridge and drained
the ink into a plastic bottle (I keep the leftover ink
because my wife uses it for art projects), and therefore I know for
sure that very little ink was left.
The next time a cartridge goes empty I will take a photograph of the
empty ink bladder. Until then, rest assured that the firmware update
is effective in reducing the amount of ink left in "empty"
cartridges.
Also, as a side note, I just want to remind you that my first "Print
of the Month" special offer expires in just 3 days! That's right,
only 3 days left to get "Antelope Light Dance" at a price
never seen before and never to be seen again afterwards! So if you haven't
checked out this incredible offer yet click
here and do so now. And if you have been hesitating well, time is
running out! Just remember, at this price you are not taking a chance
at all, plus, you are covered with my 100%, no questions asked money
back guarantee or exchange in case you are not satisfied.
|
| |
|
| |
| 2/4/2003 Very Large Prints |
| |
| Here is an entry from Ian Adams detailing the process
he uses to create very large prints using Image Print running under
Windows:
"Here is my first 40x55-inch Ultrachrome print from the Epson
9600. It's a 187 meg file at 150 ppi, and printed beautifully in about
30 minutes at 1440 dpi using the ImagePrint 5.0 RIP. I had a larger
version, at 200 ppi, but the 150 ppi print is indistinguishable from
it, even close up. For a print this large, viewed from several feet,
150 ppi is more than adequate, though 1440 dpi is needed to avoid the
minor banding and slight loss of color saturation that occurs at 720
dpi.
There are several operations that need to be carried out to produce
prints this large on the Epson 9600 using Windows 2000 or XP:
- Make sure you have plenty of free space on your hard drive.
- Make sure you have downloaded from Microsoft's website and installed
the "hot fix" for the Windows 2000 and Windows XP bug that
puts a 4 billion pixel size limitation on a print file. This fix is
included in the current Service Pack for Windows XP, and will be in
the next Service Pack for Windows 2000.
- ImagePrint allows you to rotate the image in the print window before
printing it, in order to align a horizontal print with the paper roll.
However, this requires the creation of a large temporary file that
takes up lots of space. It's better to rotate the file in Photoshop
before reading it into ImagePrint, thereby eliminating the need for
the temporary file.
- If you plan to attend to other business while the print is printing
on the Epson 9600, turn off your Windows Screensaver, or set the interval
to at least an hour, and turn off the Windows Power Management feature
as well. Both of these Windows features can cause an occasional interruption
of the communication between the printer and the driver, causing the
printer to "freeze" part way through the printing process.
The printer console on the Epson 9600 will read "printing",
but by then you've lost the rest of the print."
Ian Adams
I also want to remind everyone that the "Print
of the Month" offer expires in 7 days only (it's getting close!).
This is a great offer which is having a lot of sucess, and one that
you should not miss if you are interested. If you haven't had a chance
to read this offer just click here
to find out all the details. If you have been hesitating just remember
that you are covered by my 100%, no questions asked, "take one
year to decide" money back guarantee. This offer is a wonderful
way to first see for yourself how a print scanned on the Flextight 3,
and printed on the 9600 looks like and second add to (or start!) your
photographic print collection. |
| |
|
| |
| 1/29/2003 Fix for Win2K file limit bug |
| |
| I received this information today from Mike Putman.
I use a Macintosh and so cannot comment on any aspect of it but if you
use a PC this should be helpful to you.
"I found out from some folks who work at Microsoft that there
is a printing limit of 4 billion pixels in Windows 2000 with any service
pack and Windows XP without service pack 1. This works out to about
a 40X50-inch print, give or take a few inches. The bug and the fix are
described in Microsoft's Knowledge Base Article 318365.
http://support.microsoft.com/default.aspx?scid=kb;en-us;318365.
This hot fix seems to cure the problem for me running Windows 2000
service pack 3. This is a tricky bug to track down as some graphic software
packages have pixel and size limitations (which cause similar problems),
while others totally avoid using the Windows print software (thus avoid
this bug). So, this cure may not work for everyone." |
| |
|
| |
| 01/25/2003 Alai's Print of the Month 1/2003 |
| |
Last week I announced a special offer which will
make it possible for you to experience high quality digital photographic
prints first hand. I worked out the details of this offer over the week
and here it is!
Read
more at "Printmaking: Alain's Print of the Month" |
| |
|
| |
| 01/22/2003 |
| |
| Soenar Chamid received a number of responses regarding
the difficulties he was having printing very long files. Here is Soenar's
feedback on these responses as well as a very interesting (and inexpensive)
solution to his problem:
"I had five reactions at my question. Scott Diese was one of them.
He advised me to try Qimage Pro 2003.
You can find
Qimage here.
I downloaded the trial version and the result was remarkable. I installed
the program last Monday and till now I printed 3 prints on canvas 80x385
cm (32"x154" approximately). It is unbelievable that this
software costing about $40 can manage this file."
|
|
| |
| 01/20/2003 |
| |
| I receive a lot of emails asking me to
describe the quality of prints done on the Epson 9600, and/or the combined
quality of an image scanned on my Imacon Flextight 3 and printed on my
Epson 9600. No matter how hard I try there is simply no easy way to put
this into words. The best, and perhaps only way, to witness this quality
is to see an actual print.
To make this possible I am working on a special offer which will make
it possible for you to purchase one of my photographs, at an attractive
price, and see for yourself what the combination of top equipment, great
profiling and good printing skills can do. The image will come with
a description of the equipment used, the profiles used, the paper used,
etc. Since I use the profiles that Uwe Steinmueller made for me you
will also be able to see how these profiles will help you get the best
print possible at the same time. |
| |
| |
| 01/19/2003 9600 Setup |
| |
Here is the setup Soenar Chamid, of Holland, uses
for his 9600 (Email soenar@chamid.nl Website
http://www.sportfotografie.nl

This is how Soenar describes his setup: "When I had the Epson
7600 the rolling cart was a pefect solution. It had the exact size as
the printer and I could put my rolls of paper inside. When the Epson
9600 arrived the original stand took too much place, so I choose this
set up near the wall."
As you can see there is more than one way to "skin a cat"
as they say or to setup your 9600 printer (in this instance). Soenar's
solution is interesting since he decided not to use the stand at all
although the stand comes with the 9600 at no extra cost.
Soenar also has difficulties printing very long photographs: up to
160 inches. I cannot help him with this issue as I never encountered
it. Here is his original email. If you have an idea of what is causing
the problem he describes please email him.
"Some time ago I started reading your diary. In August I started
working with the epson 7600, in December I switched to the Epson 9600.
Till now I printed without any problem my photograph's 90x140 cm, so
about 40x56 inch.
At the moment I'm trying to make banners up to 160 inches. But it does
not work. With Photoshop 7.0 I (Windows XP) I could see in the preview
that it was not possible. The preview of PrintPilot gave a correct view.
But after exactly 250 cm (100 inches), the Epson 9600 printed lines.
White stripes (0,5 inch) after a pictureline (0,2 inch), then again
a white stripe and so on till the printer passed 160 inches. What a
waiste.
Do you have any experience with this?
Do you know a way to solve this problem?"
|
| |
|
| |
| 01/05/2003 Moving the Epson 9600 |
| |
|
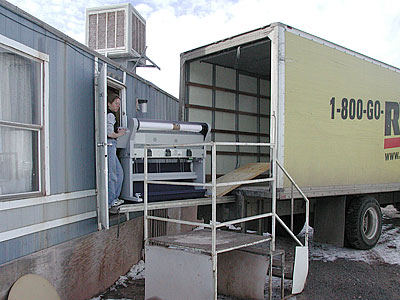
| |
| We moved our Epson 9600 printer. This part of our diary
you can find in my other diary "How
to Move your Studio". |
| |
| 12/28/2002 9600
vs. 7600 |
| |
The comparison between the 7600 and 9600 is still a
hotly debated topic and one which generates many emails. Clearly, the
main difference between these two printers is the maximum width, 44"
versus 24". This means you can print a 40"x60" on the 9600
while you can only print up to a 20"x30" on the 7600 (with 2"
wide borders all around). If you don't sell or display photographs larger
than 20" you may be content with the 7600. If you need larger prints,
up to
40" wide, then only the 9600 will satisfy you.
But there is another aspect to consider, and that is the cost of paper
per square foot. This is particularly important if you do production
work. A 44"x100' roll of paper does not cost a whole lot more than
a 24"x100' roll. Yes, 44"rolls cost more, but they don't cost
twice as much as 24" rolls, not even a third more. This means that
larger width rolls are more economical. I don't have price figures right
now but doing a quick search for those prices will prove my point.
Another important consideration, which has little to do with maximum
image size, is the ability to gang-up prints on a file. You can simply
gang-up more prints on a 44" wide file than on a 24" wide
file. This in turn means faster printing speed since you can print more
images at once. If you do production work this is an important consideration.
This also results in less paper wasted since tiling images on 44"
width gives you more leeway than on 24" width. Take 16x20 prints
for example: while you can only print one on a 24" width you can
print two, in the 20" direction, on a 44" roll and have a
one inch border around each of them. No paper is wasted and you can
print two of them at the same time.
Obviously you can print two 20"x16" on a 24" roll one
behind the other. But in my estimate this takes longer and is more costly
paper wise.
And of course there is the price difference between these two printers,
and we can go on about computing this price difference versus the cost
savings of larger rolls of paper. I won't go into
that.
Many of my decisions are made on the basis of peace of mind. By acquiring
the 9600 I know for a fact that I got the largest Epson Ultrachrome
printer available. End of the story. This gives me
peace of mind. To make a comparison I just purchased a Leica M7. I could
have got an M6, after all the only difference is that the M7 has automatic
exposure, and saved some money. But by getting the M7 I gave myself
the peace of mind that comes with knowing I have the latest M Leica |
| |
| 12/27/2002 9600 Print Quality & Profiling |
| |
I continue to receive voluminous quantities of emails
from Epson 2200, 7600 or 9600 users asking me about they can get the highest
quality prints from their printers. Clearly those users are not
satisfied with the print quality they are getting and feel, righteously
so, that their printers are capable of doing better. When I ask if they
have profiled their printers the answer is no.
I want to stress again, as I have already done in this diary on several
occasion, the crucial importance of profiling your printer. In the past
profiling may have been less important with previous Epson printers.
I got very nice prints with my non-profiled Epson 1270 for example and
with other Epson printers as well. But with Ultrachrome printers Epson
made it a necessity to calibrate each printer individually. I am not
sure why this is but the fact is that it has to be done in order to
get the full printing quality potential from your printer.
A number of readers also believe that only papers not listed in the
list of provided "canned" Epson profiles (the profiles provided
by Epson with your printer) need to be profiled. This is inaccurate.
The profiles provided by Epson (what I call the "canned" profiles)
will not enable you to get the best quality prints from your printer.
To get the highest quality you need to have a custom profile made for
each paper you are using, irregardless of whether or not there is a
canned Epson profile for this paper. This is because each Ultrachrome
printer is unique and prints with its own slight shifts in color and
density. Profiling allows you to compensate for those slight (but very
significant) differences.
Profiling in essence is done via a two step process: first, you download
and print a color target. This target consists of an image with a multitude
of squares of color plus white, black and grays.
Second you mail this print to the person who is creating the profiles
for your specific printer. This person, the "profiler' so to speak,
reads the target using a spectrophotometer. This machine compares the
value of each square, as printed by your printer, to the value of a
reference square and records the differences. It then creates a reference
file -the profile- in which the difference between what your printer
prints as a color and the perfect color reference for the same color,
is recorded. This file contains this information for all the squares
of color, black, white and grays in the profiling target. This is done
for each paper you intend to use. This profile is valid only for your
specific printer. Of course it can technically be used in a different
printer but the information contained in the profile will not be 100%
accurate and will thus not enable you to create the best prints possible.
A canned profile is basically a profile created for one specific printer
but used in a multitude of other printers. As you can see this approach
cannot result in optimal print quality.
When you print an image on a specific paper you select the custom profile
which was created on your printer for this paper. The profile tells
the printers how to adjust each color, and each density, so that it
matches the reference file. In effect each imperfection, each deviation
in color and density that your printer may introduce is accounted for
and corrected.
In a perfect world each printer would be created equal and each printer
would print each color in an exactly similar manner. All cadmium reds
(for example) would be the same, no matter which
printers they would be printed on. In this perfect world we could line
up one thousand Epson 2200, 7600 and 9600, have them all print a 10"
square of Cadmium red, and all the resulting squares would be exactly,
identically, 100% similar in tone and density.
The problem is that we do not (as yet) live in this perfect world.
If we line up these 1000 printers and have them all print this same
10" square of Cadmium Red, they will, unfortunately, all print
a slightly different shade of Cadmium red. Some will print dark Cadmium
Reds, some will print light Cadmium reds, some will print Cadmium reds
that look slightly greenish and others will print
Cadmium reds that are a little yellowish. Others will print Cadmium
Reds that are not very vivid and yet others will print Cadmium Reds
that we will have never seen before. Yet others will surprise us and
make us believe that Cadmium Red isn't everything we have been told
it is. That it isn't as vivid as we thought it was, that it is really
more Magenta than we thought it was. And yet some other of these Epson
printers will make Picasso rise out of his grave and proclaim
that there should be laws punishing people who print Cadmium reds in
such a horrible and distasteful manner.
So to make everyone happy, and to avoid the riots and complaints and
other mental-illness inducing events caused by poor printing quality
PROFILING was invented. Profiling provides all these printers, not two
of them agreeing on what Cadmium red should really look like, with a
reference file to which they can refer each time they print a particular
color. Profiling in this sense is like a dictionary. If we disagree
regarding how "negligee" should be spelled then we can
refer to the dictionary to tell us exactly how it should be spelled.
Without dictionaries we would all be left guessing creatively as to
whether it should be "negligea," "Neagliger" or
perhaps "naigleage." clearly a thousand other spellings can
be thought of, all sharing a common quality: inaccuracy.
So if you are not happy with what your 2200, 7600, or 9600 printer
is printing ask yourself this question: did I custom-profile my printer?
If the answer is no do so, and do so for each paper you are using. Only
then will you be able to assert the full potential of your
printer. |
| |
| 12/10/2002 Windows driver bug |
| |
This entry is from Ian Adams sent to Alain.
Windows bug
1. After weeks of research, I found out that there is a bug in the Epson
9600 software that, in conjunction with Windows 2000, prevents the user
from making large prints of 40x50-inches. Almost makes me wish that
I used a MAC! 30x40-inch prints are no problem, but I have
several orders for really large (and profitable!) prints that I want
to be able to produce. As a solution, I've purchased ImagePrint 5.0
from Colorbyte Software in Tampa, Florida. I expect to install ImagePrint
later this week, and will let you know my impressions after some testing.
Joel Hill, of The Cleveland Clinic, which has a 9600, says that ImagePrint
resolves the "big print" limitation in Windows and provides
numerous other advantages, including flexible formatting, faster printing,
and better quality prints than the Epson software drivers. We shall
see.
(Editor: Jim Collums reported the same bug with the 9000/9500 a year
ago to Epson. He installed Win98 on his print server to solve the issue.
We use ImagePrint for the our 7500 and 2200)
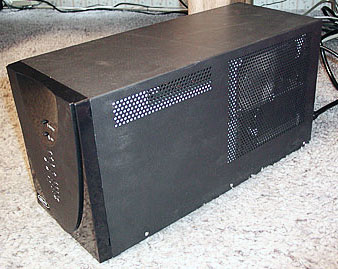
9600 custom cover
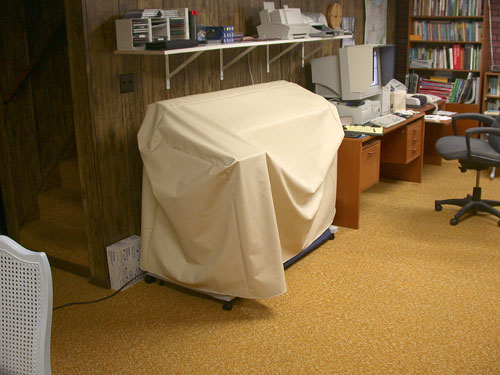
Above image shows a very nice cover I had custom-made for my Epson 9600
by W. G. Computer Supply of Harvard, Illinois. The cover dimensions
are 64" x 28" x 40", to allow for the 220ml cartridges.
The cover is very rugged and cost $62.95. The URL for W.G. Computer
Supply is www.wgsupply.com
|
| |
| |
|
| |
| 12/09/2002 Alain's 9600 Q&A |
| |
The following questions and answers are from a real
email conversation and we hope you find them interesting.
Question #1. What criteria did you use
to decide on the 9600 vs 7600?I am thinking of getting ImagePrint and
ganging up images (prints for people for some side money) but on the
other hand I have read that neither is really a production printer (in
which case the 10600 is recommended). How often would prints greater
than 24" be needed. This has been a big debate for me.
Answer: Criteria: Maximum print size.
You can use the 220 ml carts in the 7600 so this is not a factor. Just
maximum print size - I can print 30x40's and 40x60's on the 9600, that's
all. And yes, it is a production printer. Not as fast as the 10600 but
not slow either. Ganging prints up (see my diary entry on this subject)
saves A LOT of time! Printing speed per foot isn't the only thing you
need to look at. It takes a lot of time to load and eject hundreds of
sheets of paper on a desktop size printer! Also, keep in mind that the
10.600 has only 6 inks (no light black) and thus will not be able to
create the same quality prints as the 9600. In short, the 10,600 is
the fastest Epson printer but the 7600/9600 have the highest print quality
of all Epson printers at this time (December 2002).
Question # 2. For test print purposes,
is either printer easier to work with than the other for small (8x10)
single sheets?
Answer: No. Neither were designed for
that purpose although it is possible to feed an 8x10 sheet for test
purposes or to do a printhead test.
Question # 3. Did you get involved with
the dye vs ink decision?
Answer: Yes. I love the 9600 because
it creates the look of dyes with pigments.
Question # 4. I have quite a few messages
on different lists going into the dmax debate regarding paper/ink combinations
and UC inks in general. There have also been messages on bronzing with
glossy papers. Have you had enough time to test many papers and find
one that you would recommend for good dmax (similar to traditional prints
from a lab)?
Answer: I have no qualms with the 9600.
If a paper bronzes, then I just stop using it and switch to one that
does not bronze (see my precious diary entries for which papers I prefer).
You really only need a couple of papers realistically, papers that work
for you. So who cares if some papers bronze or do this and that? Just
don't use them. Problem solved!
Question #5. Has the new firmware update
resulted in less ink left in the cartridges at replacement time?
Answer: Yes. But I have not finished
a cartridge installed after the new firmware yet. Watch my diary for
updates when that happens.
Question # 6. In addition to the 46%
humidity solution for preventing clogging, I have also read that if
the printer is left on 24/7 it will help also.
Answer: Sure, but why do this when you
can simply control the humidity level in your home? Plus, it is good
for you to live in an environment that is not too dry. And, if it is
very very dry having your printer on all the time will still result
in clogging (and wasted ink). Plus you are at the mercy of a power shortage
(or someone accidentally unplugging the printer) unless you use a UPS
backup. And even then the backup will only provide power for a finite
amount of time. Why leave anything to chance?
Question #7: I thought leaving the printer
on saves ink? Had the impression that when you turn it on, it goes through
a cycling process?
Answer: Yes, but the reason why it is
not drying when on is because ink is being constantly fed (very slowly)
through the print head. I don't have hard data on this but I would be
willing to bet that this consumes just as much ink as if turned on and
off.
Question #8. Slightly off topic, but
how do you feel about film vs digital? I am shooting 6x6 and scanning
with a Minolta Multi Scan Pro (probably should have saved for an Imacon??)
but have been tempted by the new DSLRs coming from Canon and Kodak.
Answer: I stay away from digital cameras
right now. Except for an Epson 3100z which I use only to take photographs
to illustrate my articles and this diary I shoot exclusively on film
for my professional work. I love to experiment but spending untold thousands
for a product which may
be (or will be) obsolete in a year is not my idea of a wise investment.
So I use film and scan it on my Imacon Flextight 3 scanner and get excellent
results. I will go fully digital when a 4x5 back, or a medium format
back, which is both practical and affordable (relatively speaking) is
available.
Question #9. I am coming to the harsh
reality that I should have spent the extra money and gotten an Imacon.
From what I understand it generates a very clean blue channel whereas
my Minolta has a fair amount of noise in the channel :-(
Answer: Imacon is great. As usual, you get what you pay for.
Question #10: Since I am hoping to get
some income from printing other people's work, would you say that the
9600 would be better then? The other thought I had was to get the 9600
and then use 24" or smaller rolls until the volume got enough to
justify going to 44" rolls. Does that
sound like a viable solution?
Answer: No. the smaller rolls will actually
cost you more. If you have a 9600, you need to use the 44" rolls.
Just gang up prints on a 44" wide file. It all depends how much
you want to spend on this printer purchase. Look at the cost of a 44"
roll as an investment. You pay less per
square foot of paper with a 44" roll than with a 24" roll.
Even if you don't use it very fast the 44" roll is still a better
investment.
Question #11: Would doing printing for
others be asking for more trouble than it is worth? Any suggestions
on where to look for pricing ideas?
Answer: Well, anything you want to do
well will entail a lot of work, and yes some trouble, and also competing
with other people who offer a similar service. Look up fine art giclee
printers on the net for pricing ideas. Nothing is easy otherwise we'd
all be doing exactly what we want
and having a blast at it. Those of us who manage to do so have to work
hard and be smart!
Question #12: If you were to print for
others, would you still limit your selection of papers?
Answer: Yes. I just can't be everything
to everyone. Plus, I cannot spend my whole life testing papers. At some
point it is necessary to say "I like these materials, they give
me the look and the quality that I want, and I am going to use them
until something significantly better comes along."
Question #13: BTW, I know you are using
profiles that Uwe did for you, but have you tried the Atkinson profiles?
Answer: Yes, but to be top-notch profiles
need to be made for your own printer on your papers of choice. Bill
Atkinson's profiles are better mainly because of the custom target he
designed. I recommend you use his target to profile your printer. You
do need to get custom
profiles to get the best possible results. Ready-made profiles,
even if some are better than others, will not deliver optimal results.
(Editor: Also the Atkinson's profiles are not targted for different
viewing conditions D50 & D65).
Question # 14: You didn't post a follow-up
to whether or not the firewire card worked faster than USB?
Answer: I can't really tell if there
is a difference. Plus, I'm not about to make print speed test by plugging
the printer via USB and via Firewire alternately. I just can't justify
the time this would take. Mainly having Firewire gives me the confidence
that I couldn't get a faster connection to the 9600. Again, why take
a chance? It's not that much for a Firewire card so I decided to put
all the assets on my side by using a firewire connection. If you don't
want to spend that extra money I don't think you will be significantly
penalized speed wise with USB except on large files. But again, with
the 9600 most files are large.
Question # 15: You didn't post a follow-up
to how fast the maintenance tank filled up or how often it would have
to be replaced?
Answer: Right now my maintenance tank
is about 60% full.
Question # 16: It looks like there might
be a contradiction in your entries (if I understand correctly). In the
entry for 6/30/02 you stated that Epson Glossy Paper Photo Weight is
not intended for the 9600 since it is dye based. In the entry for 6/29/02
you stated that Epson Glossy Paper Photo Weight is designed for pigment
inks and the heavyweight paper is designed for dye inks?
Answer: I'm not sure. The two names are
so similar that they confuse me. If someone knows which is which for
sure please email me the information and I will post it to my diary.
Question # 17: are your favorite papers
still the Parrot Ultra Lustre and Epson Enhanced Matte?
Answer: Yes although when framed under
glass right after being printed images done on Parrot Ultra Luster create
a film on the inside of the glass. This is caused by fumes (gazes) released
from the ink-paper combination. These gazes get trapped in the frame
and are deposited on the inside of the glass, effectively creating a
veil over the image. Waiting for the print to dry may solve this issue
but I don't always have the luxury of time. So when time is short I
print on Epson Enhanced Matte.
|
| |
| |
| |
|
| |
| 12/03/2002 Matte black or photo black? |
| |
| I received many questions about which
black I use and whether I switch from one black to the other so I thought
a synopsis of my approach is in order.
I am currently using the photo black ink and I do not change from one
black to the other. I find this too costly and time consuming. The Photo
black works great for both glossy and matte papers, you just don't get
as deep a black on matte paper as you would with the matte black, but
still it looks great otherwise I wouldn't do it.
I you use both glossy and matte papers on a regular basis and want
the best blacks on both papers I recommend you get two printers and
equip one with matte black ink and the other with photo black ink. This
makes a lot more sense than switching back and forth between blacks
on a
single printer. The cost of wasted ink will, in the long run, pay for
the second printer, especially if it is a 7600. I am personally considering
this option seriously. |
| |
|
| |
| 12/02/2002 Optimal conditions for operating the 9600/7600 |
| |
Floor coverings
I have carpeting on the floor where the 9600 resides and it seems to
work well. I prefer carpet to bare floors for rooms in which I spend
a lot of time standing up as it is easier on my legs. The most important
thing is to keep the room dust free as dust can cause problems. This
is particularly true if you use enhanced matte paper (from Epson) as
this paper creates some "paper dust" which can clog the head
and cause banding. I routinely vacuum the inside of the printer, behind
the printer translucent door, to suck out any dust and other debris
that may have
accumulated. The currently-hyped "Shark" line of miniature
vacuum cleaners is perfect for this task!
Air Filtration
Jay Arthur, who helped me profile my printer, suggested I use a room-size
HEPA air filtration system. Although I have not done this yet I think
it is a worthwhile consideration as well as a good idea especially if
you also do scanning. Such a system will actually remove all the dust
in one room as it is supposed to run continously and thus filter the
air on a constant basis.
Humidity levels
Humidity is an important consideration and one that is often overlooked.
Epson recommend about a 45% humidity level. The humidity level in any
given room can be easily checked with an unexpensive hygrometer available
at most hardware stores (I got one at Ace Hardware for $5). If
the humidity is close to 45% you don't have to do anything. If it is
below that (as in Arizona) I recommend you add a humidifier to your
room. If it is above that (a rare case) you would have to consult with
an expert as I have no personal experience. One of my previous diary
entries
goes in depth about the different types of humidifier. In my experience,
most clogs are due to either a low humidity level (the air is too dry)
or debris caught in the print head. Controlling the humidity level and
vacuuming the inside of the printer on a regular basis will help prevent
most clogs.
Static electricity
Static can be a problem but I don't think printers are much affected
by it. It certainly is a major problem with film and scanning and the
way to take care of it is to use anti static brushes from Kinetronic.
Anti static floor coverings can also help but I personally haven't had
to go that far yet.
Profiling
Of course you will need to profile your printer for optimal results.
Uwe Steinmueller can do this for you at a minimal cost (editor: see
our
profiling service). If you seek professional and reliable results,
which I assume we all do, profiling your printer is a requirement.
|
| |
|
| |
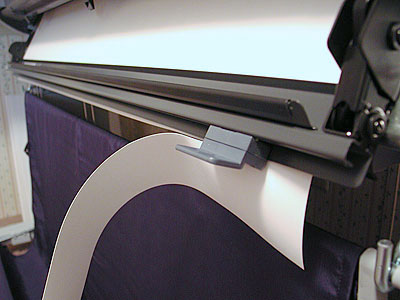
| 10/19/2002 Manual Paper Cutter |
| |
| Today I installed a manual paper cutter accessory
on the 9600 (Epson Part at $499 list price). As the name implies this
allows me to cut the paper manually. I found that I much prefer to cut
paper that way than to use the automatic cutter. The auto cut feature
wastes too much paper to my taste (or I have not
figured out how to use it so it won't waste paper).
At any rate cutting the paper myself allows me to minimize paper waste
by keeping the white margins around prints to a minimum.
The manual paper cutter is attached to the printer via two screws.
This is what it looks like from the right side.
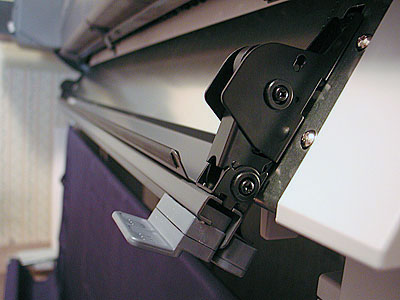
The cutting head is operated with the grey lever protruding in the
front. It cuts with a circular blade. The paper is caught in the vertical
slot on the cutting head and cut by the circular blade when the head
is pushed to the right.
The paper cutter is positioned above the paper while printing and lowered
to make a cut. This photograph shows the cutter in the raised position:
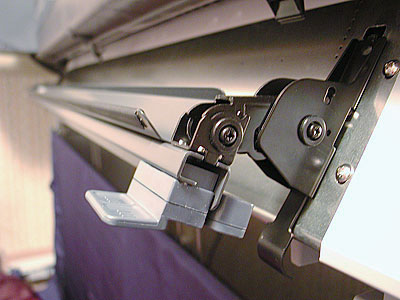
Here is a left side front view with the beginning of a cut.
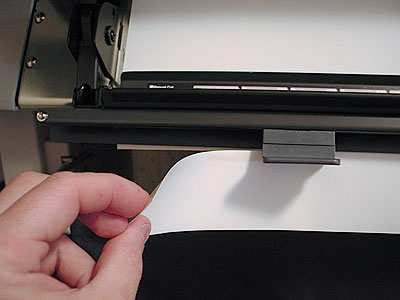
Here is the end of a cut. These are just tryout cuts using blank paper.
|
| |
| The manual paper cutter is able to cut heavier paper
stoc, such as the Somerset Velvet Photo-Enhanced, than the built in automatic
cutter.
|
| |
| 10/18/2002 |
| |
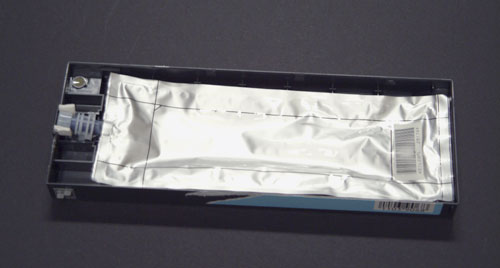
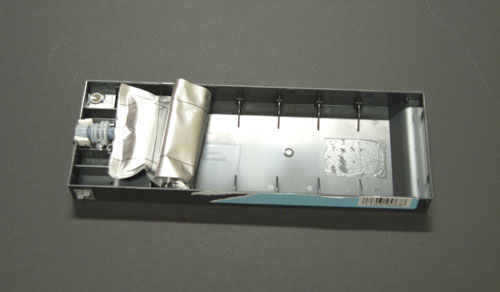
I finally ran one of the 220ml cartridges "dry".
I say "dry" because, as we all know, these are far from being
empty when they can no longer be used. I immediately opened the cartridge
and here is what the remaining ink looks like:
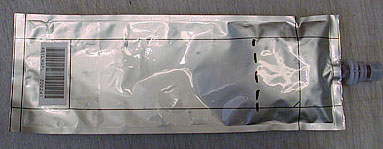
The dotted line shows the level of remaining ink. About 1/4th of the
ink is left in the cartridge. You can contrast this photograph with
my previous photo of an "empty" 110ml cartridge. I think the
110ml had more ink in it left but I didn't actually compare.
I am now running the new firmware so it will be interesting to see
if there is as much ink left in this cartridge the next time it runs
"dry." The new firmware only kicks in, as far as ink usage
is concerned, with cartridges inserted after the firmware upgrade was
completed.
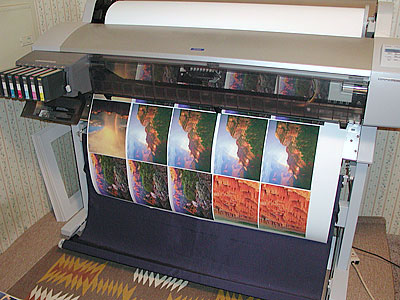
For those of you who are curious to know what I am printing on the
9600 here is another production photographs. These are 8x10's ganged
up in photoshop on a 44" wide file and printed all at once.
|
| |
| |
| |
| 9/27/2002 Firmware Update |
| |
The 9600 and 7600 firmware update is now available
for Macintosh as well as PC's. Epson posted the Macintosh version yesterday
I believe. Just follow the links in my previous diary entry to download
it.
Firware update completed.
I performed the firmware update on my 9600 today without any problems.
The update is done via the Epson Printer Utility which you must download
at the same time as the firware update. The Epson Printer Utility is
used for three functions: updating the firmware, aligning the printhead,
and power-claening the printhead when the regular cleaning cycle isn't
enough.
Here is a screen shot of the firmware update in process:
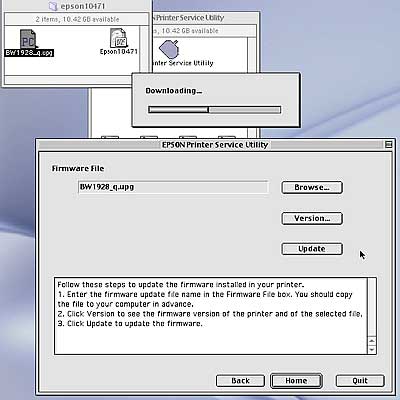
Apparently the Epson Printer Utility can be used with other Epson printers.
I have not tried it but if someone does please let me know what you
find.
Can one encounter problems if letting a printer sit idle for weeks?
I received this question today over email and since this situation
will sooner or later happen to any of us I thought it would be useful
to post my answer here.
There should be no problem letting a 7600 or 9600 sit idle for weeks
as long as you do two things:
First, run a printhead test twice a week or as soon as you return home
if you have been away. Just power up the printer and run the test using
a letter size sheet of paper, not a roll of paper. If the test is okay,
just shut off the printer. You are done. If it it is not okay run a
cleaning cycle and print a second test afterwards. Don't run a cleaning
cycle just for the sake of running it as it will waste ink unnecessarily.
Do the printhead test first to make sure cleaning is necessary.
Second, monitor the humidity level in your house and specifically in
the room in which the printer is installed. I recommend a 45% humidity
level or so. To do this you will need a hygrometer, an instrument used
to measure the ambient humidity level. If the humidity level is too
low you will have to buy a humidifier. These can be found easily and
the smaller models are not that expensive. The only thing to keep in
mind is that they need to be refilled every one or two days.
Dry conditions are the number one cause of printhead clogging. I know
this from personal experience since I live in Arizona where the weather
is very hot and dry in the summer. You want to have enough ambient humidity
to prevent the printheads from drying out. But, you don't want too much
humidity since it is unpleasant and will cause paper to wrinkle. Hence
the need to monitor humidity levels with a hygrometer so that you know
precisely what is going on.
If you are away for long periods of time, and if you live in dry conditions,
then a regular humidifier won't work since you won't be able to refill
it. Of course, you can ask someone -a friend or neighbor- to do this
for you but it is not always possible. An alternate solution, so that
constant humidity is added to your home, is to have a mister, a device
which sprays a fine mist of water- professionally installed in the air
conditioning vents of you home or office and have the mister connected
to a hygrometer. The cost of such a system is about $600 (if you find
a better price let me know) and this system is self-sufficient. You
set the hygrometer to the humidity level you want and when humidity
falls below this level the hygrometer triggers the mister which sends
water into the air vents until the humidity level reaches the desired
percentage. In very dry conditions, when owning expensive printers,
this system becomes a necessity rather than a luxury.
|
| |
| 9/19/2002 UPS |
| |
Uninteruptible Power
Supply (UPS)
Today I installed a UPS in my system. I work with a fairly complex
system consisting of 3 Macintosh computers and displays -one Power Mac
with a 17" monitor, one G4 with a Cinema Display and one iMac-
a total of 5 printers including the 9600, a CD writing drive, two scanners
-Imacon and flatbed, a phone and a stereo system (more about this last
item later). All of these are now powered through the UPS. The UPS I
selected is able to support up to 950 W, or 1400 VA, which is enough
for this system especially since I very rarely have everything powered-up
at the same time.
A UPS is basically a battery-powered back-up power supply. During normal
operation it uses current from a wall outlet. If the power goes off
it instantaneously switches to its battery supply so that your system
can continue to work without any interuption. In fact to test the UPS
I powered everything up and then unplugged the UPS from the wall outlet.
Nothing stopped working. The battery kicked in and things continued
to run as usual.
The time that your system can be powered by a UPS battery will depend
on the load placed on the UPS. Typically, the more items powered through
the UPS the shorter the battery backup will supply current to these
items. For example, with just one computer and printer on, my UPS should
be able to provide battery power for about 30 to 40 minutes. With everything
on the battery probably wouldn't be able to provide power for more than
a few minutes. This is no problem as most of the power interuptions
I have experienced so far last only a second. Typically, the power goes
off and then comes right back up. However, it is enough to ruin a print
or a scan, waste an unsaved word processing document, or interupt a
phone conversation and force you to call your party back. With the UPS
you can say goodbye to power interuptions. And if the power goes off
for an extended period of time I can always turn off some of the computers
in my system so that only those that are working on critical applications
-printing or scanning in my case- stay on.
Here is a view of the UPS front panel:
The green leds on the left side show the charge level of the battery.
In this instance the leds show that the UPS is fully charged. The green
leds on the right side show the load placed upon the UPS. In this case
the load is minimal since I only had the G4 and Cinema display on. Each
green led represents a 20% charge or a 20% load. The green led at the
top indicates that the UPS is running in normal mode. If it was running
in battery mode an orange light would come off next to the battery symbol
below it.
This particular UPS (Belkin F6C100-4) retails for about $380 including
shipping. However, if your system is smaller you may not need a 950
W UPS and can therefore purchase a smaller, and thus less expensive,
UPS.
A UPS is heavy, about 50 lbs in this case, but once you place it in
an unconspicuous place, you probably won't have to move it again so
that is not really a problem. Just make sure that it has room around
it since it needs to be cooled on a constant basis. Cooling is achieved
via a fan, very similar to a computer fan, and this fan creates a constant
noise (about 40 decibels). It is only slighly louder than the noise
made by my G4. The only difference is that you have to unplug the UPS
from the wall outlet to cause the fan to shut down.
I mentioned that my system includes stereo components (all Rega) and
that those are also connected to the UPS. Because the UPS filters the
current going through it and delivers a highly stable current the stereo
sound has been unmistakenly improved. This is a great side benefit.
Of course, a UPS is overkill in this respect as a good quality line
filter would be sufficient. However, there is no doubt that the quality
of the electrical current going into a stereo system has a direct effect
upon the quality of the sound produced by this system.
A UPS may or may not be in your future. You may live in an area where
you have a highly dependable electrical supply. In my case this is not
the case. Plus, in the summer there are a lot of storms in the Southwest
and each storm brings with it its load of power interuptions or shortages.
Now, the storms can come. I am ready.
|
| |
| |
| 9/18/2002 |
| |
| Firmware update
The firmware update for the 7600 and 9600 is available on the Epson
website. Right now only the Windows version has been posted but the
Macintosh version should be available soon. Simply follow these links
to download this update:
7600 Ultrachrome firmware update:
http://support.epson.com/hardware/printer/inkjet/pro76u/index.html
9600 Ultrachrome firmware update:
http://support.epson.com/hardware/printer/inkjet/pro96u/index.html
Epson Technical Support says that the firmware update will not become
activated until the next time you replace a cartridge. This means that
cartridges that are installed when the firmware is updated won't see
any changes regarding how much ink is used. The changes in ink use will
take place only with new cartridges installed after the firmware is
updated.
|
| |
| Here is a user report on the 9600 from Ian Adams of
Cuyahoga Falls, Ohio. Ian's experience provides valuable insights on the
9600:
"I received my Epson 9600 Ultrachrome printer 10 days ago.
When I assembled the printer and began charging the ink lines, the printer
stopped after five minutes, with all the lights flashing, and a message
"Fatal Error...contact Epson Service Center". Turns out that
although I had removed the retaining screw that locks down the print
head, I had neglected to remove the aluminum print head retaining bracket.
Fortunately no damage was done and after restarting the printer
the ink charging process completed itself without incident. I called
Epson and suggested that they highlight this matter in the user manual.
So far, I have made 20+ prints in the 20x24-inch and 24x30-inch sizes,
using Double-Weight Matte and my favorite paper, Premium Luster. Most
of these prints have been from scans of 6x8cm Velvia transparencies
scanned at 240 dpi on my Nikon 8000 ED film scanner, and adjusted in
Photoshop 7.0. The prints are superb, and print quite quickly...about
12 minutes for a 20x24 and 25 minutes for a 24x30.
I like to make small test prints on 8.5x11-inch sheets before using
the roll paper for the larger print sizes, and have found that following
Epson's instructions for loading single sheets does not work well with
8.5x11-inch paper, which tends to get sucked into the printer and then
ejected back up, often contacting the bottom of the roll paper cover
causing the paper sheet to buckle and misalign. Instead, I simply open
and close the paper release lever, then lower an 8.5x11-inch sheet of
paper into the printer until it meets resistance, line the paper up
and press the Pause button. This works well and has eliminated the problem.
The Epson folks tell me that 8.5x11 is really too small to be used in
the 9600, but my method seems to work OK and allows me to save some
paper.
My preliminary tests show virtually no difference in quality between
720 dpi and 1440 dpi, so I plan to use 720 dpi for the most part and
save on ink and printing time.
After the initial loss of ink required to charge the printhead lines,
I've been quite impressed by the low ink usage of the 9600, as reflected
in the detailed Printer Status and Job History Reports that I print
out from the Selectype menus on the printer control panel. I use about
1.5-2.0 ml of ink for an 8.5x11 test print, 4.5-6.0ml for a 20x24 print,
and 7.0-9.0ml for a 24x30 print. Light Cyan, Light Magenta and Yellow
inks have been used the most, followed by Light Black, and a smaller
volume of Photo Black, Magenta, and Cyan inks.
Like you, I have purchased a full set of 220ml replacement cartridges,
and do not plan to buy any 110ml cartridges in the future."
|
| |
| |
| 9/17/2002 |
| |
All seven 220ml cartridges have
been installed
First, I now have all seven 220ml ink cartridges installed in the 9600
and here is what it looks like. The ink cartridge door no longer closes,
which is unfortunate. It is easy to take it out and I will probably
do so next as I do not plan to install 110ml cartridges again.
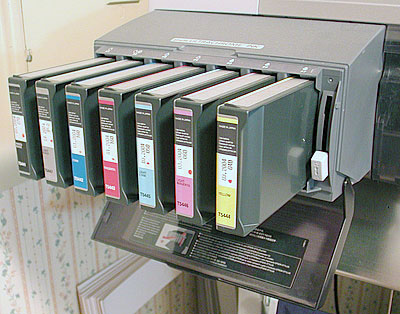
Wasted ink
There has been reports that a significant amount of ink is left in a
220ml cart when it shows "empty" on the 9600 control panel
(solid red light on). I cannot personally agree or disagree with these
reports since I have not yet run one of my 220ml cartridges dry, so
to speak. As soon as this happens I will report on how much ink was
left in it.
Firmware update
There is also rumours that Epson will post a 7600/9600 firmware update
on the Epson website, in the driver download area. This firmware update
is supposed to reduce the amount of ink left in "empty" Ultrachrome
ink cartridges. Again, I have not seen this firmware personally but
as soon as it materializes I will report on its availability.
Uninterruptible Power Supply (UPS)
I ordered an Uninteruptible Power Supply (APS) to provide power to my
entire computer system in case of a power interuption. This decision
was motivated by A. a recent increase in the number of power interuptions
where I live and B. the uneeded stress which comes from worrying that
the power will go off in the middle of printing a 32x40 on the 9600.
Usually the power interuptions are no more than the lights going off
and then back on but this is enough to turn my whole system off and
ruin a print. I should be receiving the APS this week and again will
report on how well it works when I have it installed.
|
| |
| 9/12/2002 Dry mounting & Profiling |
| |
Dry mounting
I received a lot of feedback on my dry mounting diary entry and this
has prompted me to go over a couple of details today.
I received questions about the appearance of the print borders after
the print has been dry mounted using cold mount adhesive. The answer
is that the appearance of the print borders is not all that important
because these borders will be covered by the matting. Of course, you
want the borders to be as neat and professional looking at possible
but if they are not 100% straight this is nothing to worry about. The
mounting technique I described is geared towards matting the print.
Traditionally a mat covers about 1/4" of the photograph on all
4 sides. Because the photograph is taped to the mat from the back I
normally leave a small white border around the photograph so that there
is enough paper under the mat to tape the photograph.
If you want to mount your photographs but do not plan to mat them then
a different approach should be used. In this case you need to trim your
photograph so that there is no white border at all. You also need to
make sure that the trimmed edges are perfectly square and neat. The
way to proceed after the print is mounted onto the adhesive and trimmed
is to prepare a sheet of mounting material -matboard for example- cut
to the exact size you want. Usually this means a standard frame size
such as 8x10, 11x14, 16x20, etc.
Then you need to measure your photograph precisely and deduct these
measurements from the size of your mat board. For example, if your photograph
is 8x10 and the mat board piece 11x14, this means you have 3 inches
available in the height and 4 inches available in the width. Divide
this extra space in two and you have the width of the borders which
will surround the photograph: 1.5" borders on the height sides
and 2" borders on the width sides. Carefully measure these borders
on the mat board and mark the location of the photograph lightly in
pencil. Peal off the adhesive backing and lay the photograph in the
space you just traced in pencil. Roll it with the rubber brayer and
that's it. You just need to erase the pencil marks and you are done.
Usually a small pencil mark in each corner is all you need since erasing
long lines after the photograph is mounted can be difficult if not impossible.
If you mount a lot of photographs with this method then this shortcut
will be helpful: make a ruler out of a piece of mat board the height
of the height borders and slightly longer than the width of your mat
board. Then mark on this ruler the exact location of the width borders.
After that you can simply lay this "ruler" along the top of
your mat board piece and align the photograph according to the border
markings you inscribed on it. This will work great if you have to mount
many photographs of the same size. If you mount different size photographs
you can either make "rulers" for each size or inscribe different
measurements on the same ruler.
Profiling
I am currently in the process of profiling my Imacon Flextight 3 scanner
with the help of Jay Arthur. Jay is preparing a series of transparency
targets which I will scan. Then Jay will read these scans with his software
and prepare custom profiles for my scanner. I will report on the progress
of this process at it unfolds. I expect to see a significant increase
in scan quality once profiling is completed.
|
| |
| |
| 8/29/2002 Dry mounting continued |
| |
Daige
offers reasonably priced mounting presses and equipment. I have not
tested their products so cannot comment on their performance. However,
it is a resource which provides a nice alternative to Coda's presses.
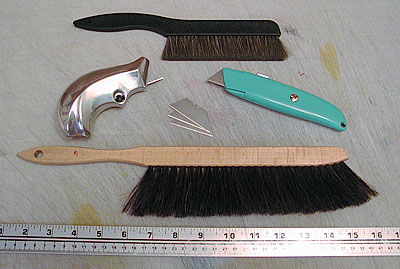
Mounting tools
A few indispensable dry mounting tools;
From top to bottom and left to right we have first, an anti-static
cleaning brush from Kinetics. This brush will clean the print while
removing anti-static electricity. Static tends to attract more dust
to the print so this is important. Make sure you clean both the front
and the back of the print. When dry mounting the back is actually more
important since this is where dust will be trapped in the adhesive and
create bumps on the print surface.
Second we have two different X-Acto knives, the fancy chrome model
being actually made by X-Acto and contoured to follow the shape of your
hand. On the right we have a more common model which I actually prefer.
Below that are visible some replacement blades. Very important. Make
sure to always have a sharp blade so change the blade often. A dull
blade will scrape the adhesive under the print rather than cut it neatly
and cause a lot of problems. Make sure you have plenty of blades available.
In quantity these cost less than 5 cents each so nothing to worry about.
Third we have a more traditional cleaning brush which I use to clean
the table and the prints prior to framing. Again, you will need a cleaning
brush, no way around that. Just make sure you get one which doesn't
loose its hairs or these will become a permanent part of your framed
artwork!
Finally, a metal ruler is a must. This one is graduated in inches and
centimeters, a nice feature for someone like me who fluctuates between
the two systems. I use this ruler as a guiding edge when I trim prints
with the X-Acto knife. When I cut the adhesive around the print I usually
do this hand held, without a ruler because using a ruler on a sheet
of adhesive isn't practical as the ruler sticks to the adhesive.
|
| |
| |
| 8/28/2002 Dry Mounting |
| |
| The 9600 continues to run like a charm and my busy schedule
has been putting it through its paces. I am printing more and more of
my work on the 9600 now and also printing more and more larger pieces.
I continue to favor Parrot Ultra Luster paper as my favorite semi-glossy
paper. For matte Paper I favor Epson Enhanced matte paper, a sample of
which came with the 9600. For both I use profiles made by Uwe Steinmueller
and Jay Arthur.
Dry mounting:
Large prints need to be dry mounted. Otherwise it is very difficult
to get them to lay flat except if they have framed directly under glass
with a sheet of foam core behind them. However, while this insures flatness,
the print may stick to the glass and be damaged.
The best is thus to dry mount the print. But with a 32x40 print this
can be difficult. I normally dry mount my prints using Coda's dry mounting
adhesive products (I don't have their web site address but their phone
number is 201-825-7400). Coda manufactures cold adhesive mounting materials,
meaning that no heat is necessary to make the adhesive sticky. Instead,
you just peel off a protective sheet to expose a layer of double-sided
adhesive material and adhere the print to this material on one side.
Then you adhere this sandwich (print plus adhesive) onto a mounting
board such as matboard or other rigid surface.
I personally use Coda's single release white adhesive and purchase
31"x100 feet rolls. This works well for print sizes up to 16x20
since this size can be dry mounted by hand using a rubber brayer (a
rubber-coated print roller).
| Here is the label from an unopened box
of Coda adhesive so that you have all the necessary information
should you want to place an order. |
| Here is a roll of double sided white
Coda adhesive material. The adhesive has a white color, instead
of being transparent. Some photographic papers are partly transparent,
that is they let in some light through the back, and the white
surface of the adhesive helps maintain the brilliance of the print
by making the back side of the print perfectly white. |
Rubber brayers used for pressing photographs
onto the double sided adhesive material. These rollers have
a soft surface, that is the beige colored surface is deformable
and thus less prone to damaging the print surface. I like them
better than hard-surface rollers. The box behind the rollers
shows the model,size, etc. This is the box for the larger of
the two rollers. I actually use both size depending on what
size print I am mounting.
Notice the tabletop under the rollers. This
is my cutting table and it consists of a 1/2inch thick white
plastic layer normally used on cutting tables in restaurant
kitchens. I actually purchased it from a restaurant equipment
company: Central Restaurant Supplies. My current table is 36"
wide by 5 feet long and I do all my mounting and cutting on
it. Because this surface is made to cut on it does not damage
cutting blades and can take repetitive cutting without being
damaged. As you dry mount photographs on a roll of adhesive
you will need to trim the adhesive around the photograph and
then trim the photograph itself. All this cutting can be done
right on this table without any need to move the print (moving
a print in the process of being dry mounted is not recommended).
|
However, for sizes larger than 16x20 a mounting press needs to be used,
especially with prints done on photographic quality paper. These papers
are harder to dry mount due to their plastic backing. When dry mounting
a print with a roller onto an adhesive material the paper needs to stretch
a little bit in order for the print to lay flat on the adhesive sheet.
If this stretching does not occur bubbles will form between the print
and the sheet of adhesive. These bubbles occur primarily with papers
that have a plastic backing. These papers, which usually include the
gloss and luster photo-like papers, do not stretch at all when they
are mounted and thus air trapped under the paper has no place to go.
The air thus stays there and forms a bubble. Once this happens there
is nothing to do to remove it and the print is ruined.
Therefore, if you want to dry mount photo-quality papers with a plastic
backing, you need to use a dry mounting press. Coda manufactures such
a press, in width up to 44". These are basically roll-presses which
feed the print together with the adhesive between two heavy duty rollers.
These presses can be hand operated via a crank or motor operated with
the speed of the motor adjustable and the motor operated via a foot
pedal. I recommend the motorized version since you will need to have
both of your hands free to feed in the print.
Such presses are both heavy and expensive. The 44" motorized press
weights 300lb and costs in excess of $3000. The 34" press is more
manageable at 100lb and approximately $2500 with shipping. I personally
recommend this model as it is more manageable weight and cost wise.
Of course, you will have to consider where to install this machine.
If you don't want to use a mounting press (I won't blame you) and still
need to dry mount your prints, then I would recommend printing on Epson
Enhanced matte and dry mounting the print on Coda single release white
adhesive using a rubber roller. Enhanced matte does not create bubbles
when it is dry mounted in this fashion. Of course some practice will
be necessary and you may ruin a couple of prints in the process.
You will also need the help of a second person to hold the print while
you roll it down. You will also have to work on a perfectly flat and
clean surface. Brush the back of the print and the surface on which
you are working with a framing brush before you start.
Also, make sure you have plenty of room to work on and that you have
all the necessary tools and supplies handy. Once you start, there is
no turning back and once the print is on the adhesive it is there for
good!
Dry mounting is not an easy process so email me at alain@beautiful-landscape.com
if you have any questions.
Good luck to all. |
| |
| |
| 8/19/2002 |
| |
|
Regarding the large print of the Grand canyon with the Colorado River:
The original is a 4"x5" transparency created on a Linhoff
4x5 with a 150mm Rodenstock lens. The transparency was scanned at 2000dpi
on my Imacon Flesxtight 3 scanner. No upresing was done as I scanned
the file so as to create a 32 by 40" file at 300 dpi right off
the scanner. The original
scan was done in 16bits and is about 800 megabytes. I have to store
it on a DVD since it won't fit on a CD Rom disc.
The file was printed at 1440 dpi and the final print shows no grain
and no dots. You can stand 2 inches away and it looks perfect in every
way.
|
| |
| |
| 8/4/2002 |
| |
| Today I tested a new profile made by
Uwe Steinmueller with the Eye One profiling system but using a new target
developped by Bill Atkinson. This new targets differs from the Eye One
profile in the following way that ist uses many more patches.
The prints obtained with the profile made from this target are, in
my judgment, better than the same photographs printed with the Eye One
Profile made with the regular Eye One target. In fact these prints are
very close to prints of the same photograph made with a Spectroscan/Spectrolino
system using a Spectroscan profile. So far the Spectroscan profiles,
made for me by Jay Arthur, have proven to be the ones I like best. However,
as I learned today, the Eye One profile made with Bill Atkinsons new
target are very close. This is good news as the Eye One profiling system
is far more affordable than the SpectroScan profiling system (unfortunately
there is currently no official support from GretagMacbeth for other
targets).
Editor note: We will not answer emails
which discuss these new targets. But our news
group is the right place for such a discussion and we are open to
share the details (with permission of Bill Atkinson).
The regular Eye One profiles create prints which exhibit significantly
more contrast (mainly darker and/or less open shadows) and slightly
less saturation than prints created with a spectroscan profile (very
open and beautiful shadows). The new profiles based on Bill Atkinsons
targets create prints which have just slightly more contrast (much more
open shadows) than prints made with a Spectroscan profile. The color
saturation is still slightly lower than prints made with the Spectroscan
profiles. Of course these remarks apply to an image which has been perfectly
color corrected and whose contrast has been adjusted to my taste prior
to printing. My remarks are also based on comparing 3 prints made from
the exact same file and on the exact same paper all with the exact same
settings except for the profile used. |
| |
| |
| 8/2/2002 |
| |
| Today I created the largest print so far on the 9600:
a 32x40 inches photograph on a 44" wide roll. The result is superb.
Prior to printing at this size I did three test prints, 8x10's on letter
size paper. The profile used this time was a Spectroscan/Profile Maker
4 Pro profile made by Jay Arthur of Castroville, Texas.
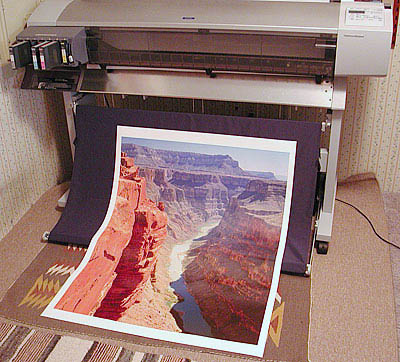
|
| |
| |
| 8/1/2002 How to tile a photograph in Photoshop |
| |
| I had several requests for explanations on how to tile
a photograph in Photoshop so that it can be printed in multiples from
a single file. I thought I should post this process so that everyone can
benefit from it.
Tiling is very simple. First, open the file you want to print in Photoshop.
Then, use the Canvas Size command to enlarge the width of the canvas
to the width of your paper, either 24" or 44" or whatever
size you are using. Then, enlarge the height of the canvas, with the
same command, to a multiple of the number of prints you want to tile.
For example, with an 8x10 print tiled 3 times, as in the photo in my
diary, you would create a 24 inch wide by 20 inch tall canvas which
will hold 6 copies of the image you want to print. My image was actually
smaller than 8x10 which allowed me to leave a gap between each print
as well as leave a white border.
Then, select the image with the selection tool, copy it and paste it
as many times as needed (5 times in my case). Then move it to the exact
place you want it on the canvas. You will, at this point, have 6 layers
in your file. After each photo is in the right place flatten the file,
save it, and print it.
That's all there is to it.
When I review ImagePrint 5.0 you will see that there is are very sophisticated
tiling capabilities built into the program, capabilities which makes
tiling a lot easier and faster.
|
| |
| |
| |
| 7/31/2002 |
| |
| Today I started doing production printing on the 9600.
Using the regular Epson driver and the custom
profiles from the Eye-One I created files in Photoshop 7 on which
I tiled the same print many times over to print on the full 24 or 44"
roll width. Here is a photo of what this tiling looks like. A 24"
roll was used in this case.
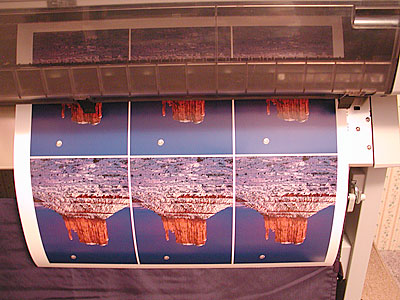
This tiling process is much easier if a RIP is used. I will be reviewing
Image Print 5.0 for Macintosh later on and will be able to report on
how tiling works with Image Print.
Finally, just for your information, here is what a 220ml cartridge
looks like in the printer. The ink cartridge receptacle door no longer
closes since a 220ml cartridge is twice the length of the 110ml cartridges.
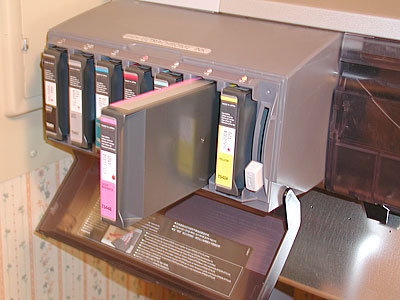
|
| |
|
| |
| |
| 7/27/2002 The waste is real! |
| |
| Regarding the half full ink cartridge being:"empty"
there has been posts remarking that opening the printer door, or lifting
the ink cartridges lock lever, both while the inks were originally being
loaded in a new printer, would result in cartridges being used only partly
because the printer got lost in its ink count.
However, in my case, I can attest with 100% certainty that I did not
open the printer door or move the cartridges lock lever during initial
ink loading. I read the notices located on the printer and in the manual
asking not to do this prior to loading the inks and followed all the
directions to the letter.
The 50% waste in ink, my guesstimate as to exactly how much ink is
left in the "emtpty" cartridge, is therefore due solely to
how the 9600 calculates how much ink is left in the cartridge, and not
to any wrong doings from my part.
|
| |
| 7/26/2002 How empty is empty? |
| |
| Today I powered the 9600 again after a two week absence.
I did a printhead test right away as this is my regular approach. A couple
of nozzels were clogged, nothing serious. One of the ink cartridges was
low on ink -the light magenta- and when I tried to run a cleaning cycle
from the software driver the software wouldn't let me do it because of
the low ink level in the cartridge. I therefore attempted to run the cleaning
cycle from the printer itself and was able to do so without problem. Clearly,
the printer cleaning command, on the control panel, bypasses the driver
software.
As I was printing the cartridge low-ink light flashed and after about
25 8x10's is finally lit up permanently and I had to change the cartridge.
This occured during printing but no harm was done to the print. After
inserting a new 220ml cartridge printing started again right away and
no lines were visible in the finished print.
Out of curiosity I opened the old cartridge to see if ink was left
in it. This is an easy process which I completed with a screwdriver.
I was careful not to use a sharp tool to prevent puncturing the ink
bladder.
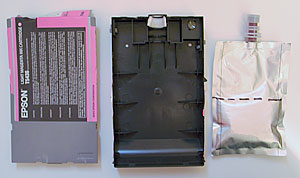
To my surprise the silver-colored bladder which holds the ink was half-full.
I have no idea how much ink was originally in the cartridge but from
pressing on the bladder it is clear that it could not contain much more
than twice what was left in it when I opened the cartridge.
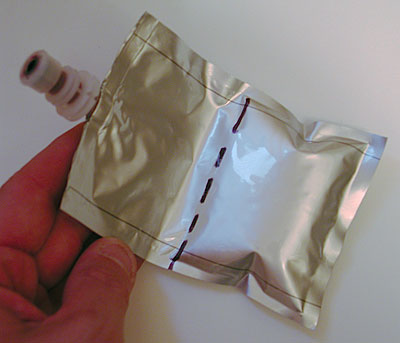
The dotted line on the ink bladder shows the level of leftover ink.
I
drew this line myself.
I wonder how much ink will be left in an "empty" 220ml cartridge?
Hopefully no more than in a 110ml cartridge... Clearly, ink has to be
left in the cartridge prior to replacing it to prevent the printer from
sucking air into the ink lines. This is why cartridges are never fully
empty when they are replaced. However, in this case the amount of leftover
ink is overkill. My guess is that the Epson engineers played it safe
because these are new printers and they did not want to run into problems.
However, now that we know more about these printers it would be nice
to get a firmware upgrade so that we do not have to waste ink unecessarily.
|
| |
| Part 2 of the Diary |
| Part 1 of the Diary |
| |
| |
| Alain Briot |
| |
| |
|
|