What is meant by the terms upsizing or interpolation?
I am sure there is a formal definition, however in simple words, upsizing
or interpolation is the process of taking an image from one size say
12” x 18” at 300 dpi to 17.5” x 26” at 300
dpi. It is also possible to take a 12” x 18” inch image
at 300 dpi and only change the dpi to 205 which will give you a 17.5” x
26”. However depending on your image and your printer, you may
suffer considerable detail loss on the final print. Many stock agencies
or printing shops will ask for work to be submitted to them at 300
dpi. There are many tools on the market to address upsizing. Some of
these that come to mind are:
- Genuine Fractals--(One of the oldest tools
on the market)
- S-Spline--(Now sold under the name of Photo Zoom
Pro)
- Qimage--(An excellent image tool with up to 10 algorithms for
interpolation)
- Adobe CS/CS2--(Now offers several options, Bicubic
being the most common)
- DOP upsizing--(excellent tool and offered
for free on this website)
I have used all of these at one time and
have consistently
found
that for the most part, there will be some detail loss
as the image is
upsized.
This effect will be much more visible in parts of your
image that contain fine detail. Many times upsizing will give
an image a
blotchy or blurred
look, especially in areas of tonal transitions, and as
this is enlarged, the effect will become more pronounced creating
what
I call the “watercolor
effect”.
Upsizing works by taking an image at a
certain dpi, then running an algorithm that will “guess” as
to what the nearby pixels should look like once you have
increased their size. This is because as you increase
the image’s size, holes are formed and new pixels
have to be created to fill in those holes. How the guessing
works is very important and
each upsizing software tool has it’s own unique
solution for this. Terms like Spline, Bucubic, Nearest
Neighbor all apply to mathematical
methods of guessing as to what the new pixels should
look like. This process tends to create a softer final
image than the original so it’s
very important to have some form of sharpening to work
with, either during the upsizing or after or both. There
are as many opinions on upsizing as there are photographers.
Some photographers feel their 6mp camera can produce
excellent 20” x
30” prints with no need for any upsizing assistance.
Yet others will state that “you can’t get
to a 20”x 30” unless
you are using a 39mp back”. It’s all dependent
on your style, and what you want that final output to
look like. What I can state, is
that most images will require some upsizing to get to
a 20” x 30” output
and having a good software tool to work with is extremely
important.
This is why I was so interested in Sizefixer
when it was announced in 2005. I am always looking for
new tools
to
assist in upsizing.
I have
been surprised over the years that more development work
has not occurred in this area. Sizefixer was created
by the same
company that created
Focus Fixer: Fixerlabs. Their main website is www.fixerlabs.com.
Here is a quick description, by the numbers on Sizefixer.
1. There are two versions, Sizefixer SLR and Sizefixer XL.
2. Sizefixer XL is Mac only, Sizefixer SLR is Mac and
Win.
3. The XL version allows for upsizing to sizes
beyond 23” x
33.”
4. The SLR version allows for upsizing up to
23” x
33.”
5. Currently it is a stand alone program with no
plug-in support.
6. It will work with both 8 or 16 bit images.
7. It uses a new proprietary algorithm called “super resolution” which
is designed to upsize an image up to 16x of the
original without loss of sharpness.
8. It has an excellent user interface which allows you
upsize an image or a crop from an image.
Working with
Sizefixer
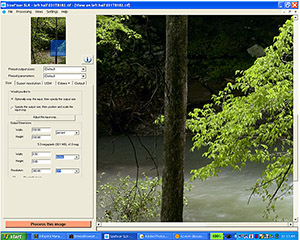
The main interface of Sizefixer looks
like this.
NOTE: this review is based on the Windows version of Sizefixer
SLR.
The Mac version
will operate basically
the same, however the interface will look different. As
you can tell, the overall interface is not busy, and you only have
a few options to consider. The main interface
screen
offers
a large
preview window
on the right
2/3’s of the screen and on the left column, you
will find a menu bar. Across the top left you will see “File,
Processing, Views, Settings and Help”.
In the middle you will see a series of tabs labeled “Size,
Super Resolution, USM, Edges +, and Output”. Towards
the bottom left you will see a bar titled “Process
this image.” To start working on an image, go to
file?open, which opens a standard browsing dialog. Sizefixer’s
interface makes it easy to select an entire image for
upsizing or to crop a portion
of an image and
then upsize
the crop. For the purpose of this review I will be working
with upsizing an entire image.

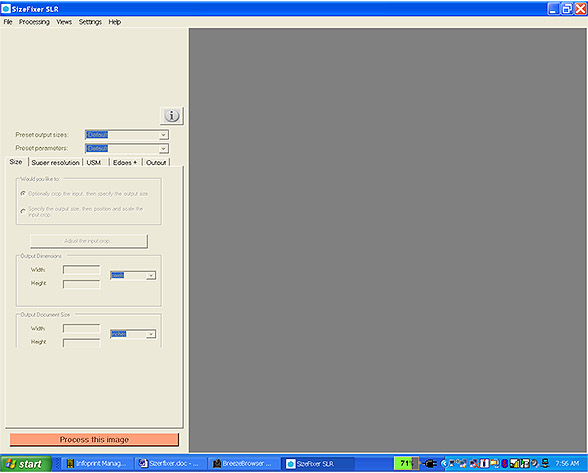
Once you have selected an image that you
wish to work on, the view will change. You will now see that Sizefixer
has
opened
the image
into the
large preview
screen on the right and on the left side you now
see the current size settings for your
image. The view is a 100% view and not a print size
view. Fixerlabs is working on adding the print size view as
an option.
NOTE:
When Sizefixer loads a new
image, the program defaults to 300 dpi and gives
the dimensions based on 300 dpi even if your image has
a different dpi.
In my example, Sizefixer has loaded the image
into the preview as a 300 dpi image with dimensions 6.50” x
9.0”.
Immediately to the right you can tab between inches
and centimeters. Below the width and height
settings is the resolution
box. It will start out at 300 dpi, however you
can change this depending on how you want to work with the tool.
NOTE:,
depending
on your input image,
you will
want to experiment with various dpi outputs.
I have found many times I prefer output from Sizefixer at less than
300 dpi.
It
should also be mentioned
that
Photoshop will refer to an image in units of
ppi
(pixels per inch) instead of dpi (dots per inch). For example,
if you upsize
an 8x10 inch 300 dpi
image up
to a 16 x 20 inch 300 dpi in Sizefixer, when
you open the image in Photoshop, it will be a 16 x 20 inch image at
300
ppi.
On the left menu column you will see two small radio
buttons:
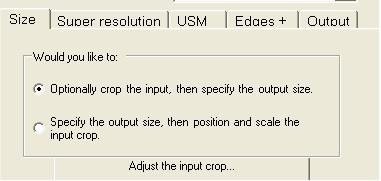
You can choose either of these options,
I prefer the top one. If this option is checked when you
change the dimension
for
width, the corresponding
proportion
for the height will be selected. If you choose
the lower option, then you have to enter amounts
for
both
the width
and height.
Here
are the
steps I follow
to upsize an image with Sizefixer.
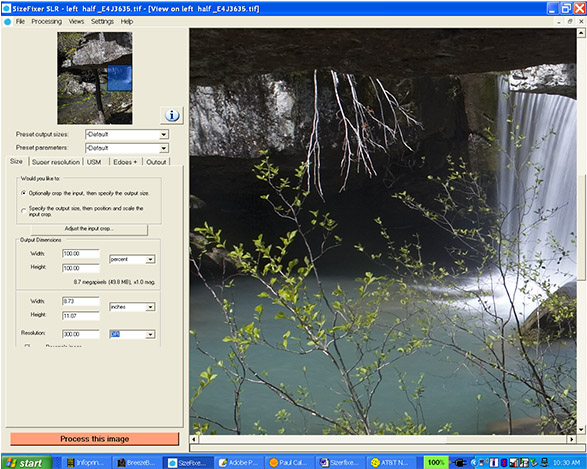
1. My image example is one half of a 1DSMKII
tif (I will give the reason for this later).
It has
opened into Sizefixer
with
a default
view of
8.7” x
11” at 300 dpi.
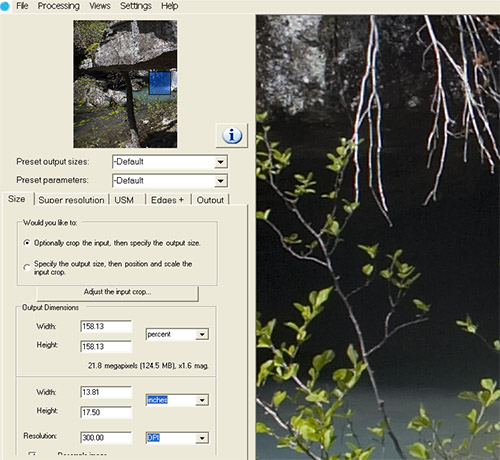
2. Now I have changed my output height
to 17.5” and my output width changed
automatically to 13.81”. I entered
the 17.5” and
when I hit enter Sizerfixer changed the
output width to keep the proportions
of the
image intact.
This is because I have the top radio
button selected.
NOTE: when you made
the change
in the size, the image preview on the
right also changes and
shows the
new image at the larger size. You can
also view the output dimensions
box and see the increased percentage
from 100%. In this case my new image
is
158% of
the original. This is a very important
check, for as you start to approach
200%, I feel that you will start reaching the
point
where final image quality
will
start to suffer due to softer output.
If I wanted to, I could just hit the “process
this image” button
at the bottom of the screen and Sizefixer
would upsize the image with quality approximately
the same as Photoshop’s Bicubic
algorithm. But that’s
not what you want to do, as the next
step is where the magic starts to show.
Move to the “Super Resolution:
tab. You will see a box that says, “Use
Super Resolution” and when checked
you will get a screen that looks like
this:
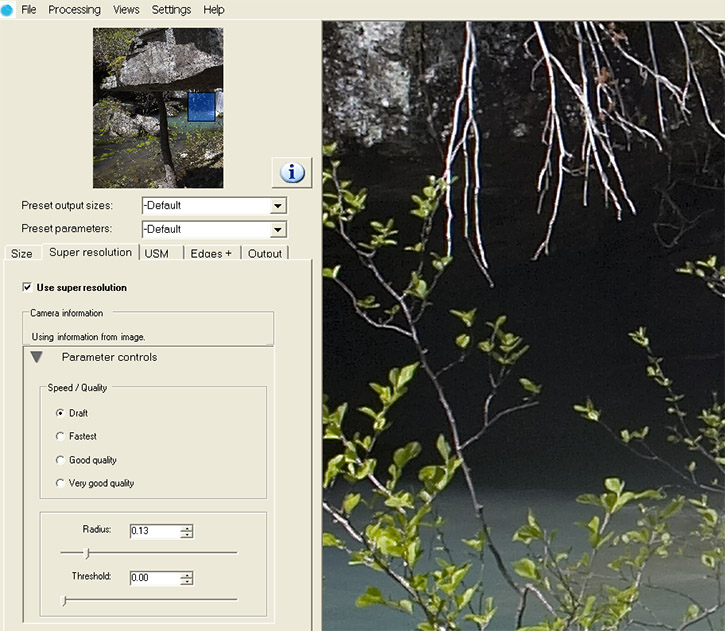
The super resolution setting is
what makes Sizefixer unique. On their site
there is
mention that they
are using technology
that
allows
a 1:1 pixel
view during
the upsizing process that was until
recently only available to NASA. I can state that
it is different
than anything
I have worked
with.
NOTE: if your
image doesn’t
contain exif information that shows
the aperture and focal length setting,
then you will get a “view” error
on the super resolution tab. It is
also important that the Camera Make
and Model be present, however if
you don’t
have these loaded, a drop down box
will appear and Sizefixer will allow
you to select them. If you shoot
any of your work
with non Canon glass,
you will need
to pick up an exif editing software
package if you wish to use the super
resolution setting on these images
At
the Super resolution box, you have
4 output quality settings:
- Draft
- Fastest
- Good Quality
- Very Good Quality
Below these you will see settings
for Radius and Threshold. These
two settings
control
the amount
of sharpening
that is processed
during the super resolution
stage. I have found that if the
threshold is any higher than 0 and you have
any noise in
the image,
the super
resolution process will
accentuate
that noise
to
unacceptable levels. On the radius,
I will adjust it depending on my
image. NOTE: as you adjust the
radius and threshold, Sizefixer will repaint
the preview
based
on these settings. It will take
some time to
process especially on the Very
Good Quality setting. The
preview window will
also repaint
if you
switch between
the
4 output quality settings.
I recommend
starting with the Very Good Quality setting but make sure
you preview
the image.
Sizefixer’s super resolution
setting will start to halo rather
quickly depending on the radius
you have set. This is especially
true with light
halos.
Once you have found the settings
that you feel work best there
are three
other tabs
to consider.
1. USM
I believe this is a standard
USM process and I have not
used it,
primarily because
I feel
that
enough
sharpening is provided
in
the Super Resolution
setting. Also
it appears that this USM
works across the entire image equally
so solid
areas like
sky or water
will get sharpened
along
with the rest
of the
image. If you
do choose to try it, the
preview window will show the changes.
2. Edges +
This tool is designed to enhance edges even more than the
super resolution setting. I have tried it a couple of times leaving
it at the tool’s
default of 70% and have yet to see any difference with my upsizing
work. Again if you select to use it, the preview window will reflect
the changes.
3. Output
The last tab is for output and allows you to select where
your upsized file will be placed. If you make no change, Sizefixer
will place
the upsized image in the folder where the original image was.
The new upsized
image will contain “_upsized” at the end of the file
name.
Notes on Results from Sizefixer
I would recommend that when you are
finished with the selections that you click on the “view” tab
on the top of the screen and select “close all views”.
This is because considerable processing power is needed just to
create the previews. Once you have
everything set, just hit the “Process This Image” tab.
With the super resolution setting on a 1DS MKI or MKII image
you can expect the process to take at least 1 hour. You will
get a
process bar on the center of the screen that is fairly accurate
in telling
you how long the current process has taken and approximately
how much
longer is left.
NOTE: on the Windows version of Sizefixer
SLR, you have to cut a 1ds MKII or MKI file in half as the current
software
will not
complete
on a single file. My 1 hour processing time for a 1dsMKII
file includes processing both halves of the image. I don’t
believe that the Mac Version has this problem.
Sizefixer
will take as close to 100% of your machine’s processor
as it can. I don’t believe the Windows version has
a multiprocessor kernel, so a 2 way box won’t speed
up the upsizing process. I have used Sizefixer on the following
two machines.
1. P4 3.2 Ghz 4 GB of ram
2. P4 1.8 Ghz 1 GB of ram (laptop)
The 3.2 Ghz machine and the 1.8
Ghz laptop processed the files in about the same time. The
3.2 Ghz machine will
allow me to
work with
other
programs while the upsizing process was running whereas
the 1.8 Ghz laptop is pretty much strained untill the
Sizefixer process
is finished.
NOTE: I strongly recommend not having a screensaver
program running while Sizefixer is running. If the screensaver
kicks
off, there
is a chance that you may not recover the machine
until Sizefixer has
finished. Photoshop will actually run OK in the background
as it tends to need
more memory than anything else. From what I can tell
Sizefixer takes very little RAM to operate. You will see occasional
slow downs in
Photoshop when it needs to grab some processing power.
Once your image has finished it may need extra sharpening. I have
found that the DOP Toolkit sharpening software
is an excellent
companion to Sizefixer output as it allows you
to control the sharpening
with
an edge mask and has built in haloing controls.
Overall the upsized output from Sizefixer is very impressive.
I have
used it with
great success on images ranging from a Nikon D1
all the way to the Canon
1ds MKII.
Issues/Concerns
During my testing I did discover some issues.
1. Slow processing
speed.
2. Problem with larger camera files such as the
Canon 1ds MKII or MKI.
3. Vibratory Haloing (called also "ringing") with Super
resolution setting.
4. Noise issues with Super Resolution setting.
Slow processing speed
I feel the software needs some performance tuning
to allow it to run faster. I can remember the first versions of
Neat Image and how slow
they ran, however now Neat Image processes files extremely fast with
amazing accuracy. I realize that with the Super Resolution setting
the tool is doing a 1:1 look at pixels but there is room for improvement
as it doesn’t seem that Sizefixer takes advantage of hyper-threading
with Intel Processors. (note my processing times when comparing a
non hyper-threaded laptop to a 3.2GHz hyper-threaded desktop).
Current
Issue with larger Camera Files
When working with Sizefixer SLR
for Windows on Canon 1Ds and 1DsMKII files, I found that upsizing
using the super resolution setting
at “Very
High Quality” will develop an error and not complete. I
know that the Mac version doesn’t have this problem so
I feel that it’s possibly a porting issue. To work with
these larger files you have to cut the file in half, upsize the
halves, then
reassemble
them in CS. I first communicated with Fixerlabs about this back
in December of 2005, and they are working on a fix.
Vibratory
Haloing (called also "ringing") with the Super Resolution
Setting
Of all the issues, this is the most serious. Repeatedly I have found
that in certain conditions, while using the “Very Good
Quality” or “Good Quality” setting in Super
Resolution, certain parts of the final output will contain what
I am calling “Vibratory
haloing” (technical term is more likely "ringing").
This mainly shows up with situations where you have a dark object
being upsized
against
a lighter
background.
The Vibratory
Halo’s that are created will be clear and extend out from
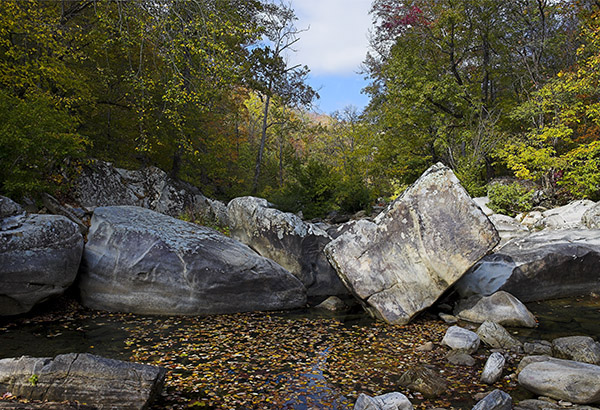
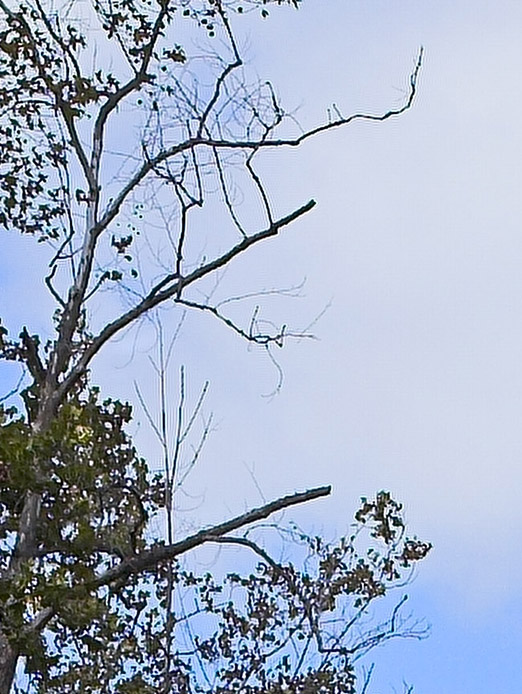
the object in layers, creating an illusion of vibration. An example
of
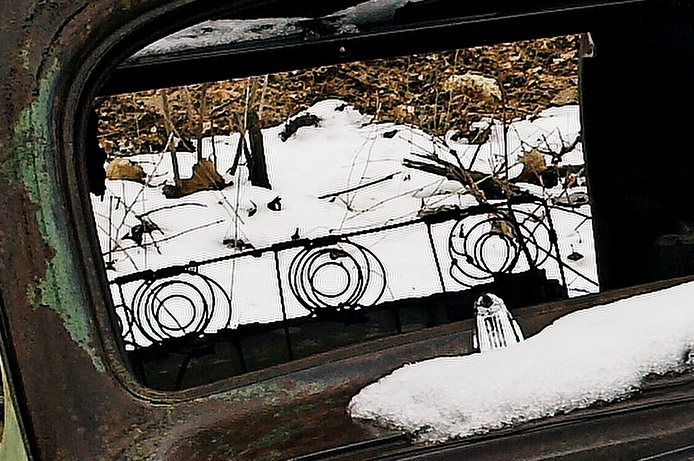
this haloing is shown in the crop below. On the left you will
see a crop of an image where this problem manifested itself in
the smaller
branches against the blue sky. The entire image is shown on the
right. Look closely and you can see the clear haloing that seems
to create
a vibratory effect.
The problem will be even worse when there
is more contrast between the dark and light objects. The next example
is a image of an
old car taken with a snowy background. Look at the two crops
I have
provided.
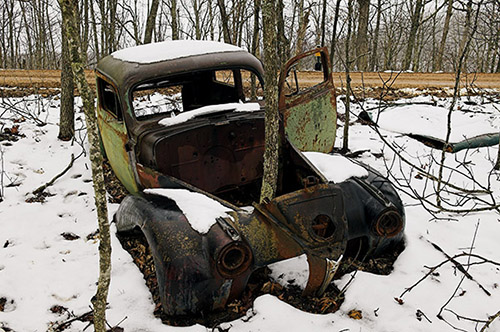
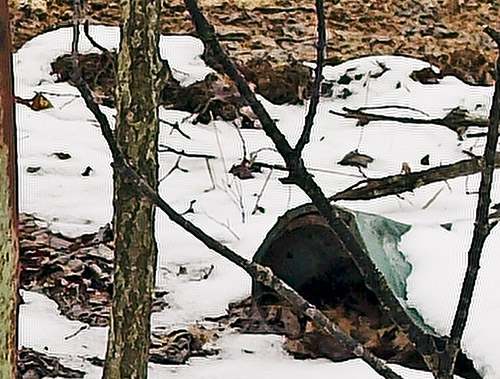
In the 1st crop you can see a lot of the
vibratory haloing effect against the edges of the car door and
all the various
limbs.
In the 2nd crop
the back seat springs really show the effect. If you do any
sharpening on the image the effect is intensified.
I have
found no way to control this. If you turn off all sharpening in
the super resolution process, the Vibratory
halos will still
be seen. After much experimentation, I found that if you
select the “Draft” setting
under super resolution, the problem is not seen, however
with the “Draft” setting
you will not get the best results from Sizefixer. So for
now, if you have an image that may have subject matter
that might be affected by
this problem, you will need to run the super resolution
process twice. Start with the “Very Good Quality” and
then rerun the same upsizing using the “Draft” setting.
Combine the two outputs later on in Photoshop.
This is
much more work than most people are going to want to do.
I mentioned this to Fixerlabs and their comment
was to
watch for
over-sharpening
during a raw conversion. Generally I always have some sharpening
turned on during raw conversions but went ahead and tried
some images that
were not sharpened at all. I found that there are still
situations where you will get the vibratory haloing. As
of 02/20/06,
I don’t
know if Fixerlabs has either agreed that this problem exists
or if they are working on any fix.
Noise issues with the
Super Resolution
Setting
Pure and simple, I feel that the super resolution
sharpens noise, even with the threshold set to zero. Make a note
to look at your
images
before you run any type of super resolution on them
for if there is noise in parts of the image, this noise will
be
picked up
and grossly
resized. This is another reason not to sharpen your
image before using Sizefixer unless you use a selective sharpening
tool
like the DOP EasyS Plus Sharpening Toolkit .
Conclusion
Well I am sure you asking, is it worth it? Can I justify the up
to one hour wait and having to cut my images in half to work with
this
tool? In one word YES.
I have found that the output from Sizefixer
more than justifies the extra time. Sizefixer is the first upsizing
tool I have found
that
allows me to get to the same degree of final output as I get
from stitching. I started to include comparisons between various
upsizing
tools but
I realized that you really can’t tell much when viewing
such comparisons on a CRT or LCD screen. Many people use different
screen
resolutions and no two people will view the same output the same
way. This is why I strongly recommend that Sizefixer release
this software
in a demo version. Currently the only way to get a demo is to
send Sizefixer your image and pay them to upsize it. They will
send
you the final output back and you can deduct the cost of the
upsizing from
your final bill for the software. Instead of this process I feel
a person should have the ability to test/demo the software in
their own
environment. This is the standard demo process that most companies
offer and one that Fixerlabs offers on their other products.
I have been working with Sizefixer since mid November 2005 and
have used it to upsize over 100 different images. I have found
that I
can get excellent results from a 2.74mp D1 shot all the way
to a 16mp 1DSMKII
file. Each time I have found that the output from Sizefixer
has amazingly accurate details. Even with the issues that have been
pointed out,
I prefer the output enough to develop work a-rounds to overcome
these problems.
Pros |
Cons |
|
|
Software has the ability to upsize images
with extremely detailed results |
Slow processing time when using the Super
Resolution option |
Excellent user interface |
Vibratory Haloing issue |
16 bit support |
High price point for entry SLR version |
Versions for Windows or Mac |
Windows SLR Version has a problem with large
camera files |
Ability to upsize an image up 16x from the
original |
|
- The cost of Sizefixer XL (currently only available for Mac)
is $335.00
- The cost of Sizefixer SLR for Mac and Win is
$185.00
Reply by FixerLabs
We got the following note by FixerLabs:
"All the Issues/Concerns discussed in Paul's review are being addressed
by work on SizeFixer and we plan to release an update as soon as
we can to address:
1 Speed - our prototype is about five times faster,
2 Fix bug on PC SizeFixer SLR for large files,
3 Edge artifacts ("Vibratory Haloing" or ringing)
is suppressed automatically,
4 Noise amplification does not occur
5 Free 30 day trial
6 Minor bug fixes, and suggestions from current users.
Updates are
free to existing owners."
If there are any questions, you can write me at the following
email
address, pcaldwe@aristotle.net.
My work with landscape photography can be viewed at
either of the following websites:
Digital Outback Photo is a registered affiliates for FixerLabs.
If you plan to buy these products use these links as you help support
Digital
Outback Photo. Buy
SizeFixer SLR (Mac & PC)
and
SizeFixer XL (Mac OS X only)
This is one of the many techniques we will teach during the 2006 Summit.
We will also work with you 1 on 1 and help you with your own images
and with how to use this technique, and many others, in your own work. Click
here to read a detailed description of the 2006 Digital
Fine Art Summit. Joseph Holmes will join the Summit 2006 as a guest
instructor means you can ask this world class printing expert directly.
About the Fourth Annual Photography & Fine Art
Printing Summit
The 4th Photography & Fine Art Printing Summit will take place
November 10th to 13th, 2006, in Page, Arizona. Seats are limited. In
addition to studying color management and color spaces, we will also
do field photography in stunning locations such as Antelope Canyon,
Lake Powell and Horseshoe Bend, as well as study Raw conversion, Photoshop
processing, image optimization, printing. We will also conduct print
reviews of your work created during the Summit. Find out all the details
of this unique learning and photographing opportunity on the 2006 Summit
page. |