This essay is part 2 (part 1 can be found here) of Chapter 5 in Alain’s second book
Mastering Composition, Inspiration and Personal Style
4- Controlling color in Photoshop
It is not the form that dictates the color, but the color that brings out the form.
Hans Hofman
The model described by Munsell is also present in digital photography in a second way, besides color spaces. It is present in Photoshop in the Hue/Saturation adjustment dialog box. The Hue Saturation dialog box gives you access to the 3 variables of color independently: Hue, Saturation and Lightness, just as Munsell described them in 1921:
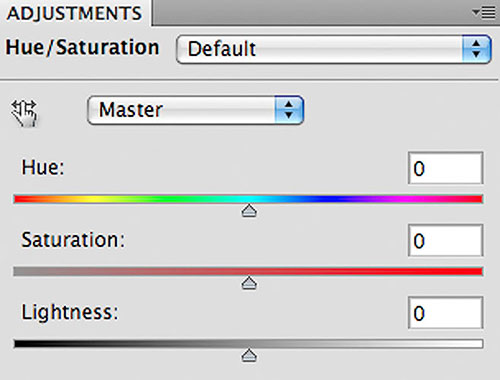
These three adjustments work exactly the way I previously described them: hue controls color, saturation controls how intense that color is, and lightness controls how light or dark the color is. These controls duplicate Munsell’s description of color precisely.
In practice, when using this dialog box, I change primarily the saturation level, occasionally the lightness level, and rarely the hue setting. This approach is personal and is based on my personal preferences regarding image adjustments. As to how I control each variable of color in Photoshop, since I do not control all 3 three variables through Hue/Saturation, this is something that we will see in the chapter titled Image Maladies and Remedies.
5- Color Balance
The difficulty with color is to go beyond the fact that it is color – to have it be not just a colorful picture but really be a picture about something. It's difficult. So often color gets caught up in color, and it becomes merely decorative. Some photographers use it brilliantly to make visual statements combining color and content; otherwise it is empty.
Mary Ellen Mark
One of the most important aspects of color photography is color balance. Color balancing a photograph means adjusting the overall color of the image so that neutral colors are rendered correctly. Color balance is sometimes called grey balance or white balance.
From a technical perspective the goal of color balancing is getting a neutral color to be truly neutral, that is without a colorcast. From an artistic perspective, the goal of color balancing is to get colors to be pleasing to the eye. Either approach is correct. I personally use a combination of both, working towards getting neutral colors to be truly neutral and working towards creating a color balance that is pleasing to me.
Color balance can be set in your digital camera by selecting one of the options in the color balance menu (auto, shade, daylight, flash, etc.). This will change the appearance of the image on the LCD screen. However, when you capture the photograph in raw format, the color balance information is only “tagged” to the image data and can be changed later on during raw conversion. In other words, the color balance setting used on your camera does not alter the raw file in any way.
I personally set my camera to Auto white balance most of the time, then adjust the white balance to the settings of my choice during raw conversion. It is important to set the proper white balance at the time you convert the image. The reason for this is because a raw file is a single-channel file and as such adjusting the color balance is much easier and much more accurate than adjusting the color after the image has been converted. After conversion, the image becomes a tri-color image –Red, Green and Blue—and color correction must be done on three channels instead of one. Furthermore, a raw file is not a photograph but instead a set of numbers and data that will be transformed into a photograph by the raw converter. As such, any modifications made at that stage are applied not to a photograph but to raw data. You are affecting the way the photograph is created, a much more reliable approach than modifying the photograph itself after conversion.
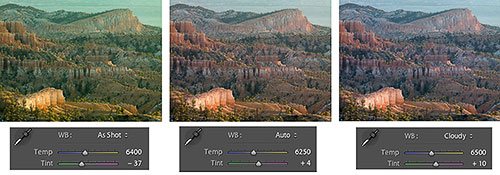
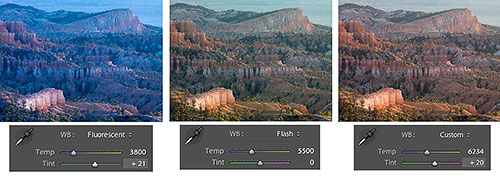
Both digital cameras and raw converters offer a variety of color balance settings. On the next page you can see the different color balance settings offered by Adobe Lightroom 2.0. These different settings were all applied to the same photograph. No other changes were made to this photograph besides changing the color balance. The color balance settings used are indicated under each version of the photograph.
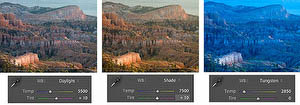
Color balance is adjusted by changing two values: the color temperature (“temp” in the screenshots below) and the tint (tint in the screenshots below). The color temperature allows you to adjust the image from blue to yellow, while the tint allows you to adjust the image from green to magenta. Green and Magenta are opposite (adding green removes magenta and vice versa) and so are blue and yellow (adding blue removes yellow and vice versa).
The tint value indicates how much or how little magenta or green is added or removed. The temperature value indicates a value in Kelvin degrees. Kelvin degrees are used to measure the temperature of a light source. Cold light (blue) has a high Kelvin number while warm light (yellow-orange) has a low Kelvin value. For example, tungsten light, which is warm, has a value around 2800 Kelvin degrees while overcast northern light, which is cold, can have a value has high as 10,000 Kelvin degrees.
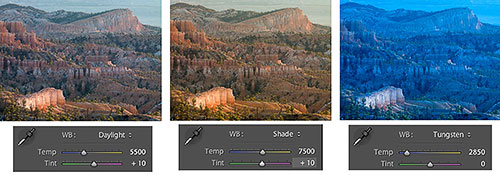
These values are used in the screenshots below. Each preset indicates the Kelvin degree value for the type of light source that was selected. For example, the daylight preset indicates a temperature of 5500, the Kelvin temperature of sunlight at noon, while the tungsten preset indicates a temperature of 2850, the average light temperature of tungsten light bulbs.
The tint is also adjusted by the preset. The proper color balance is achieved by adjusting both temperature and tint.
6-Color Palette
I've been forty years discovering that the queen of all colors is black.
Henri Matisse
Color palette is another very important concept to take into account when working with color.
Color palette is different from color balance. As we just saw, color balance is about balancing the color of the light so that neutral tones are truly neutral or so that colors are pleasing overall. Color palette, on the other hand, is about selecting a range of colors that are going to be used in the photograph.
Color palette is a painting term. In painting, you start with a blank canvas. Therefore, defining the color palette lets you choose the colors that will be placed on the canvas. We can think of painting, for the sake of argument and learning, as an additive process. When painting colors are added to the blank canvas.
In photography, you start with a frame filled with elements and colors. Therefore, defining the color palette is often a matter of modifying or, in some instances, removing colors from the photograph. We can think of photography, also for the sake of argument and learning, as a subtractive process. When photographing we subtract, or remove colors and elements from the original scene.
Considering the color palette part of the act of creating a fine art photograph is a novel concept. It demands that you give yourself the freedom of altering, modifying, enhancing or manipulating your photographs, as you prefer to put it. This is an important step that you have to take as an artist in order to develop a personal style (remember that we are talking about art here, not about forensic, scientific or other literal photographic representations). Nobody forces you to “manipulate” your work. However, it is necessary that you take a stand for or against manipulation. This is an important step. The chapter titled Just say yes, in this book, is here to help you with this aspect of developing a personal style. So are the four chapters devoted to the creative process, chapters that are specifically designed to help you work towards the achievement of a personal style.
For now we are considering color palette for what it does best and that is the selection of a range of colors that will be used in a specific photograph. Color palettes are defined for a single photograph, or for an entire project if you are working on a project and wish this project to have a continuum in regards to color (a color continuum we might say). You could, for example, work on a project in which the color palette makes use of a variety of blues and whites. Or, you might work on a project in which warm hues are used, such as reds and browns.
When defining a color palette all three variables of color are used: hue, saturation and lightness. For example, when defining the warm palette I just mentioned, you might decide to use saturated light reds and low saturation dark browns. Just by writing this short description we have precisely defined the two main colors of your palette. These two colors, as we just described them, would look like this for example:
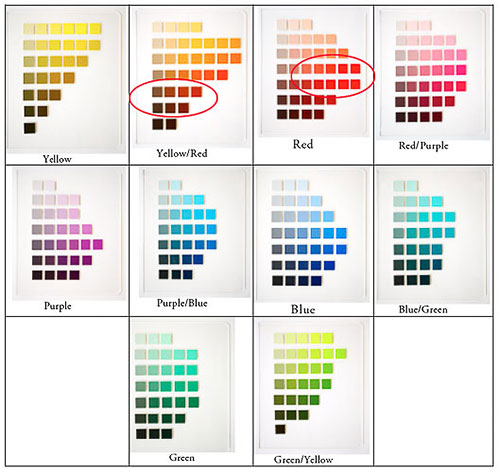
In the image above I circled in red the colors that I defined in the previous paragraph.
Two important things need to be said about what I just did. First, I used the Munsell Color System, and more specifically the photograph of the 10 color panes from the Munsell Color Tree that we discussed previously.
Second, I circled not a single color, but a group of colors. And, I did that for the two colors that I previously defined.
Why did I do this? I used the Munsell Color System because I want to tie the concept of color palette with what we studied previously in regards to color, and that is the Munsell Color System. It makes sense to do this since we are talking about color in the terms that Munsell introduced: hue, saturation and lightness.
Using the Munsell Color System to define a color palette has another important advantage. Because Munsell’s description of color is used in Photoshop and other image processing software, there is a direct relationship between Munsell and digital image processing. In other words, if we define a color with the Munsell Color System we can create this color very easily in Photoshop by using Hue/Saturation, or some of the other tools that we will study later on in this book.
Why did I circle more than one color? After all I talked about single colors, not groups of color therefore I should have circled a single color. I did so because when talking about a color palette we are not referring to a single color. Instead, we are referring to a group of colors. In other words, there is room to “err” for lack of a better term. The expression “color palette” is not a scientific term. Instead, it is an artistic expression that is used to indicate a range of colors rather than a single, specific color.
What is great about the Munsell Color System is that it works both as a scientific approach and definition of color, as well as an artistic approach and practice of color. It can do both because this system can be used in a very specific manner or it can be used in a more general manner. Using the Munsell Color System within a specific color space, one can define a color using RGB values. Using the Munsell Color System in a more general manner, as we do in this section on color palettes, one can define a color in general terms of hue, saturation and brightness.
When defining a color palette for artistic purposes, as we are doing here, saying that we want high saturation light reds and low saturation dark browns is all we need. Circling the range that these two colors encompass on the Munsell Color Charts is specific enough for our purposes.
Why? Simply because a photograph, even when its color palette is restricted to two colors, will have a certain variation of tones within these two colors. In other words, the photograph will have more than two colors in reality. A photograph composed of leaves, for example, which are desaturated dark brown in the fall, photographed in front of a sandstone canyon wall, which could be light saturated red if in full sunlight, will have many variations of reds and many shades of brown. Yet, its color palette would be light saturated reds and dark desaturated browns.
In other words, the color palette is defined in simpler terms than the actual colors used in the artwork, be it a photograph or a painting. This is the beauty and the power of a color palette. Because it is somewhat vague and unspecific, it gives to the artist the to interpret the color palette according to their own style and inspiration. In practice, it gives them the freedom to invent the actual colors. The outcome is that two different artists working with the same color palette would most likely not create the exact same colors. This is the beauty of art: the lack of specific values results in endless variations in the creations of each individual artist.
Defining a color palette using Chromix Color think
There is another way to define a color palette besides using the Munsell Color Tree. This other way is using Chromix ColorThink to map the colors of the photograph into a color space. This mapping can be done by itself, or it can be superimposed onto a specific color space to see how much of this color space is used by the photograph.
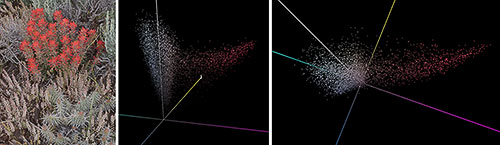
Indian Paintbrush Photograph color space side view Top down view
This is exactly what I did with the photograph titled Indian Paintbrush. I opened the photograph in Chromix ColorThink and graphed its colors in 3D. The result is the graph seen above next to the photograph.
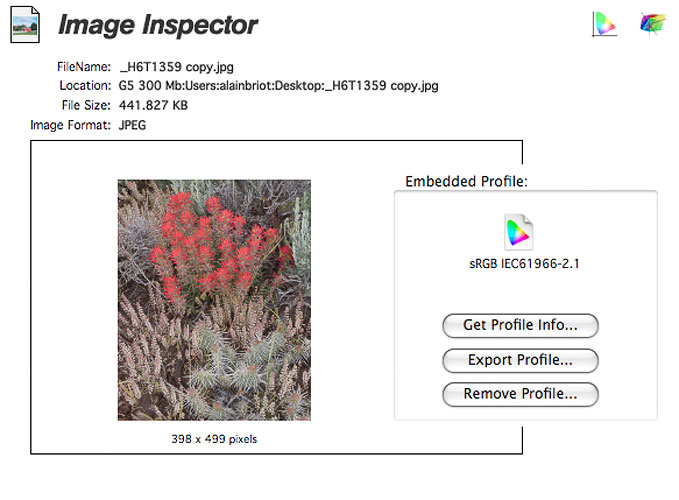
The image inspector dialog box from which you create a 3D graph of the photograph
Chromix ColorThink is a color analysis software that can map the colors of a photograph into a color space, in this case a LAB color space. The resulting graph is comparable to the graph of any color space, such as those we saw previously in this chapter.
The graph at left above shows the colors that are present in the photograph looking at the color space from the side. The graph at left above shows the same color space looking from the top down. Each color in the photograph is represented by a small dot of color on the graph.
When looking at the colors from the side we see the Lightness axis running vertically at the center of the graph and we see the Color axis going in four different directions towards the corners of the graph. We learn a number of things from looking at this graph. First, there are only a few colors in this photograph. Second, the color that is dominant in quantity and in saturation is red, as shown by the large amount of space taken by the red dots. These dots extend very far to the right, meaning that the reds are very saturated. Remember that the visual representation of the colors in this photograph follows Munsell’s System. Saturation goes from the center outward, Lightness goes up and down and Hues go in a circular way around the color space.
Third, we can see that there are no extreme bright or dark areas in the image and that therefore the contrast of this photograph will be low. This is shown by the dots in the center of the graph, along the vertical Lightness axis. These dots do not go all the way to the top or the bottom of the color space, showing that there is little or no pure white and pure black in the image.
The top down view shows the same information but provides a better view of the colors found in this photograph. It confirms what we saw previously: reds dominate and are the most saturated color while the rest of the colors consist essentially of soft mauves, greens and blue-greens. None of these colors is very saturated, as shown by the dots being close to the center axis.
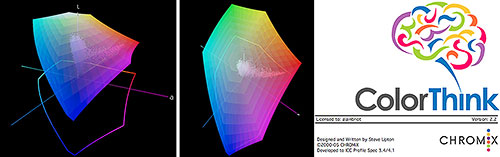
Photograph and sRGB color spaces side view Top down view ColorThink Logo
The two graphs above show the same information but now I added the graph of the sRGB color space on top of the photograph color space. I chose the sRGB color space for this example, however any color space can be used. The color space is in full color, while the photograph is graphed as it was in the previous graphs, with dots of color. The photograph is now located within the sRGB color space and is seen by looking through the sRGB color space which is shown as semi-transparent for the purpose of this illustration.
The first thing we notice is that the colors in the photograph occupy only a small area of the sRGB color space. While there are a lot of nuances of color in the photograph, there are not that many different colors, meaning the color palette used in this photograph is small. If we circle the colors found in this photograph on the Munsell Color Tree panes, we have this representation:
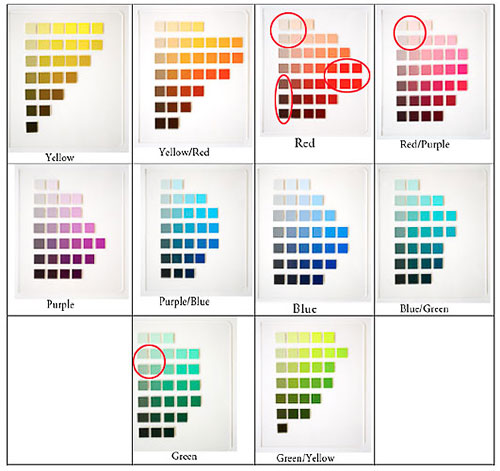
The colors found in Indian Paintbrush circled on the Munsell Color Tree panes
We also see that the colors do not exceed the color space boundaries. In fact, even the reds, which are the most saturated colors in this photograph, are well within the boundaries of the sRGB color space. This is good news since it means none of the colors are clipped, therefore giving us detail in every area of the image.
Seeing the color space also confirms that the brightness range is small since none of the colors reach the top, or the bottom, of the sRGB color space.
All this information is very useful in helping us define the color palette used in this photograph. This is a more technical approach than finding the colors on the Munsell Color Tree but it works just as well. My recommendation is that you use both approaches since, as we just saw, they complement each other very well.
This essay is part of Chapter 5 in Alain’s second book Mastering Composition, Inspiration and Personal Style. You can find more information about this book, and sign up for Alain’s pre-announcement list, at this link.
Alain will be teaching composition and color at the Digital Fine Art Summit this fall in Zion National Park together with Uwe Steinmueller and R. Mac Holbert. A detailed description of the Summit, together with information on registration, is available at this link. |