Since about over 4 months we use our technique called High Speed HDR. The key technique is to capture at least 3 frames and if done freehand as fast as possible (means with the highest frame rate you camera can deliver).
The core idea is actually to capture bracketed frames and this technique is as old as photography. In that way this technique is even very useful if we have no need for HDR or Super-Resolution. The beauty of this approach is that we can in many cases get higher dynamic range images or even improve the resolution (check out this article).
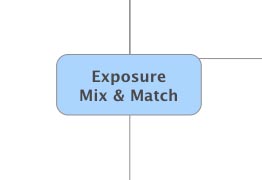
We cover what we call Mix & Match in two parts:
- Exposure Mix & Match: Philosophy
- Exposure Mix & Match: Technique
Exposure Mix & Match: Philosophy
We add this more philosophical section because some of our readers may think this is all just technical Mumbo Jumbo and they rather take photographs. Of course they have a point here and many different ways lead to Rome. You have to work the way that fits best for you. There is no universally best practice.
Photography falls into two principle parts:
- Framing and Exposure
- Post-processing
We think both parts are equally important although we spend way more time processing than taking pictures.
Framing and Exposure
Without the right framing and an at least decent exposure there is hardly a chance to get a good print. The ideal would be to concentrate only on framing and leave the rest to the camera. Too bad that this does not really work. Even with today's sophisticated cameras there is a lot to consider:
- f-stop: Depth of field but also diffraction limits (prevents to get best resolution at higher f-stops)
- Shutter speed: Consider moving objects and camera shake
- ISO: Allows higher shutter speeds at the expense of more noise
- Tripod vs. Freehand: This is a whole can of worms and a very personal decision. Of course it even more depends on the situation. Night shots are not often done freehand (except at very high ISO values). Freehand allows more flexibility while the tripod is a strong aid to get the best framing.
- Exposure: Mostly about not clipping the highlights but also dealing with the dynamic range of light in the scene.
Capturing bracketed shots makes for us exposure much easier. We hardly worry that we get one of the three shots without blown highlights and low enough motion blur. This gives us a chance to way more concentrate on the framing aspect.
The really main downside of this approach is to capture more images (bigger CF cards and disks). Otherwise bracketing was and is always very useful.
Post-processing
Shooting brackets makes post-processing easier and more complex at the same time.
Easier
Having 3 or more exposures available allows to find the best possible exposure of the bracket. With only a single exposure you have to live with it and fix things that might gone bad (e.g. blown highlights - hard to fix if at all).
More Complex
Having options is always nice but also makes life more complex. If you ignore the techniques like HDR and Super-Resolution all is quite simple. But if you want to explore these options this will cost quite a bit more time and work.
The nice thing of this approach is that you can defer the more complex workflow for later and if you need more resolution of you want higher dynamic range. We are right now re-processing image brackets we took over a year ago (e.g. using PhotoAcute).
With bracketing you capture more images that allow you to revisit some of the images later (e.g. HDR, lower noise, ...). If you capture only single shots this can be just fine but it also limits your options.
During our last SF Walk (portfolio here) we captured the following photos:

Bus Stop
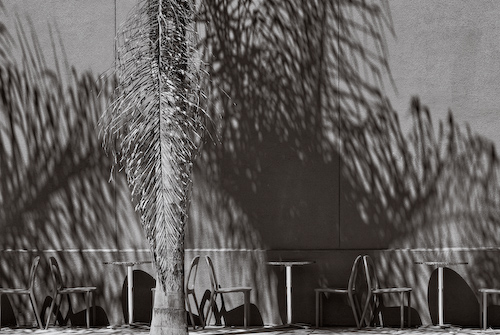
Chairs and Shadows
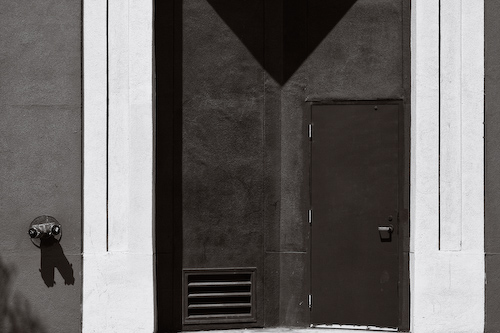
Black Door
All of these shots were from a single exposure inside a 3 shot bracket and we like the result (actually the portfolio contains the initial colorized version). Now assume we wanted to make a larger print. In this case we would revisit the photos and try noise reduction and Super-Resolution processing in PhotoAcute.
We like to have these options. This does not mean we want to make our life complicated. One thing is for sure: we have right now a lot of fun taking pictures and concentrate more on framing than ever.
Exposure Mix & Match: Technique
We created a few diagrams that discuss the preparation for you shooting and the evaluation of the resulting shots.
Control Camera Movement
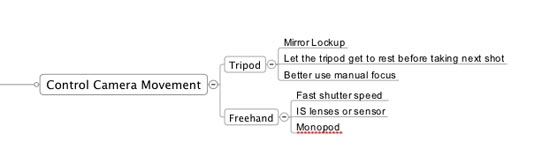
There are two principle different situations:
Tripod mounted
You need to use all techniques available to stabilize the camera/lens on the tripod.
- Use mirror lockup (best even use live preview on some new DSLRs)
- Let the tripod rest between shots (to avoid vibrations from previous exposures)
- Better use manual focus as the camera AF may shift during bracketed shots
Freehand
- Use the fastest shutter speed you can afford (this is a balance of ISO & Noise vs. shutter speed)
- Use image stabilized lenses (or sensors). Don't assume this does wonders. We try to be very conservative how much the IS buys us. Also newer IS systems are somewhat better than older ones.
- Use a monopod for extra help (light yet sturdy)
Consider moving Objects

- Fast moving objects: HDR does not really buy you anything if there are faster moving objects. Fast is in relation to the time it takes to take all bracketed shots. From tripod all movements can be considered too fast. With High Speed HDR many movements can still be captured without too much blur. Not all blur is actually a problem. This is then an artistic decision).
- Slow moving objects often don't show with High Speed HDR.
- Some movements may not bother you: Clouds, distant people
- Birds: We often treat distant birds like dust spots :-). Article to follow.
Essential Camera Settings
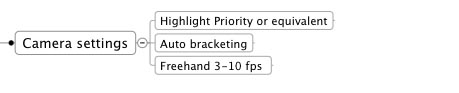
- Highlight priority: To be able to recover some minor overexposed shots. Remember this technique is also about getting the single best exposure from the bracketed shots.
- Enable camera auto bracketing
- For High Speed HDR we need about 3-10 frames per second speed. The higher the better.
Controlling the Bracketing
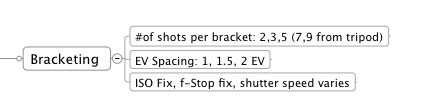
- Number of shots per bracket: We use mainly 3 or 5 for our High Speed HDR technique. 7 or more shots are reserved for pure tripod based bracketing
- EV Spacing depends on the dynamic range we want to capture. We most of the time use about 1 1/3 EV but in some situations 2EV is better. How did we come up with 1 1/3 EV? In this case the best shot in the bracket can be only about 2/3 EV off an optimal exposure because Highlight Priority allows us easily to recover at least 2/3EV overexposure.
- ISO and f-stop should be constant for all shots in the bracket. The only variable should be the shutter speed.
Evaluating the Bracketed Shots
We have to consider two goals:
- Capture a good single exposure as part of the bracket
- Allow as often as possible to merge images for HDR and/or Super-Resolution
In case you have visible object movements during the full cycle taking all bracketed shots you have two choices:
- accept the resulting artifacts when merging the exposures
- Use on a single frame from the bracket
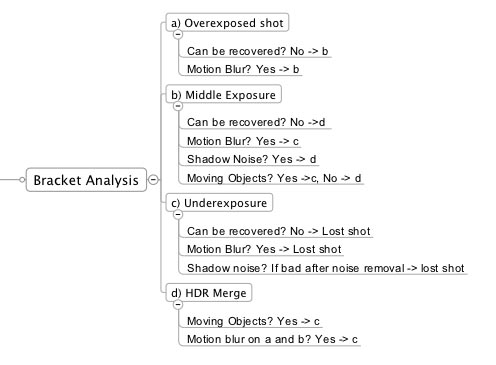
a) Overexposed shot
This is often the least usable shot working freehand. Why? Because it uses the longest exposure time and so the image can easily get blurred. Watch always the shutter speed for this shot.
If this shot can be properly recovered (read more about highlight recovery here) and is not blurred you have actually all the information you need (except maybe super-resolution).
b) Middle Exposure
In most of our cases (using the cameras Aperture priority automatic) we can recover this shot properly using highlight recovery to some extent. If the image does not show motion blur we have a good single shot photo. If you want to open up shadows a lot you also can experience too much noise. In this case HDR or super-resolution merging can help to bring down noise.
c) Underexposed photo
It is often not good if you need to use only the underexposed shot because it shows the strongest noise. On the other side it can still get you good results if you stay at lower ISO values or accept some noise in your image.
d) HDR and Super-Resolution Merging
If there are hardly any object movements (for minor camera movements the HDR alignment algorithms take care of). You can merge some exposures.
- All three exposures if all three shots don't show motion blur and are in focus
- Only two exposures if one of them shows motion blur or is out of focus (most likely the overexposed shot)
Conclusion
Our bracketing technique combines classic bracketing with modern technologies like HDR and Super-Resolution. As you can see this Mix & Match strategy is a powerful tool to capture more light and make use of it if all works fine. If not you pick the single best exposure and still win the game.
Note: All diagrams were developed with Mindjet MindManager |