Some readers ask us why we mainly cover Photomatix and Photoshop for HDR. There are quite a few reasons for this. All other applications we used fall into one or more of the following categories:
- Windows only applications (and we only look at Windows only applications if they deliver exceptional results for our work and we did never find any HDR app that did blow us away)
- Some applications just crash early and mainly on larger images
- We were not happy with the results for our work
On the other side Photomatix and CS4 worked for us quite well. We have to stress the term "for our work" because every photographer looks for the images he likes best. We got nice results with just Photomatix and Photoshop. This did never mean that we stopped looking for tools that help us to improve our work. Here again are some factors to consider:
- How easy do we get a pleasant (to us of course) result
- How many different types of images work well
- Also we like to tonemap in Photoshop and here are not many options
available
- The CS4 "Local Adaptation" tool can get sometime nice results but it is challenging to find the optimal settings
- Photomatix Plugin (got just recently updated)
- Previous version of FDRCompressor (but did not work in CS4)
FDRCompressor Tonemapping Plugin
Some may not even know FDRTools. FDRTools is a HDR solution that is on the market for a long time. We looked into FDRTools and the old FDRCompressor many times and never really got too excited. This was mainly because of bugs, handling, speed and image size limitations. When they now released the FDRCompressor plugin 3.0 we did not know what to expect but gave it a try anyway.
Installation
We had a rocky start because the plugin is very critical on the Mac where it needs to be installed. We missed this note:
"You have to copy the plug-in bundle to the default plug-ins folder of your Photoshop installation which is something like '/Applications/Adobe/Photoshop CS4/Plug-ins/Filters' inside your Photoshop installation. The plug-in will not work when installed to a different location, e.g. the "additional plug-ins folder" that can be configured in Photoshop."
Don't experiment and install the plugin exactly at this location.
- For non English versions only CS4 is supported.
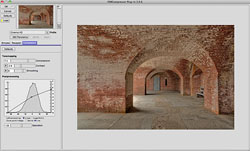
Using FDRCompressor
The preview window can be full screen and you can zoom into the image to a 100% pixel view. Processing is not very fast but on our machine (MacPro Quad) acceptable if compared to other tools.

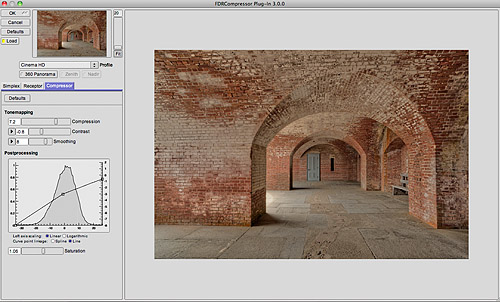
FDRCompressor has 3 methods:
- Simplex
- Receptor
- Compressor
We only care about the Compressor method here (the most advanced method for true HDR images).
There are 3 tonemapping sliders (the parameters shown are our personal starting point)
- Compression: (read the documentation here) This is the parameter we vary more than the other sliders depending on the image at hand.
- Contrast: Here we tend to work with low values (0.8 to 1.2)
Note: Contrast has two sub-controls Frequency and Luminance. They add complexity but maybe useful in certain situations. You need to be aware that in the current version the slider and the curve interact. This means both the slider and the curves determine the contrast behavior. Better look at both to avoid surprises.
- Smoothing: Often values between 4 - 8 work just fine
Note: Smoothing has also a sub-control. Again this adds complexity. You need to be aware that in the current version the slider and the curve interact. This means both the slider and the curves determine the smoothing behavior. We did not use the Smoothing curves so far.
The Post processing Curve tool is extremely helpful:
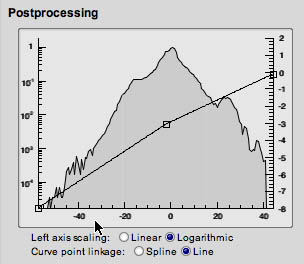
Logarithmic Curve Display
Best you use the logarithmic curve display. This way it is easy to see the extreme highlight and shadow values.
- Right control point allows to control the white point (move this point left or right) and avoid clipping. We do the final white/black point correction later in CS4. If you have clipped highlights here there is nothing you can do in CS4. This means keep the image slightly soft.
- Left control point allows to set the black point (again move this point left or right)
- The rest of the curve can hold arbitrary handles and controls the brightness over the tonal range of the image
We worked on many of our images and liked the results a lot.
Missing Presets
FDRCompressor does not support presets. This is very cumbersome. Fortunately the previous settings can be saved. This allowed us to create a CS4 script for the Mac that loads and saves presets (and even a history of settings).
Note: We could make this scripts a commercial product if there is enough demand.
FDRTools as of now is not working properly on layers (colors are way off) and as smart filters.
Our main HDR Workflow using Tonemapping Plugins
- Select images in Lightroom 2.x
- Correct CA (Chromatic Aberrations in Lightroom)
- Merge to HDR via the Photomatix and its Lightroom plugin
- Save HDR file from Photomatix
- Open HDR file into CS4
- Tonemap using the Photomatix or FDRCompressor plugin
- Add some midtone contrast with DOP Contrast Plus
- Sharpen with DOP EasyDS
Conclusion
We find the FDRCompressor a very useful second tonemapper (besides the Photomatix plugin). If you work with HDR images give it a shot. We have been positively surprised by the new FDRCompressor plugin version. The FDRCompressor is now part of our HDR toolset.
|