Heavy Vision, Light Gear
HDR images have changed how we think about photographing high contrast lighting situations. HDR is the future of digital photography. I’ve argued that your personal vision makes HDR interesting (Note 1). I hope here to enliven our use of HDR with a hand held method and celebrate the idea that vision outweighs photo gear.
In 2010, the dogma of High Dynamic Range (HDR) is “tripod, cable release, do not move.” Well, not every subject fits this approach. Tripod-mounted HDR is like walking in sand with your shoes on. Hand-held HDR is like going barefoot on the beach. There is a sense of ease and freedom. Minimal gear allows a greater awareness of the scene. The point of keeping gear simple is to put it out of conscious awareness. This lets us devote our full attention to embracing the subject ahead.
The more gear we carry, the heavier the burden on our attention. We are aware not only of the weight but also preoccupied with gear technique. Trim your gear and your method until you can operate it by touch alone with eye, hands, and heart. A tripod can be left behind. Hand holding the camera, we stretch our muscles instead of expensive carbon-fiber legs. Practicing HDR imaging with unified, simple tools stretches our vision, not just the dynamic range. Since each scene has different light, contrast, and luminance, you should choose your own number of exposures, not just follow in someone elses footprints.
WTF ?
WTF? Well . . . there is that. But WTF is also is short for With Tripod Forgotten. Tripod-free, we photograph noiselessly and nimbly. Without the stability of a tripod, accurate HDR needs faster shutter speeds to prevent blur. It also needs less time in-between shots to allow alignment of the frames. HDR software needs precisely aligned frames with no changes, except exposure, between them. These processing requirements are a foundation of Burst Bracketing. Remember WTF, but realize the idea is not just about forgetting the tripod, it is about realizing your final vision of a high contrast landscape or portrait.
The Essence of Burst Bracketing: Play as fast as you can. Wait for the right moment.
Pioneered by Uwe and Bettina Steinmueller of Digital Outback Photo (Note 2 ), Burst Bracketing means hand-holding to capture a series of exposures for extending dynamic range. When we add a rapid capture digital camera together with a hand-held method of shooting, we use Burst Bracketing.
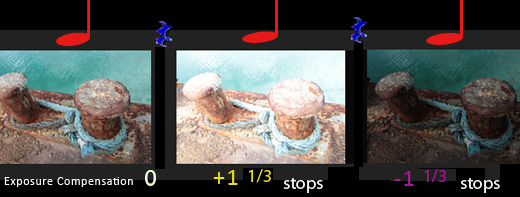
Think of a musical score. The notes are analogous to the exposures (illustrated in Red here). The rest interval between the notes (in Blue) represents a very short Time In Between Exposures (TIBE). Blending exposures with Burst Bracketing works best when the Time In Between Exposures is a very short duration as this eliminates any subject or camera movement. The essence of burst bracketing is to minimize the Time In Between Exposures (TIBE).
What is the goal of Burst Bracketing?
Burst bracketing is a useful shooting skill for extending dynamic range with either a point and shoot or digital SLR. The goal of burst bracketing is to get better detail in the highlights and shadows.
First, some background on bracketing. Developed for film cameras, auto-exposure bracketing is labeled AEB in a digital camera’s menu. In AEB mode, the camera changes the exposure for each of 3 shots, automatically. It may underexpose the first, overexpose the second shot, and correctly exposure the third frame. Whatever the order, the goal is to get just one correct exposure, if a high contrast scene has fooled the camera’s light meter.
Burst Bracketing is auto-exposure bracketing but with frames taken much faster due to high speed buffers inside today's digital cameras. Modern cameras have a drive mode; they can rapidly take 3 pictures (or 2, 5, 7, 11 or any number you choose for your unique scene. See Note 3). Burst Bracketing has two parts: burst and bracket. Burst means taking exposures rapidly. The bracket part means AEB automatically over-exposes, under-exposes, and correctly exposes this burst series. The reason to take a series of exposures very quickly— making the time in-between exposures as short as possible — is to eliminate subject and camera movement, thus preventing errors when exposures are combined in HDR software. HDR software needs perfect alignment to read the camera response curve, making a low dynamic range image into a high dynamic range one. To summarize, auto-exposure bracketing (AEB) is done to ensure correct exposure for one frame. Burst Bracketing is done to acquire multiple exposures, from too light to too dark, for extending the dynamic range of the scene.

Checking DOF: Depth of Feeling
Emotion and good composition in your pictures are more crucial than perfect HDR technique. I check for DOF first. It was FSA photographer W. Eugene Smith who said “What good is great depth of field without adequate depth of feeling.” Following Smith’s approach, first I take a test shot and look at the back of the camera, wondering “Does this HDR picture have Depth of Feeling?” and asking “Does it excite me, and will it draw in the viewer?” If I can answer affirmatively to this Depth Of Feeling (DOF) check, then I continue to photograph, with or without HDR.
Software
To get good highlights and shadows from high contrast scenes, you combine 3 or more bracketed exposures. You can choose any HDR program: Photoshop CS4, Photomatix Pro or a program you like. I’ve found Photomatix meets my needs, so on the next page I’ll show some examples using that program. Enfuse and Lightroom Plug-ins can also help HDR processing. They let you process your Burst Bracketed HDR directly in Lightroom. Use your I-Phone to combine HDR shots if you have the app (TrueHDR). In other words, follow your own path and use the equipment that lets you enjoy doing HDR.
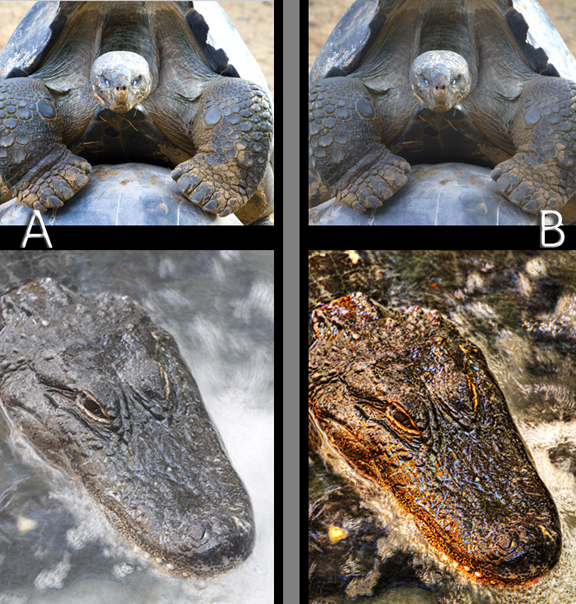
How do 10 exposures compare with 3 exposures?
Now let’s see some examples. Extended dynamic range photography is best done with more than one exposure, and it takes more time to process. Given that we look at HDR images on TFT monitors with a dynamic range of 300:1, can our eyes see, and can we perceive, a difference between one, three and ten exposures? To explore this question, let’s look at a landscape and some wildlife photographs. In the scene below, Images A and B were identically processed with HDRsoft’s Photomatix Pro® version 3.1.3 with its Exposure Fusion method.
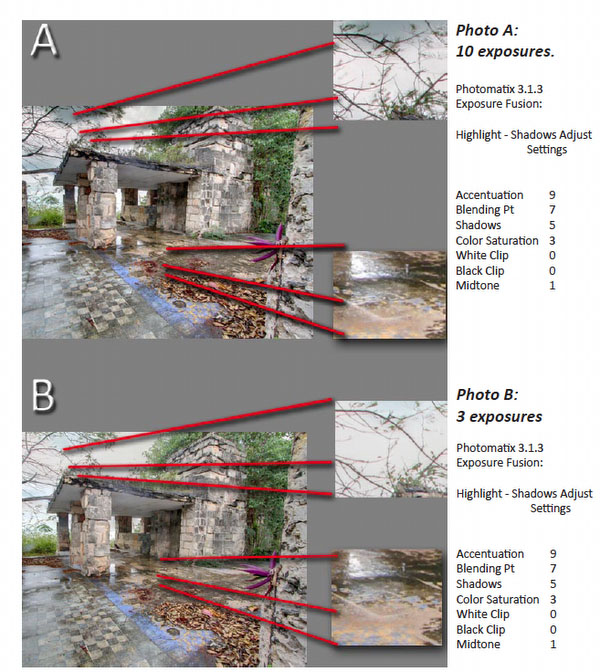
Results. For this scene there was little difference between 10 exposures and 3 exposures for onscreen viewing. When specific details of the patio floor and the sky are examined, the 10-exposure sky has a little better contrast. This can be seen when comparing the detail of the sky in A (10 exposures) with the detail of the sky in B (3 exposures). The clouds in A are darker and seem to have a bit more detail. Are 10 exposures worth the longer processing time? In my opinion, for onscreen viewing, probably not for this scene. The scenes you capture may differ.
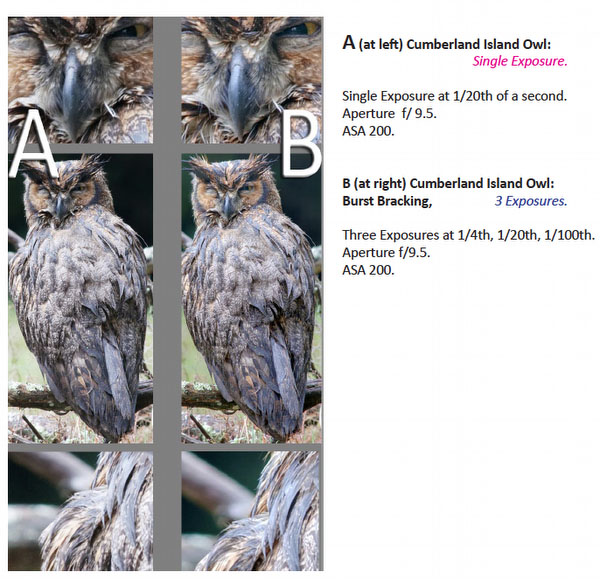
How does 1 Exposure compare with 3 Exposure Burst Bracketing?
If you can stably hand-hold a camera, it makes sense to take 3 exposures using Burst Bracketing. Practice your stability. HDR dogma holds that some subjects do not work well, but try your own experiments. We may soon see extended dynamic range used for animal portraiture, and all kinds of nature photography, since in-camera HDR processing is gaining popularity. Meanwhile, although it takes longer, processing a 3-exposure series lets photographers create better tones and color from high contrast scenes. Image A, below, shows 1 exposure, processed in Adobe Camera RAW (ACR). Image B is the same picture with a 3 exposure Burst Bracket method, processed in ACR and Photomatix Pro 3.1.3. Both pictures were taken with a 400 mm lens in daylight.
Photographed under diffused bright sunlight, the horned owl was illuminated from the front, so the subject had no side lighting or backlighting. In this situation, 3 exposures had advantages (Image B). The feather and face details had lower contrast and well-exposed highlights. The shadows on the owls face were also better exposed. Image B (3 exposures) had better shadow detail than Image A (1 exposure). For certain nature situations, extending tonal range with Burst Bracketing makes sense. Two similar comparisons are pictured at the the end of this article.
Results:
It can be tough to see on screen, but the 3 exposure image has fewer blown out, overexposed areas. Details of the beak and eyes, body feathers, and the background foliage show that the 3 exposure image does not have blown out highlights in the feathers on top of the owls head.
Foliage in the foreground of the 3 exposure image has slightly better saturation and a wider color palette. Comparing the two images, the digital noise pattern was the same.
Summary
Simple equipment keeps HDR an enjoyable process. Hand-held Burst Bracketing will not replace tripods, but offers a practical solution for many beginnings and advanced photographers searching for accessible HDR, both to extend dynamic range and to lighten up on their equipment. Here, I’ve explored reasons to try Burst Bracketing, and anyone interested can learn more from the sources in the Notes section below. Methods of photography come and go. What persists is the beauty of HDR to realize your vision, and the playful joy of doing so. An essential part of HDR photography is that how you see is more important then the gear you use.
Note 1 Austin, Jim. Symphony in A Moment: HDR Photography from Eight Maestros
Note 2 Steinmueller, Uwe and Steinmueller, Bettina. Capture More Light: High Speed Bracketing Report
Note 3 McCollough, Ferrell. Complete Guide to HDR Photography. Ferrell advises 5 exposures for most HDR situations.
Notes by Uwe Steinmueller
We use now Burst Bracketing for over 2 1/2 years and shot more than 20,000 bracketed sequences freehand. Our first goal with these sequences is to exercise classic bracketing to get a single best exposure. Then there are situations where the HDR version shows the better results (mainly in the highlights but also in the shadows). Only in rare cases you can go back and re-shoot a scene. For us Burst Bracketing is all about options:
- Single best exposure
- HDR processing if needed
The only downside we see is more disk space because everything is stored multiple times.
By the way with very fast cameras like the Nikon D3s or the Canon 1D Mark IV we may even take 5 shots in a blink of a second.

|