For now over half a year we use a technique that we call "High Speed Bracketing" or also sometimes refer to as "High Speed HDR". We are also teaching this technique in our workshops.
What is "High Speed bracketing"?
The camera is set to the highest burst rate (5 - 10 fps) and we capture bracketed shots with different exposures at this speed. This means a 3 exposure bracketed sequence (-1, 0, +1EV) is shot in less than a second.
The camera exposure is set to aperture priority. We watch that the shutter speed is fast enough to give us sharp photos. If not we may use higher ISO or a tripod.
As you can see the basics are very simple. This is important because in the field we want to get as much technique out of our way as possible. We can much better concentrate on the subject scene.
Why "High Speed bracketing"?
We combine with this approach classic bracketing with modern HDR and Super-resolution techniques.
Classic bracketing
It is an old proven technique to take multiple shots at different exposure settings to ensure a single best photo. The only difference here is that we shoot these frames so fast that it feels like a single shot (at least once you make it a habit).
Expose to the right
"Expose to the right" is a well known technique. It means essentially that you try to get the brightest exposure that allows to fully recover all highlights. If you only shoot one shot you may lose the shot if you are not able to recover all highlights. This is not always easy to check in the field. With our technique we always have the underexposed exposure as a solid backup.
Because we do not much worry about the right exposure (one of the three frames will be good enough) we concentrate in the field only about the scene to photograph. In the past we checked histograms all the time and even used manual exposure. Now exposure is on automatic and Highlight Priority gives us extra headroom in the highlights (read below).
Using advanced imaging techniques
You can use also new tools to create HDR or Super-resolution images:
- Merge to HDR in Photomatix or Photoshop CS3
- Super-resolution in PhotoAcute (gain effective more resolution from multiple shots). PhotoAcute can also improve the dynamic range a bit and remove all sorts of fringing (e.g. chromatic aberrations)
It may sound like we always combine these images to HDR or Super-resolution. This is not the case. But we have always(!) the option to do so. That is why we call it "Capture more Light". We capture about 2-4 f-stops more dynamic range (see below) and can make use of this extended range if we need it. If you consider that many of the recent top DSLRs capture about 9 f-stops in a single frame we can extend the dynamic range to 11-13 f-stops (this maybe even better than color negative film).
About dynamic range
Improving the dynamic range that our digital cameras can capture is for us somehow more important than getting higher resolution or megapixels. There is a well-known technique to capture more dynamic range: shooting more than one image at different exposures (bracketing). From these multiple exposures you can create HDR (high dynamic range) images. This article won’t explain HDR in more detail.
The enemy of merging images is any sort of movement (moving objects or moving cameras). That is why exposure bracketing is most often only applied to static objects and the camera is mounted to a sturdy tripod. This of course imposes sever limitations what we can shoot using HDR.
If in theory these multiple exposures could be captured instantly both issues
- Moving objects
- Camera move
would be no problems at all. We may actually see in the future cameras that could implement this kind of strategy: capture multiple exposures and still freeze even faster moving objects.
Improving Highlights
We always want the best highlights possible. Clipping in the highlights is a no-no. That is why we use the new "Highlight Priority" option with the Canon 1D Mark III, 40D and also the 1Ds Mark III.
Speed Matters
For us it started with the Canon 1D Mark III camera. This camera can capture 10 fps. The main audience is sports and also wildlife photographers. In general we photograph more static nature or urban landscapes. This means fast burst of images in general do not matter for us. Once we got used to the 1D Mark III we started experimenting with what we first called “High Speed HDR”. What does this mean? The camera is set to the highest burst rate (10 fps) and we capture bracketed shots at this speed. This means a 3 shot (-2, 0, +2 EV) bracketed sequence is shot in less than a second. Why does it make a difference? Everything that does not move much in a second is frozen in all three exposures. It also limits the camera movement and captures all slow moving objects reasonable sharp.
Note: We now use the same technique successfully with the Canon EOS 40D and even the Canon 1Ds Mark III. The 6.5 (40D) or 5 (1Ds Mark III) fps work just fine (of course faster frame rates are nice to have).
We used this technique now for at least 3,000 shots (at 3 or 5 shot brackets, makes over 10K frames in total). It really started to change our photographic style.
Good and bad light?
Photographers talk a lot about “good” and “bad” light. Actually they do not really talk about the light. They mean that some sort of light is not “good” for their photos. It is bad because normal film or digital cameras cannot capture the dynamic range in the scene. Using HDR techniques (multiple exposures and tone mapping) you can capture quite a bit more dynamic range. Then again freezing movements is essential. We are using “High Speed Bracketing” now in many light situations that we called previously “bad” light and get very good results.
Note: One sample we present was shot at strong sunlight in San Francisco. We photographed this scene many times before and never got a result we really liked.
Notes on camera technique
We use most of the time image stabilized zooms (24-105mm or 70-200mm range) and shoot handheld or use the aid of a monopod. The ISO range is set to a value that allows us to keep even the longest exposure in our bracket sharp if shot handheld (but also taking the image stabilization into account).
Mix & Match
Because we have 3 shots to use we can do all of the following (we call it “Mix & Match”):
- Use the single best exposure (actually most of the time)
- Merge 2 or 3 shots for HDR (Photomatix or Photoshop CS3)
- Merge 2 or 3 shots for Super-resolution in PhotoAcute
- Merge 2 or 3 shots manually in Photoshop (e.g. to lower the noise in the shadows)
You may realize that this gives you way more options in the image editing process than being stuck with only a single exposure.
Samples
Sample 1 (SF China Town)
After some experiments we started with a sequence of -2, 0, +2EV.
-2,0,+2EV bracket
In some cases you may even recover the +2 EV overexposed shot.
Tonemapping is important
Once you have a HDR image you need “tonemapping” to fit the high dynamic range into a contrast range that can be printed. Actually tonemapping is at least as important as capturing the full dynamic range. Why?
- Without tonemapping HDR images would not be helpful for making prints
- Tonemapping can also be used for single low dynamic range images (open shadows, tame highlights and extract details by improving local contrast).
After Detail Enhancer ToneMapping in Photomatix
We are very careful during tonemapping not to clip any highlight data and also try to preserve as many shadow details as possible (we stay in 16bit all the time).
After some tuning in LightZone and Photoshop CS3 we got the following final image:

Final image (Canon 1D Mark III)
Notes:
- You probably have realized that we also performed a perspective correction. We do this in Photoshop using the Crop tool in "perspective" mode.
- We enabled the Canon 1D Mark III “Highlight Priority” mode. This gives us about 1 f-stop more latitude in the highlights. There is likely slightly more noise in the shadows though. This shadow noise is easily removed by using multiple exposures.
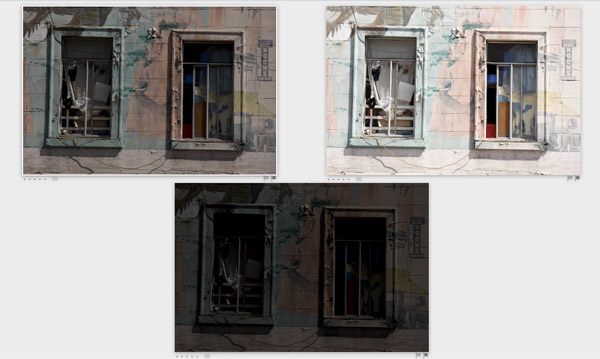
Sample 2 (Laws Museum Railway Car)
Photographing the interior while showing some outside detail is a prime domain of HDR photography. We shot 3 photos with the Canon 40D (high speed and handheld) at -2, 0, +2 EV.
Note: Using a tripod may not have helped because the motor was vibrating the car. Our longest exposure (+2 EV) was 1/50 second at 24mm with an image stabilized lens.
Original RAW files from the Canon 40D at ISO 800
ISO 800 looks very challenging. But you have to understand that the shadows are taken from the +2EV exposure and here the noise is much under control.
This time we combined the images again in Photomatix and tuned the result in LightZone.
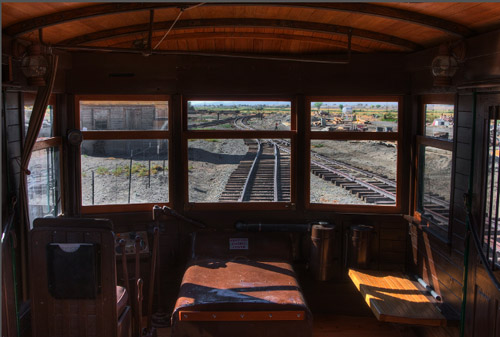
Final image
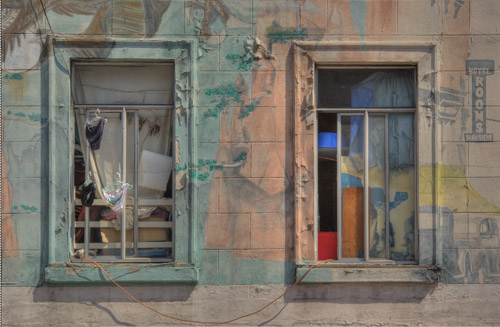
Sample 3 (Venetian Mask)
The following picture was created with PhotoAcute. The shot was taken with a 40D at ISO 1000, freehand and through a window glass. Here combining the images helped to reduce the noise quite a bit.
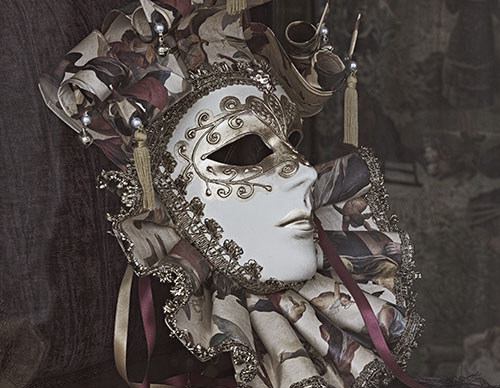
Canon 40D at ISO 1000
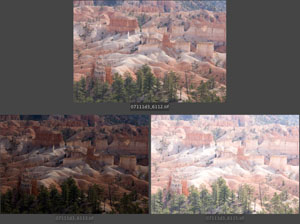
Sample 4 (Nature Photos)
Our method is not restricted to urban scenes. We use it in nature all the time.
The shadow in the next photo is important. This means we are not afraid photographing at strong sunlight. Both photos were converted to HDR and tone-mapped in Photomatix (+ some enhancements with our own Detail Extractor).
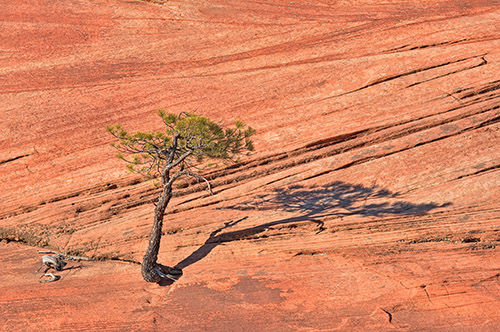
Zion Plateau (Canon 1D Mark III)
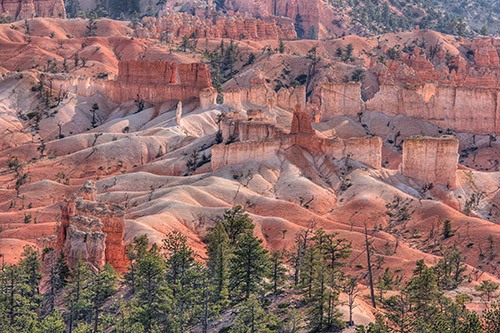
Bryce Canyon (Canon 1D Mark III)
Portfolios
Most of our portfolio photos in 2007 are shot using our new technique.
Bettina + Uwe Steinmueller Portfolios
Conclusion
We think High Speed Bracketing is a new and powerful technique. Being able to capture good photos freehand and at normal sunlight opens new possibilities. Besides more space for images and more imaging work we don’t see any disadvantages. If some of the objects move too much we can still pick the best single exposure.
Since we use this approach we have a very high keep rate with our photos. As said it changed at least our photography.
Best you experiment with different bracketing sequences:
- -1, +1 EV: saves space
- -1, 0, +1 EV: would allow getting a good optimal single exposure that cannot be more than ½ f-stop off.
- -1 1/3, 0, +1 1/3EV: our standard setting now
- -2, 0, +2 EV: if you want to captures an even larger dynamic range. The +2 EV exposure may often require the use of the tripod though.
All the following elements are important:
- Bracketing shots (different exposures)
- Fast frame rate
- Highlight Recovery
- Highlight Priority
- Merging to HDR
- Tonemapping
- Super-resolution
We are quite excited about using the "High Speed Bracketing" technique also in the future and share our experience at our workshops.
More to read
|