Introductory note by Uwe Steinmueller
Finally our first article in this Photo Optimiztion series. Mac and Uwe plan for 2011 workshops with the same goal. The articles demonstrate how you can improve your images. We believe that there is hardly ever a perfect image right out of the camera. This is even more the case when you capture special moments that hardly can be planned (the image featured is a good example).
This article is not a tutorial that can feature all the Photoshop concepts used. We cover them in more detail at our Summit and Photo Optimization workshops. We hope that even photographers new to some of the concepts get motivated to analyze their images and learn some of the techniques that help them to optimize their images.
Mac has printed many photos for highly regarded photographers and learned how to enhance images in a way that they meet the vision of the photographers.
Why I Did What I Did and How I Accomplished it
Mac R. Holbert
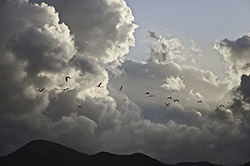
Image: Flamingos In the Clouds by Mark Songhurst
Raw image sent in by Mark Songhurst
You can view/download a 2000 pixel wide version of this image from here.
Global Considerations
Question: Are there Global Issues That Need to be Addressed?
Answer:
Luminosity - Flat, lacks mid-tone separation, some clipping in highlight values, dMax lacking
Hue – Overall blue
Saturation – Washed out
Solution:
- I used the Shadow/Highlight command on a copy of the background to knock down the extreme highlights and to add some contrast in the deep shadows.
- I then used the Gray Dropper on an adjustment layer of Curves (blending mode: Color) to reduce the overall blue cast.
- Next I created a Group with an attached Mask that removed all the Flamingoes from being affected. In this Group I used two Curve Adjustment Layers (both in Luminosity Blending Mode) – one with an additional mask restricting the lightening effect to the horizon above the mountains, the other increases the shadow density and adds overall contrast.
Regional Considerations
Question: Are there any Regional Luminosity, Hue or Saturation adjustments necessary?
Answer:
1. The sky lacks Density and Saturation
2. Even after increasing the overall density the hills still need more.
3. The right side needs some warmth to indicate the setting sun.
4. The clouds on the left are overall too yellow.
5. The whites of the clouds on the left need some added warmth to emulate end of day light.
6. The flamingos need density, contrast, hue and saturation adjustment.
Solution:
1. I created a Group with an attached Mask to block the effect from all but the sky. I included in this Group a Curves Adjustment Layer (Luminosity Blending Mode) and a Hue/Saturation Adjustment Layer (Color Blending Mode}. With the Curve I increased density and with the Hue/Saturation I moved the Hue slider more toward Blue and with the Saturation slider I increased the overall Blue Saturation.
2. I created a Group with an attached Mask that selected out just the hills at the bottom of the image. I created two Adjustment Layers, a Curve (Luminosity Blending Mode) and a Selective Color (Normal Blending Mode). I used the Curve to add overall density and to open up what shadow detail there was. I then used the Selective Color to add Black to the blacks in hope of increasing the dMax without destroying the shadow detail. I use the Blend-if sliders to further restrict the added Black to just the blackest Blacks.
3. Here I made a Group with an attached Mask created with a Radial Gradient. I then used a Curve Adjustment Layer (Luminosity Blending Mode) to add regional contrast followed by a Photo Filter Adjustment Layer to add “sunset” warmth.
4. I created a Hue/Saturation Adjustment Layer (Color Blending Mode) with an attached Mask restricting the effect to the clouds minus the flamingos and reduced the Yellow saturation -75.
5. To complete the “end of day” illusion I added a Photo Filter Adjustment Layer (Color Blending Mode) and used a Linear Gradient Mask to restrict the effect to the left of the image. I then used the Blend-If Sliders to limit the effect to just the brightest whites in the clouds.
6. Using the existing flamingo Mask I created a Group that included a Curve Adjustment Layer (Luminosity Blending Mode), a Hue/Saturation Adjustment (Hue Blending Mode) and a Hue/Saturation Layer (Saturation Blending Mode). I used: the Curve Layer to overall lighten and increase the contrast: the Hue/Saturation (Hue Blending Mode) to adjust the hue of the flamingo to a solid pink; the Hue/Saturation (Saturation Blending Mode) to increase the intensity of the pink.
Local Considerations
Question: Are there any Local Corrections Necessary?
Answer:
The clouds would benefit from some local contrast.
The flamingos also would benefit from even more contrast enhancement.
Solution:
I created a * Lighten/Darken Layer and with a Brush set to 8% Flow I painted in light (white) and shadow (black). The overall effect was then adjusted to 85% Opacity to properly blend with the overall image. To insure mid-tone separation without affecting the Shadows or the Highlights I then added a * Midtone Enhancement Layer set to a 30% Opacity.
Final Considerations
Question: Last chance to add or subtract any adjustment!
Answer:
There is a very obvious gap in the center of the string of flamingos.
Solution:
I chose an appropriate single flamingo, copied it to a separate layer, warped it slightly to make its appearance different from the original. And added it (Layer #2) and updated it’s mask to all the appropriate layers:
#4 - Adjustments Minus Flamingoes
#8 - Minus Sat Clouds
#10 - Flamingo Adjustments
Although I made the decision to add the flamingo at the end of the optimization process I added it (#2 Layer) to the Pixel area of the Layer Stack. This way it is affected equally by all the layers and adjustment layers above it.
Output Sharpening
Output sharpening is a size dependent, substrate dependent function. It should be the last thing you do before printing.
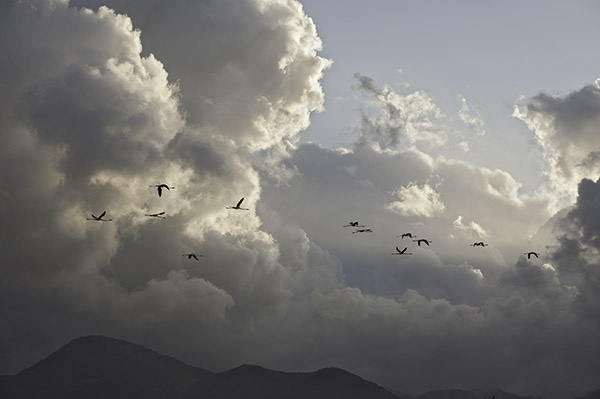
Final Image
Final version
You can view/download a 2000 pixel wide version from here.
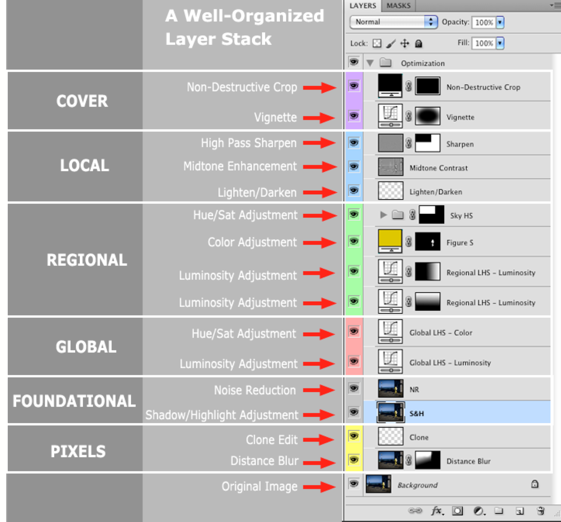
Final Layer Stack
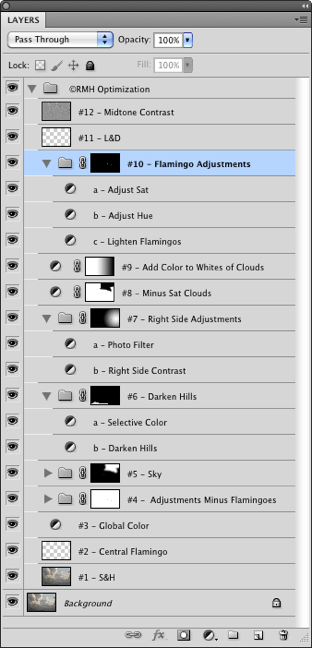
Well-Organized Layer Stack
|