The Art of Raw Conversion #004
"Raw is
all you need: Adobe Camera Raw Plug-in"
Review by
Uwe Steinmueller (2/19/2003)
|
| |
|
| |
|
| |
Nearly all high quality digital cameras (especially
the high end digital SLRs) support a so called Raw file format (see
our article here). There is no doubt, that only Raw files deliver
the maximal possible quality a camera can deliver. Unfortunately all
these Raw file formats are different and non standard (that will hopefully
change over time).
If you want to view your Raw file in Photoshop you either need to use
a proprietary manufacturer Raw converter, a third party tool or in some
cases a special manufacturer plug-in.
What is the problem? Although these Raw converters do all the same
thing (see our article on Raw
Converter Essentials) they all behave very differently. Also some
manufacturers of digital cameras want to provide colors of their choice
instead of the most possible correct colors by profiling their cameras.
Note: We are aware that there are variations between individual camera
color spaces. These differences are not as big as some might believe.
That means generic camera profiles can be very useful.
Adobe's Camera Raw plugin changes this situation quite a bit. Now most
of the Raw file formats can be opened using a common user interface.
Camera Raw provides the generic profiling for each supported camera.
Here is the impressive list of cameras supported right now (we list
only those cameras that we covered in our magazine):
- Canon D30, D60, 1D, 1Ds
- Nikon D1, D1x, D1h, D100
- Fuji S2
- Olympus E20
- Kodak 760, ProBack & ProBack 645 (CR opens these files but they
are not officially supported by Adobe, we actually get very good results
from ProBack files)
|
| |
It is kind of needless to say that of course everything
in Camera Raw (CR) is fully color managed (monitor profiles are the
same as used by Photoshop and for all supported cameras Camera Raw uses
built in generic camera profiles).
| For all color work it is very important that you
can trust the color management implementation of your Raw converter.
There are not many raw converters on the market that we really trust
to implement proper color management. On the other hand Photoshop's
color management implementation is trusted by the whole graphics
industry. |
|
| |
| This review is based on our practical experience over
the last few months using Camera Raw on a daily basis. |
| |
|
| |
| Integration into Photoshop's File Browser |
| |
| |
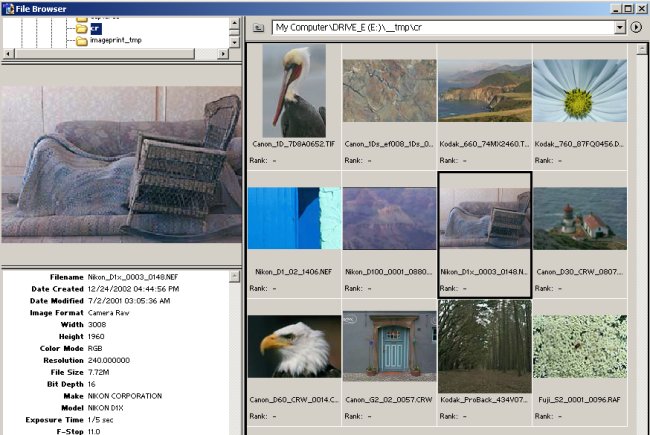
Photoshop File Browser showing Raw images from 12 different digital
SLRs we have used |
| |
| We like the feeling that the Photoshop File Browsers
shows now all of our raw files, can preview them (the previews are a bit
small due to some limitations of the Photoshop 7 file browser), displays
EXIF camera information and open any of these different Raw files into
Photoshop. |
| |
|
| |
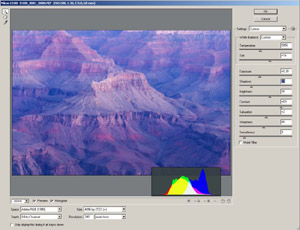
| Camera Raw User Interface Overview |
| |

Camera Raw User Interface
|
| |
The user interface of Camera Raw is clean and easy
to use. The window can be resized up to full screen. The only downside
of this feature is that some operations might be less real-time than
using a smaller window (this depends of course on the performance the
machine used).
The preview image is really big enough to judge the color and other
details. If you need to view finer details (e.g. for sharpening) the
preview can be viewed at 100% pixels and beyond. |
| |
|
| |
| The User Interface Elements |
| |
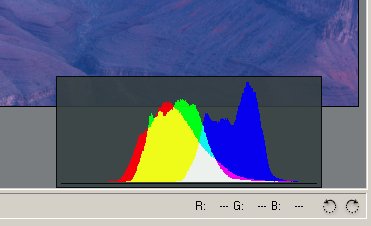
| The Histogram |
| |
Histograms
|
| |
| The histogram shows a RGB histogram and also histograms
of the three color channels. The histogram can enabled/disabled and freely
positioned inside the preview pane. |
| |
| Zoom/Hand tool |
| |
| CR supports all the usual zooming and file moving that
you are used to in Photoshop. We most of the time have the preview set
to "Fit in View" as we do detail inspections later in Photoshop
itself (but that is our personal workflow style). |
| |
| Eyedropper |
| |
We will explain the eyedropper later when we cover
WB (White Balance).
The Eyedropper can also be used for RGB readouts. These RGB values
are displayed on the right side below the preview window. |
| |
| Rotating |
| |
There are two controls to rotate the image clock or counter-clockwise.
Due to some limitations of the File Browser in Photoshop 7.0 rotations
done in Camera Raw will not show in the File Browser. The opposite is
works: Rotate in the File Browser and Camera Raw will show it correctly
rotated. That means it is better to rotate in the File Browser before
opening the photo in Camera Raw.
|
| |
| |
| Options |
| |
|
| |
| Preview |
| |
| The preview checkbox toggles between the current settings
and the default settings for the camera. So you can change the "before"
state while the dialog it open by setting the camera defaults. |
| |
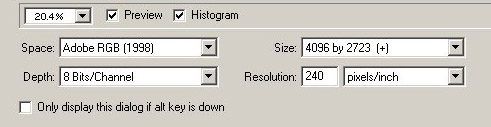
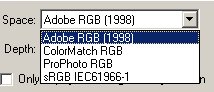
| (Working) Space |
| |
|
| |
| CR offers four different working spaces. We use Adobe
RGB (1998). |
| |
| (Bit) Depth |
| |
| You can open Raw files with CR in 8 and 16 bit mode.
We most of the time use CR in 8 bit mode. This seems to be strange as
we are among the 16 bit advocates. But all the very strong data changes
like WB and EV are performed in CR (as 16 bit) and we then continue in
Photoshop in layers anyway. Layers require 8 bit for Photoshop 7. |
| |
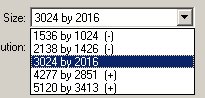
| Size |
| |
|
| |
| For most Raw file formats CR allows to up/downsize the
image. The algorithm used is much improved over the standard Photoshop
"bicubic". "(-)" indicates a downsampling from the
native camera format and "(+)" an upsampling. |
| |
| Resolution |
| |
| This defines the DPI that the opened file gets tagged
with. We use 240DPI. |
| |
| Only display this dialog if alt key is down |
| |
| For some operations like web galleries and contact sheets
you do not want that the CR dialog gets opened for each individual image. |
| |
| |
| |
| Most of these options discussed so far will be not changed
that often. |
| |
|
| |
| Camera Raw's Main Controls |
| |
The right side of the user interface shows the main CR controls
|
| |
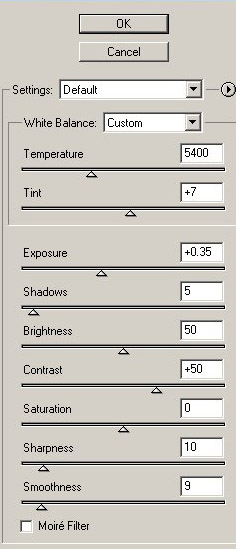
| The main tasks you do in any Raw converter are correcting
your White Balance (WB) and Exposure (EV). |
| |
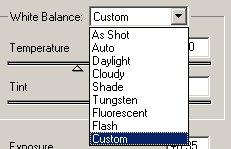
| White Balance (WB) |
| |
The white balance in CR is controlled by two sliders:
Temperature and Tint.
Here is how Thomas Knoll (the original creator of Photoshop and also
Camera Raw) explains their function:
"To get a color to appear white, you need
to get three parameters correct. This is a basic feature of human version,
stemming from the three types of color sensors in the eye.
There are several common ways of factoring these
three parameters. Probably the most familiar is red-green-blue values,
where white is when they are all equal to some maximum value.
Another common factoring is luminance-temperature-tint,
which is what the Camera Raw plug-in is using.
Luminance is basically how bright the light is.
This is what photographers fiddle with all the time by adjusting shutter
speed and f-stop. The Camera Raw plug-in allows you to fine-tune this
using the "Exposure" slider.
The remaining two parameters describe the "color"
of the light.
If you take a black object and start heating
it up,first it starts to glow red, then orange, then yellow,then "white,"
and then a blue-white. The exact color of this light is dependent only
on the temperature of the object, and is called "black body radiation".
It is usually measured in degrees Kelvin. Unfortunately, humans usually
describe lower Kelvin numbers as being"warmer," and higher
numbers is being "colder," which is opposite what science
would suggest.
But real world light is rarely pure black body
radiation. A tungsten light comes very close to being a pure black body,
but other light sources usually have a color that is offset from the
black body curve. On one side of black body curve, the light is greener;
on the other side, the light is more magenta. Fluorescent lights are
often very green. The standardized average daylight values (D55, D65,
D75) are all slightly greener than black body. Flashes are sometimes
more magenta than black body.
The Camera Raw plug-in has two sliders to adjust
for the color of the light. The first is "Temperature," which
is a closest point on the black body curve to the light's actual color.
The second is "Tint," which is the offset distance perpendicular
to the black body curve. Positive values means the light is greener
than black body; negative means the light is more magenta than black
body."
We have used nearly all other Raw converters out there and practically
found that just a color temperature slider does not cut it. We must
say that the WB control in Camera Raw is the best we ever have seen.
Of course Camera Raw also allows a one-click WB. Click with the eyedropper
on a gray or white (no overexposed white please) area and CR sets the
correct temperature and tint values. We try to photograph a gray card
under the same light as the other images, correct the gray card image
and then apply the WB settings to all the other photos with the same
light.
Then there are also some standard WB presets:
Standard WB Presets
Please read our article about "Subjective
WB" to understand that often the "right" WB needs
some subjective corrections. |
| |
| Unfortunately there is no tool support to only apply
the WB to other photos in this version of CR. But you can remember the
two numbers for temperature/tint and apply them for other images. |
| |
| Exposure & Shadows |
| |
The exposure slider allows you to
control the right settings for your highlights. CR has a very powerful
unique feature to view possible blown highlights. While you drag the
exposure slider use the "Alt" key and you get a threshold
view.
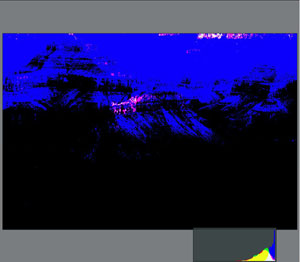
Threshold view shows clipped Highlights
The shadows slider lets you control the shadows and
again the "Alt" key allows you to see a threshold view.
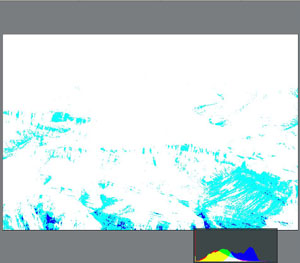
Threshold view shows clipped Shadows
The preview and histogram are both updated in realtime. |
| |
| Brightness/Contrast |
| |
| CR also allows you to control the brightness and contrast.
We perform the final correction to Photoshop and leave these two sliders
at their default values. |
| |
| Saturation |
| |
| Also the control for saturation works quite nicely.
We like to tune later the saturation in Photoshop for selected regions
and selected colors. |
| |
| Sharpness |
| |
You can get quite good sharpening results with CR's
sharpness control. There are three possible strategies:
1. Do all sharpening in CR (recommended for batch conversion)
2. Do some 10% sharpening in CR and later final sharpening in Photoshop
3. Leave all sharpening to Photoshop.
We currently tend to use method 3 as we have very good sharpening tools
later in PS and want to have sharpening as the final step. |
| |
| Here is a Canon 1Ds file as an example |
| |
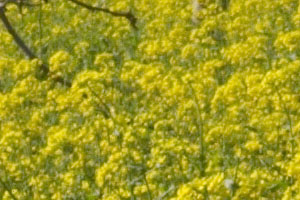
1Ds image (4064x2704 pixels)
|
| |
CR sharpening 0% on the left and 50% on the right (at 100% pixels)
|
| |
| Smoothness |
| |
| The smoothness control can be used to remove some noise
(especially for higher ISO images). CR tries to keep the sharpness on
all edges but as any noise filter the images gets a bit degraded. Our
strategy is to use as much as possible low ISO with our (Nikon D1x and
Canon 1Ds). |
| |
Again the general strategies are the same aw with
sharpening:
1. Do all noise removal in CR (only for really high ISO images)
2. Do some 10% smoothening in CR and later more work in Photoshop (or
Neatimage)
3. Leave all noise removal to Photoshop.
Again we tend to use method 3 or in general do hardly any noise removal
at all. |
| |
| Moire Filter |
| |
| Can remove some minor to medium moire for cameras like
the Fuji S2. Is "off" for most of our images. |
| |
|
| |
| Saving and reusing settings |
| |
Often you want to use the same settings for a set
of photos. There are two ways in Camera Raw to save the settings and
apply them later to other images.
1. Save and load settings (all settings are saved and can be restored).
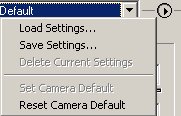
Once saved into the folder "Presets/Camera Raw" these settings
are also shown in the settings drop down list
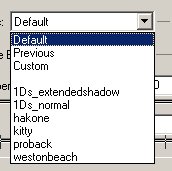
- Default: Apply camera type default (see next paragraph)
- Previous: Recall values from last use in CR
- Custom: User has changed values
- other entries: List of user saved settings that are located in the
folder "Presets/Camera Raw"
2. Use "Set Camera Default" in this case the settings are
used for the same camera type as the default if you later open a new
image from the same camera (type). This allows you to have defaults
e.g. for the Canon 1Ds and also the Nikon D1x at the same time.
3. "Reset Camera Default" can be used to get back to the
Camera Raw factory (Adobe) default settings.
We most of the time use a mixture of methods 1 and 2. |
| |
|
| |
| Recording the CR settings |
| |
Later you might ask how the settings had been when
had converted converted a certain Raw file. No problem! CR records all
the settings used by CR in the EXIF information of the created file.
You can later use the Photoshop File Browser to read the settings you
used and apply them in Camera Raw to the original raw file. CR allows
you to enter all these values as a simple number.
E.G. the White Balance consists only of two simple values: Temperature
and Tint. |
| |
|
| |
| Batch conversion |
| |
You can also perform batch conversions. This is done
by creating Photoshop actions and using these actions in batch mode
(see Camera Raw manual). This opens the possibility to have different
actions for different purposes.
A main reason to use batch conversion would be to create some preview
JPG images from newly captured photos. |
| |
|
| |
| Pricing |
| |
| Adobe Camera Raw can be ordered at $99 online from the
Adobe
store. As far as we know there is no trial version of this software. |
| |
| |
|
| |
| Other Features |
| |
- Camera Raw comes with a JPEG2000 file format plugin.
|
| |
|
| |
| Our raw converter profile lists which operations a raw
converter performs and how well it does it's job. We think that some operations
are better left for Photoshop and that some raw converters end up being
overblown mini Photoshop applications. |
| |
| Adobe Camera Raw Profile |
|
| |
|
| |
|
| Responsibility |
Adobe Camera Raw |
| |
|
| Bayer
Pattern interpolation |
good |
| |
|
| Apply Tone Curve |
good, wide range for shadows and highlights |
| |
|
| Apply Camera Profile |
fixed generic profiles per camera type |
| |
|
| White Balance (WB) |
excellent |
| |
|
| Exposure Compensation (EV) |
excellent |
| |
|
| Noise removal |
good |
| |
|
| Artifact Removal (e.g. noise) |
Removes moires (most of it) |
| |
|
| Contrast and Brightness (Levels, Curves) |
good |
| |
|
| Saturation |
good |
| |
|
| Sharpening |
ok |
| |
|
| Color Corrections |
n/a except WB (use Photoshop) |
| |
|
| |
|
| |
|
| |
|
| |
|
| Features |
|
| |
|
| |
|
| |
|
| User Interface experience |
excellent |
| |
|
| Color Management |
full support (Photoshop trusted quality!) |
| |
|
| Histogram |
yes |
| |
|
| Reasonable large preview |
excellent |
| |
|
| Realtime WB, EV and other correction preview |
yes |
| |
|
| Batch capabilities |
yes (using actions) |
| |
|
| Workflow integration |
Ok. integrated with Photoshop file browser |
| |
|
| Integration with Raw image browser |
good |
| |
|
| Saving and recalling settings or setting groups (like WB, Sharpening,
...) |
yes (saving of all settings and as camera default), no separate
WB saving and loading. |
| |
|
| Saving in 16bit |
yes |
| |
|
| Tag saved files with profiles |
opened in Photoshop in the right working space |
| |
|
| Recording of conversion settings |
Excellent. Stored as extra EXIF information |
| |
|
|
| |
|
| |
| Conclusion |
| |
The Adobe Camera Raw plug-in can be considered a
milestone for all photographers using Raw files today. But it should
also encourage all out there that still think JPGs are easier to handle.
We also like that the colors (we find them very natural) are just based
on objective (though of course generic) profiling of the different camera
types. The profiling was done by the people who implemented color management
for Photoshop and can be surely trusted. Camera Raw is also equally
available for the Mac and PC like Photoshop itself.
What could be improved? We could think of a more sophisticated noise
removal but that also would add some more complexity to the plugin.
The integration with the File Browser could go beyond the limitations
of the current Photoshop 7 implementation although we like what we get
without changing the current version of Photoshop 7.
We leave the comparison of how well Camera Raw handles fine details
to other more analytical reviewers out there. For us good color comes
first and here Camera Raw clearly delivers. We also cannot complain
about missing details either.
In an upcoming article we will compare Camera Raw with our other favorite
Raw converter "Capture
One DSLR".
Needless to say, every Raw user should get his copy of Camera Raw.
For the rest it is a good reason to give Raw files a try. Even if Raw
files are still non standard, Camera Raw provides a great unique interface
for nearly all Raw file types on the market as of this writing.
We expect that the customers will soon request from the camera manufacturers
to support Adobe's Camera Raw plugin as it has the potential to become
the industry standard Raw converter.
Highly Recommended
Camera Raw might also one of the best reasons for some
photographers to finally upgrade to Photoshop 7. |
| |
Adobe
(Russel Brown) Tutorial for Adobe Camera Raw
|
| |
| |
| Please have a look at our latest
e-booklet that features our new workflow using Adobe's Camera Raw. |
| |
| |
|
| |
|
| |
| |