| |
|
| |
Digital Outback Photo Contest #013
Contest March 2004: Sharpening Contest #4
|
| |
|
| |
|
| |
|
| |
Limited to 8 entries (8 entries
terminated) |
| |
|
| |
See also our other
contests |
| |
|
| |
A Note on Copyright:
This image can only(!) used in the context of this contest and the only
site that has the right to publish images is Digital Outback Photo. If
you want to use this image for any other purposes (e.g. marketing) you
can acquire a license from us. |
| |
|
| |
|
| |
There are no prizes for this contest as the evaluation
of the results can be too subjective. |
| |
|
| |
To share experience it is not enough
just to show the results. We need precise step-by-step descriptions
of all image editing operations that had been performed. That is why
we need to limit the used tools to the ones that are available at Digital
Outback Photo (and they have to be available for PC or Mac):
- Photoshop (this is the standard image editor we use)
- Commercial and non commercial sharpening actions and plugins
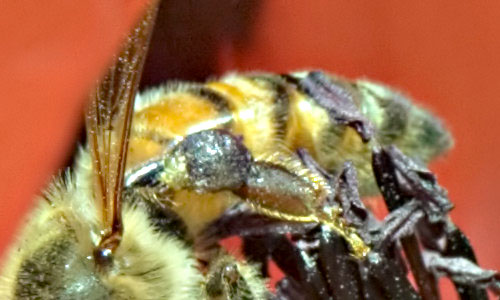
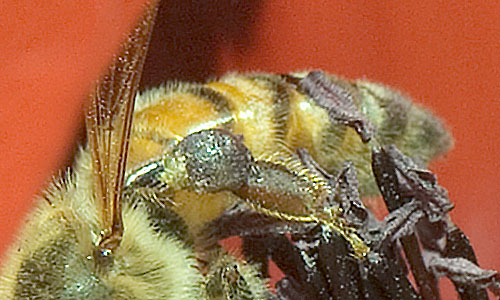
Photo was taken with the Canon 1D Mark II.
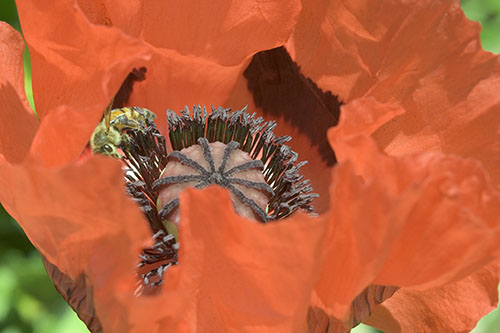
Giant Poppy with Bee

500 pixel wide crop (from not sharpened image)
This photo was created using:
- ACR 2.2 (sharpening to off)
Rules:
- It is your task to sharpen the crop shown above
- You load the cropped image (JPG, copyright Bettina & Uwe Steinmueller)
from here (about 150KB JPG at low compresion 12)
- Use any sharpening technique you like
- Describe the process step by step
- Send only the instructions and the final sharpened image crop (JPG
8 in Photoshop) and your full name to:
contest@outbackphoto.com
- Do not change any colors
 No
selective sharpening (like painting or color selection). Edge masks
are of course ok. We would like to see techniqes that work also automated. No
selective sharpening (like painting or color selection). Edge masks
are of course ok. We would like to see techniqes that work also automated.- The final image has to be in Adobe RGB and RGB color mode (without
any layers)
|
| |
|
| |
|
| |
|
| |
|
| |
|
| |
|
| |
Note: As all photos should be in the Adobe RGB color
space it is recommended to download interesting samples and view them
in Photoshop on a profiled monitor and at larger magnification. |
| |
|
| |
|
| |
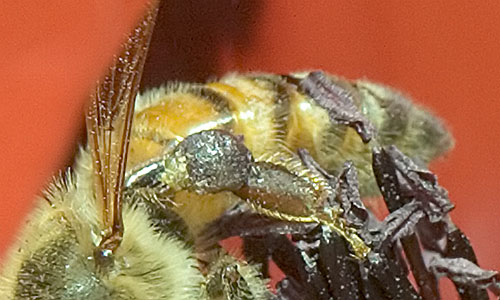
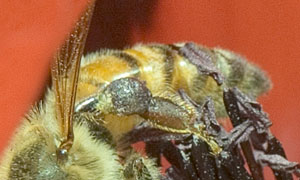
Sample Entries (by Uwe Steinmueller) |
| |
|
| |
-
Sharpened with EasyS at
strongest level, amount 250, 3D 50% and used with EasyS actions
- Opacity of EasyS layer 100%
|
| |
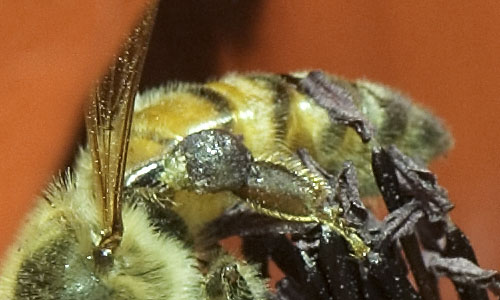
Normally we do not enter a second sample. But the
reader entries 1-5 indicated the following:
- Noise removal is a benefit
- You can even sharpen more
|
| |
|
| |
|
| |
|
| |
- Exchanged the green and blue channel with an image cleaned by Noise
Ninja 2.0
-
Sharpened with EasyS at
strongest level, amount 440, 3D 50% and used with EasyS actions
- Opacity of EasyS layer 80%
Note of caution: At these levels of
sharpening the final print may look to sharp and not natural. We always
use sharpening in a layer and can then tone down the sharpness if needed. |
| |
|
| |
|
| |
|
| |
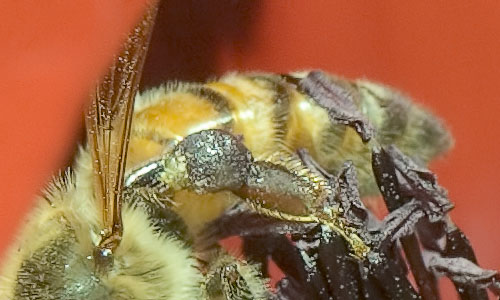
#01 Kagan Tuncay |
| |
|
| |
|
| |
|
| |
- First I used Neat Image to filter the noise
- * auto profile with regular
image
- * default filter preset
- Then I applied PS unsharp mask filter
twice:
- Amount 20 Radius 10 Threshold 3
- Amount 50 Radius 30 Threshold 3
|
| |
|
| |
|
| |
|
| |
#2 McBain |
| |
|
| |
|
| |
|
| |
- PS USM 300 , 1 , 5
- PS USM 200 , 0.25 , 8
|
| |
|
| |
|
| |
|
| |
#03 Reto Holz |
| |
|
| |
|
| |
|
| |
- dSLR Fractal Sharpen Hvy Sharp Low Iso
|
| |
|
| |
|
| |
|
| |
#04 Carmen A. Vecchione |
| |
|
| |
|
| |
|
| |
- Ran image through Neat Image Pro, default sharpening,
saved as tiff.
- Then save image as Genuine Fractal file using trial
program.
- Reopen in photoshop, upsized 500%.
- Applied USM, 170%, 6 pixels, 0
threshold.
- Finally downsized to original size using bicubic sharper.
|
| |
|
| |
|
| |
|
| |
#05 Anthony J. Spadafora |
| |
|
| |
|
| |
|
| |
- Select blue channel on channels palette
- Duplicate channel
- Filter, Noise, Median Radius 1
- Filter, Other, Maximum Radius 2
- Filter, Blur, Gaussian Blur Radius
0.6
- Select RGB
- Load mask (Ctl-Alt-4 Windows, Option-4 MAC)
- Convert to Lab
- Select Y channel
- USM 0.6, 350, 1
- Convert to RGB
- Deselect Mask
|
| |
|
| |
|
| |
|
| |
#06 John Connell |
| |
|
| |
|
| |
|
| |
- Presharpen 3d - Edges Only - Method:Normal - Amount:
100
- Fred Miranda 10D ISOR - ISO 100-200 ISOR (De-Noise)
- Smarter Sharpen
X V2.0 - Detail: 37 - Threshold: 50 - Window Size: 1
Despeckle window: 0, Sharpening Amount: 25 - Edge Fix Amount: 10
- Overall Blending:
100
- Qimage Unsharp Mask Radius: 3 Strength: 100 - Sharpness Equalizer:
50%
|
| |
|
| |
|
| |
|
| |
#07 Clive Carpenter |
| |
|
| |
|
| |
|
| |
- Ran image through Neat Image - standard settings
- Photokit Capture
Sharpener
- Sharpener Set - Digital Mid-Res Sharpen
- Sharpener Effect - Medium Edge Sharpen
- Photokit Creative Sharpener
- Setting - Edge Sharpen 1
- Photokit Output Sharpener
- Web and Multimedia Sharpener
- 400 pixel Narrow Edge Sharpen
|
| |
|
| |
|
| |
|
| |
#08 Peter Flamman |
| |
|
| |
|
| |
|
| |
- I used focus magic twice
- 1st blur with 2, 125 %
- 2nd blur with 1, 100%
|
| |
|
| |
|
| |
|
| |
Thanks to all participants (including all submissions
that may not get published). |
| |
|
| |
|
| |
|
| |
|
| |
|
| |
|
| |
|
| |
|
| |
|
| |
|
| |
|