| Home | News | Nature | Places | Reviews | Workshop | Resources | Galleries | About |
| |
| |
| |
|
|
"Solution to the Fuji S1 Green Cast Problem"By Rich Shelton, Rich Shelton's Photography |
| The Problem |
| As great as the Fuji's S1 color rendition is, it turns out that there is one annoying problem. It appears that most S1 bodies exhibit a pronounced "green caste" over the left side of the frame. It is not noticeable in most normal shots, but is quite visible when shooting against a white (or light neutral) background, or when assembling horizontal panoramas. In fact, I had shot over 800 frames with my S1 before I noticed the problem! Once you see it, it begins to drive you nuts! It can be seen in the two examples below: |
|
White Card Photo |
|
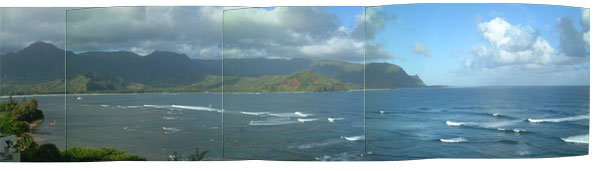
Here's a real world example from a Raw four-image Panorama Tools output
file... |
| The Solution! |
| Fortunately, after countless hours working with Photoshop tools and gradients, and a a two-day Internet search regarding the problem, I discovered the solution... |
| Mike Chaney, himself an S1 owner, is the author of an outstanding photo editing and printing program, Qimage Pro 2001. This program has an array of excellent filters and processors for the digital camera owner. It includes a color caste and vignette correction filter. It is a bargain at $35! |
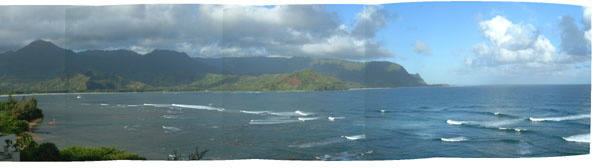
| Basically, you take a photo of a white card like the one at the top of the page. Then you apply it as a correction to the raw photograph, and resave the image. The raw version of the caste-corrected panorama is shown below: |
|
Qimage Pro removed the green color caste completely! |
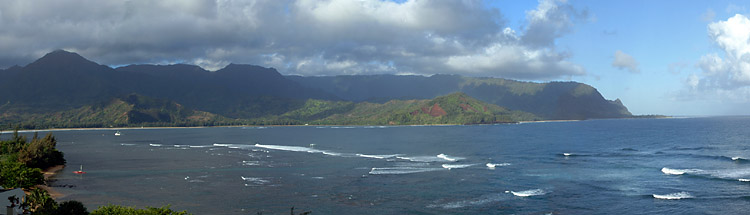
| After a few tweaks to the layers in Photoshop, the finished panorama comes out looking very clean: |
|
Hanalei Bay, Kauai |
| If you are a serious digital photographer, buy Qimage Pro. I have tested many of its other filters (including dark frame subtraction, chroma correction, shadow noise filter, dark current filter, etc) and found them to be very useful, and not easily reproduced in Photoshop. Mike clearly understands digital processing very well, and has produced quite a product! |
| Detailed Qimage Procedure |
| To set up for green caste removal, first shoot your "white card" photos. I shoot mine out of focus in sunlight against two stacked large sheets of bright white matte paper. I use an exposure compensation of +1.3 to +1.7 stops so the frame isn't too dark. I also use TIFF image mode as recommended by Qimage's author. |
| After shooting, I open the reference frames in photoshop and apply a 'dust and scratches' or gaussian blur filter to ensure there are no faint dust specs on the reference frame (otherwise dust will appear as white spots on your corrected images!). I shoot white frames with each lens, and at two apertures for each. Then I rename the images something like "Tokina 20mm f16.tif" or "Nikon 35mm f2.tif" so I can apply the best fitting reference frame. |
| Put all of the reference frames in a new folder on your hard drive ( eg - "Green Frames" ). Open an image in QIP and go to edit mode. Check the "dark frame" filter. A dialog box will pop up. Select your folder with the reference images. Then click "select image from this folder" and pick the appropriate reference frame. Then click on "Correction Method: Frame Equalization". Press Apply to run the filter. |
| When you are finished editing in Qimage, go to the menu at the top and click on "File: Save Filtered Images". When the dialog box pops up, click on the "Create New Images" radio button. This will save your corrected image so you can edit it further in Photoshop. |
|
|
| For Comments post in our News Group |