The race for megapixels continues. “Resolution
isn’t everything.” “Having a 16Mpixel sensor does
not guarantee a good image.” These are true statements, and Uwe
repeats them to me all the time. I come from a 4x5” film world.
I chose that route 20 years ago, because detail is a vital part of
how I see things. I prefer a tactile image. One that has an almost
3 dimensional quality to the texture. As a result, I’m on a constant
search for “enough detail”. The largest I typically print
is 30x40 (although I have printed 40x50” images from a Betterlight
scanning back), so this is my goal. 30x40” prints with no visible
digital artifacts. Uwe doesn’t really believe me though... he
doesn’t think I’ll ever be happy... give me 100Mp, and
I’ll be looking for 200. (He’s probably right... just don’t
tell him)
There are already a few articles on how to capture the stitched image.
I prefer flat stitching... which involves keeping the lens stationary
and moving the sensor around the film plane. The most common method
I use is with a Canon Tilt/Shift lens, by capturing three overlapping
images: left, middle right. The important thing for quality
flat stitching, is to ensure minimal parallax errors (read
here how to avoid parallax).
This review is based on the version 4.04 of Stitcher.
I use one of two methods of stitching. My initial method involved
bringing each image into Photoshop as a layer, and then creating the
seam following detail where it wouldn’t be noticed. This method
becomes more troublesome when using 16 bit images. The general manipulation
of the 3 layers slows down a lot. It is also *very* cumbersome when
attempting to combine a 5x5 matrix of images taken with the Canon 1Ds
Mk II mounted on a Sinar view camera.
Since I’d much rather be photographing than playing in Photoshop,
I have always been on the lookout for an automated method of doing
this. There are many stitching programs on the market, both free and
as products. I tried most of them, and was always able to find the
seams. Most will work if you downsize the image to 1024 pixels for
display on a monitor, but none really held up to scrutiny at 100% enlargement
(this is necessary for me, since most of my images are printed at greater
than 16x20). The program that held up best was Realviz. It was also
one of the easier to work with.
Realviz allows you to do more than just flat stitches. It’s
a VR creator’s dream. For my purposes, this additional functionality
just got in the way. Once ignored, the use became much easier for me.
The Realviz Interface
The following is a quick overview of how I normally interact with Realviz.
It in no way even begins to document all of the features and capabilities
the product has. My sole purpose in using it is for flat stitching.
If you are using a Pano head, then I’d recommend getting the
demo version and trying it out. A word of warning though, the demo
version is 4.0.1, and there are numerous, aggravating bugs that have
been fixed in 4.0.3. Their site doesn’t allow access to any
of the upgrades unless you’ve purchased the product.
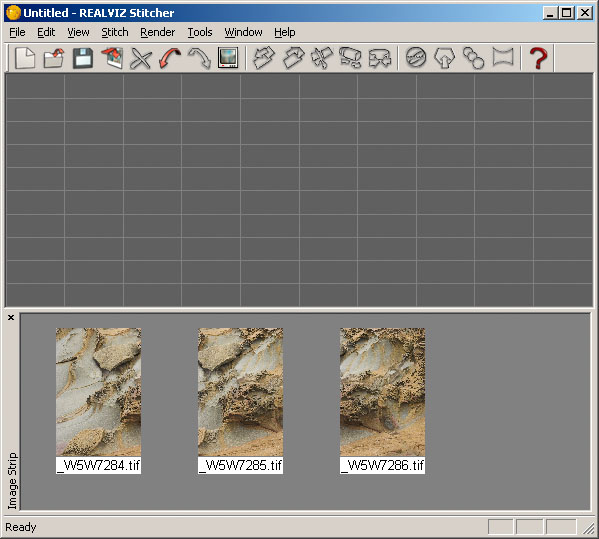
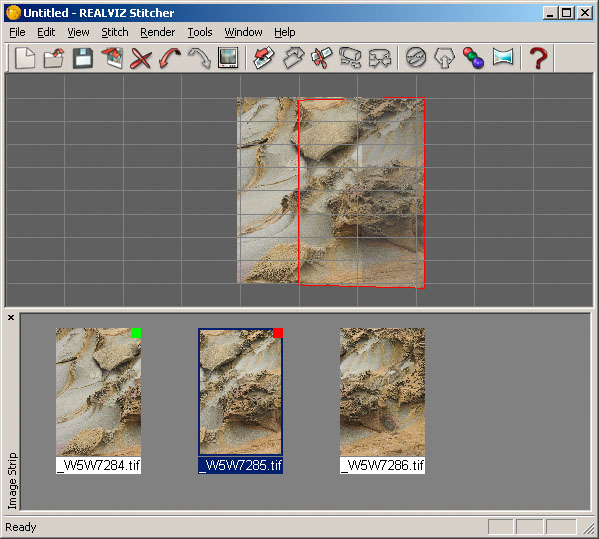
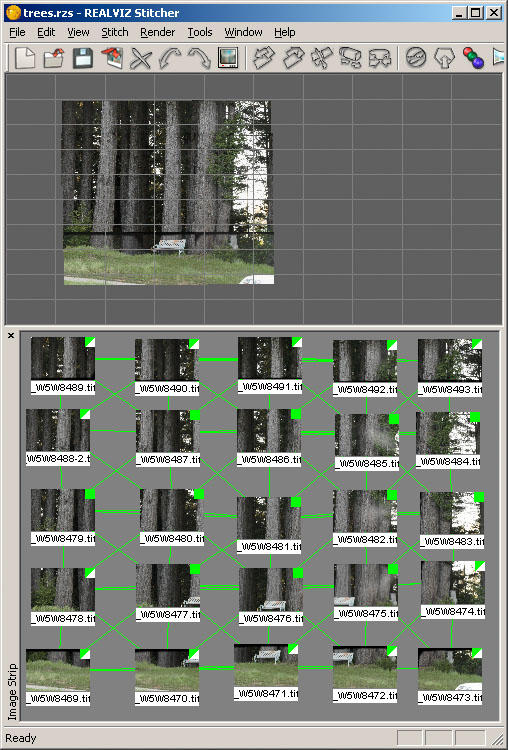
After starting the program, you are presented with a dual screen view
of your project. The top portion (stitching window) is used for the
combining of individual images, while the bottom (image strip) is
where you can drag/drop each individual one (loading is also possible
from the file menu).
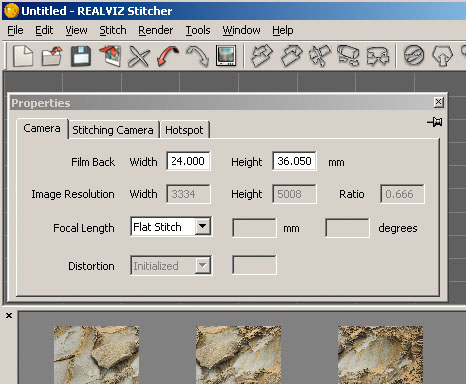
If you are doing flat stitches, then you need to set that in the Properties
dialog box. This has to be done prior to dragging any of the images
into the stitching window. Forgetting to do this will result in a
projected panorama, rather than a flat. (If you’re image in
the stitching window has curved edges, then you have this setting
wrong).
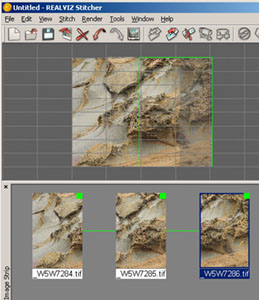
Creating the stitched image is as easy as dragging an image from the
Image Strip and dropping it into the Stitching window. If an image
has been joined successfully, then you’ll see a green square
in the upper corner. A red means that you haven’t joined it
yet.
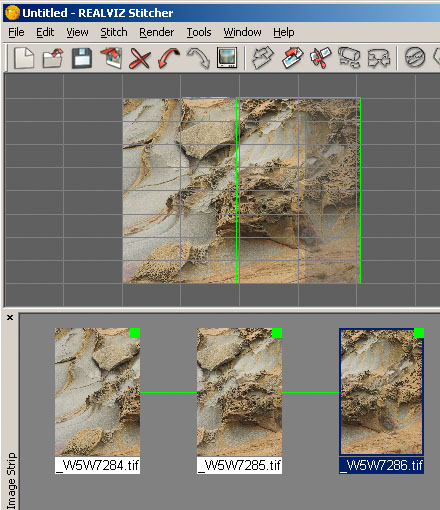
Here is an example of all three images joined successfully. If the
images to be joined are lacking in detail (a lot of sky would do it),
then Realviz will tell you that, and ask if you want to force a joining.
This requires more manual control on where the images will join.
When manually stitching in Photoshop, there are times that the exposure
in one more of the images differs slightly. This requires some careful
curves adjustments on each of the layers to make sure that this isn’t
visible in the final image. Realviz makes this much easier. After the
images are fully joined, you just select “Equalize All Images” and
voila.

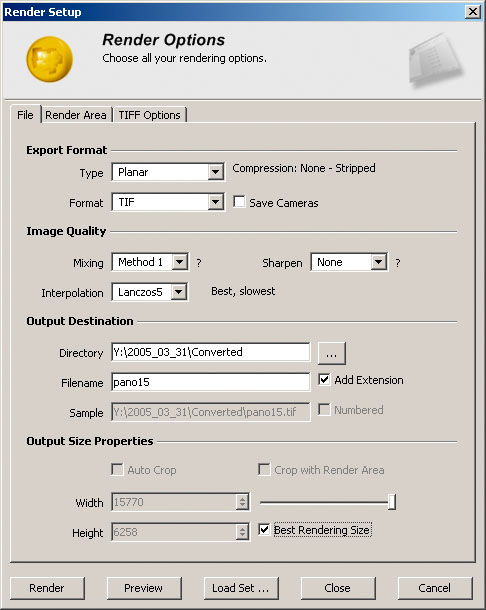
Realviz gives you a plethora of options. I’m only going to outline
those necessary for my workflow. I set Sharpen to none (I prefer to
use Uwe’s EasyS sharpening toolkit). The type of panorama is
Planar (with other options being Cylindrical QTVR, Cubic QTVR, Cylindrical,
Cubical, Spherical, Shockwave3D and VRML). Mixing option is used to
combine the images along the seams when there’s a difference
between them (possibly due to parallax). Method 1 has worked for me.
Lanczos5 is the highest quality, but slowest, interpolation method
used during the seam creation.
Mixing Options
Let's say you have a line in the overlapping part of two images,
which should become 1 line in the resulting image: Method 1: Stitcher tries to match the lines
into one line when combining the images; this is called warping
and can mean that the line becomes curvy, if there are parallax
problems
Method 2: Stitcher just blends the two images
as is, so if you have a parallax problem you will see in the
result two lines instead of one. |
There are a number of output options as well. I normally use either
Tif or PSD. The advantage to PSD is that Realviz will output each image
into a layer, and supply the layer mask necessary to combine the images,
forming the final panorama. This takes a lot more time, and more disk
space (these files grow very quickly), but it offers the most control
over the images. I will use TIF first, and if there are any artifacts
around seams, then I’ll rerun it with PSD as my output option.
Select the Render Area tab to highlight the area you wish to render.
I normally leave a little white space around it, and remove it later
in Photoshop. I find that cropping in Photoshop is more accurate.

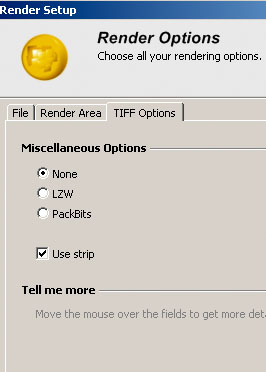
One useful option that is new in 4.0.3 is “Use strip” under
the TIFF Options. Early releases of Realviz had problems with the program
crashing when attempting very large panoramas. The “Use strip” option
will help with this, however it does increase the length of time necessary
to render the final image.
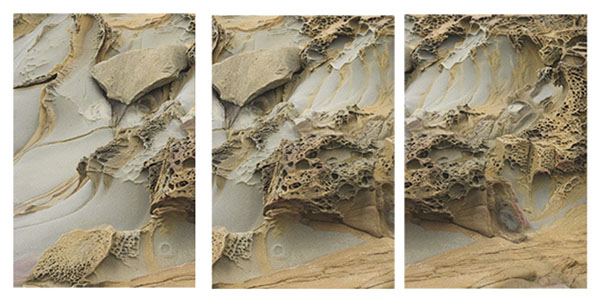
Here is the final output image, produced by Realviz ( output using
TIFF). Not much can really be told by examining web versions of stitched
images. Of course you can’t see seams in the image posted here.
The real test is to examine it at 100%. My advice is to download
the demo version and give it a try yourself. I have noticed an improvement
in 4.0.3 in both memory management and joining of images and the
seams produced. It is unfortunate that you can only download 4.0.1
and unless bought, a user doesn’t have access to maintenance
releases (4.0.3 is the most significant).
Best you download the demo and then apply the following 4.04 patches:
Mac: ftp://ftp.realviz.com/private/ST4/Stitcher404PatchEN.dmg.gz
PC: ftp://ftp.realviz.com/private/ST4/Stitcher4-0-4_patch.exe
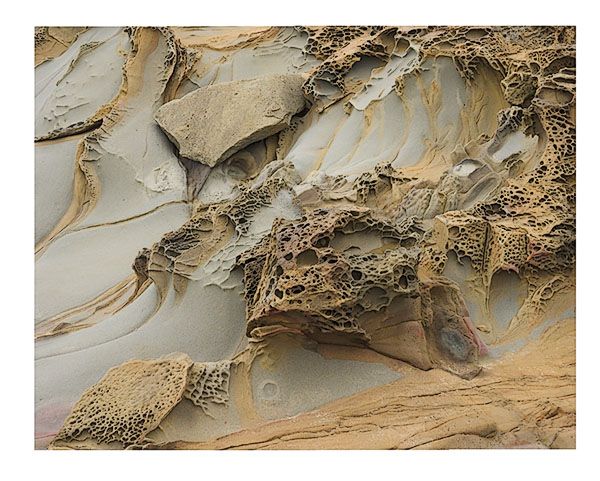
Finally, here’s an example of what can be done. I wouldn’t
begin to attempt this using Photoshop and layers, and combining them
by hand. Each of these images is a full frame from a Canon 1Ds Mk II
(16.7Mp). I used a Sinar 4x5 view camera and an attachment (read
more info here) to capture 25 images (5x5). The final rendered image is
about 180Mp, and
took
about 3 hours to render
(using a dual Xeon 2.2Ghz processor).
Like I said above, I’m a detail person. I sell large images (up
to 40x50). Although not perfect (slight parallax errors can still produce
artifacts around seams), I have found it the best tool on the market
for my workflow.
Stitcher Express ($120 list price)
Drawbacks compared to Stitcher 4 are:
- only 8 bit support (that maybe a big one for some users)
- no panorama conversion tool
- very limited stencil tool compared to Stitcher 4
- limited export format support
- no hotspot editor
- limited interpolation methods
- no templates or batch rendering
- no render sets
You can find a comparison here.
A special deal for DOP readers
Buy Stitcher 4.0 (actualy
version 4.04) at $290. Order here: http://www.realviz.com/purchase/buyonline/index.php
and enter at checkout the discount code: "OBPSOD15".
The offer will be valid till end of June.
|