09/04/2009 Important Improvement: DOP Luma Mask Pro 1.1
We realized that the mask in quite few cases needs some blur and also that changing the mask density from the dialog could be helpful (Photoshop CS4 has a special mask density tool. Our version works in CS3 and CS4).
Note: If you purchased DOP Luma Mask Pro before 9/4/2009 please download the new version from with your old login.
If the new options are
the behavior of the old and new version are the same. All your old presets will work as before.
Please read the updated documentation below.
Motivation
We sell for a long time our Tonality Tuning Kit. The core of this tool is the capability to create Luminosity masks (masks that are defined by certain Luminosity ranges in the original image). DOP Luma Mask Pro allows you to create your own fine tuned custom Luminosity masks and preview their effect interactively.
Installation
The DOP Luma Mask Pro comes is Javascript file for Photoshop CS3/CS4 (we only support CS3/CS4).
- Full version is named: DOP_LumaMask_Pro.jsx
- Demo version is named: DOP_LumaMask_Pro_Demo.jsx
There is also a script: DOP_LumaMask_Pro_NOUI.jsx that we cover later
Installing the scripts
The scripts need to be copied to the Photoshop CS3/CS4 folder and here to Presets/Scripts (or to the equivalent locations for other languages). After restarting CS3/CS4 you should find the script under File->Scripts. If you do not find it there you did not put the script into the proper location.
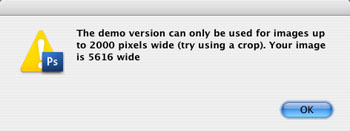
Note: The free demo version can only handle images up to 2000 pixels wide. The commercial version does not have this restriction. You will get this warning message if you use larger images with the demo version:
Using the DOP Luma Mask Pro
Using the script
Note: The following should be true:
- The top most visible layer should be selected
- The layer should not(!) be the background layer
- The layer should have no Layer Mask attached
- The image should be a RGB image
Otherwise you may get an error.
Using the script is simple. Best you have the top layer selected. Open the script from File->Scripts
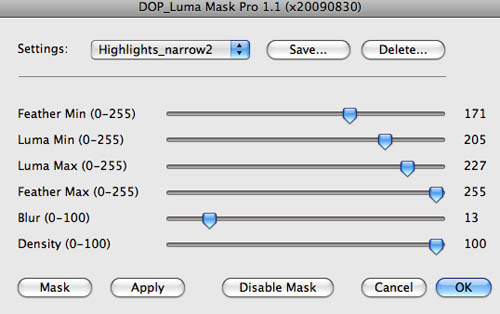
The DOP Luma Mask Pro provides 4 sliders. These four sliders define the mask:
Important Note: The sliders in each row have to have lower or equal values than the one in the slider directly below (as in our screen shot). We catch some of these errors but maybe not all. This means these values should be like:
Feather Min <= Luma Min <= Luma Max <= Feather Min
Sliders
- Feather Min: The mask is black for all values darker than Feather Min. The range Feather Min to Luma Min defines the feather range. The closer the values to Luma Min the whiter the mask becomes.
- Luma Min, Luma Max: For all luminance values of the original image that are >= Luma Min and <= Luma Max the mask becomes white.
- Feather Max: The range between Luma Max and Feather Max defines again a feather range. The closer the values to Luma Max the whiter the mask becomes.
- Blur: Performs a Gaussian Blur. Value between 10 and 30 are most often used. Blur can introduce some halos at very high contrast edges. Whether you need/want blur you can find out by trying the preview (Apply) with different settings.
- Density: Most of the time the default value of 100 is just fine.
Buttons
- OK: Confirm and create the Layer Mask
- Cancel: No mask will be created
- Apply: Creates the mask but also keeps the dialog open for fine tuning
- Mask: Shows the mask. You need you run "Apply" first. If you change values you need to re-run "Apply".
- Disable/Enable Mask: If "Apply" had been executed this button allows you to toggle between Layer Mask disabled or not. Here you can best judge the effect of the mask
Presets
You likely will have your favorite luma masks. That is why we support named presets.
You can save named presets of any settings you like:

You can save, recall and delete presets.
These presets are stored in the "DOP_LumaMask_Pro_Settings" folder located in the Photoshop/Presets/Scripts folder. If presets don't work it is likely due to read/write permissions for this folder. We also ship a few presets for your use. Copy them to the "DOP_LumaMask_Pro_Settings" folder.
Note: Luma Mask Pro comes only with three sample presets to get you started, The screen shot above includes our own personal presets.
Custom scripts
Sometimes you want to run Luma Mask Pro with certain settings without using the dialog (e.g. for batch processing). With Luma Mask Pro you can actually create your own custom scripts.
Use the script DOP_LumaMask_Pro_NOUI.jsx as a template (not in the demo version):
var runScript = app.path + "/" + localize("$$$/ScriptingSupport/InstalledScripts=Presets/Scripts") + "/DOP_EasyDS_DetailSharpnessResolver.jsx" ;
var defSetting = "LastUsed";
$.evalFile(runScript); |
This script actually runs using the last settings that are automatically recorded as a preset called "LastUsed".
Now if you want to create your own script you do the following:
- Create a preset in EasyDS (e.g. "midtones")
- Open the "DOP_LumaMask_Pro_NOUI.jsx" script.
- Replace "LastUsed" with your own preset name (here "midtones"). Leave the rest of the script unchanged.
- Save the script with a new name to your CS3/CS4 Presets/Scripts folder
var runScript = app.path + "/" + localize("$$$/ScriptingSupport/InstalledScripts=Presets/Scripts") + "/DOP_LumaMask_Pro.jsx" ;
var defSetting = "midtones";
$.evalFile(runScript); |
Sample Sessions
There are many use cases for luminosity masks. Here are some:
- Restrict effects to midtones
- Restrict noise removal to shadows
- Tune aggressive highlights
- Restrict color changes to certain tonal ranges
General Example
Open the script and select your luma and feather ranges. "Apply" creates the mask.
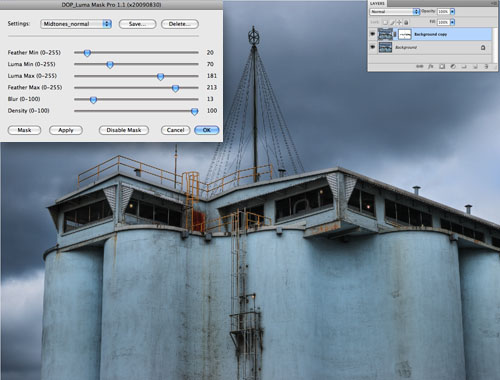
Apply created the mask
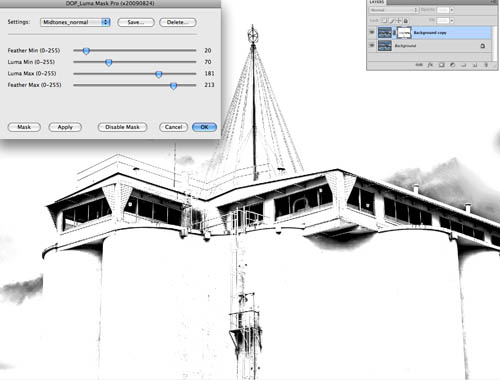
View the mask by hitting "Mask"

Mask is disabled (red X in the layers palette)
Once you like the result hit "OK" and the final mask will be created.
If you know that you want this mask you can just hit "OK" without using "Apply". "Apply" allows you to preview the effect of the mask.
Contrast Sample
You apply an S-Curve to a photo. This can block shadows and clip highlights.
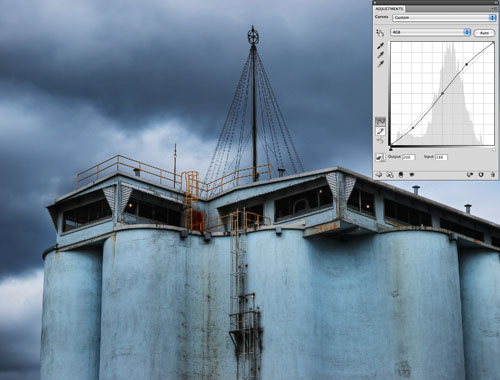
S-Curve
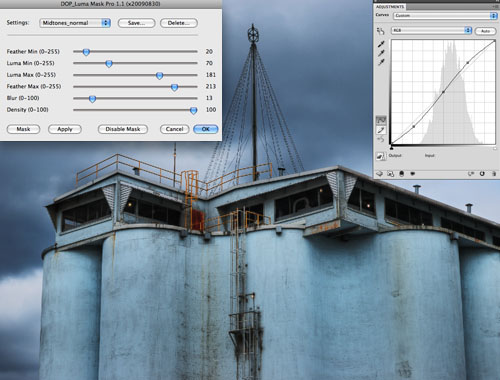
Apply Midtone Mask

Enable and Disable the mask to evaluate the effect of the mask
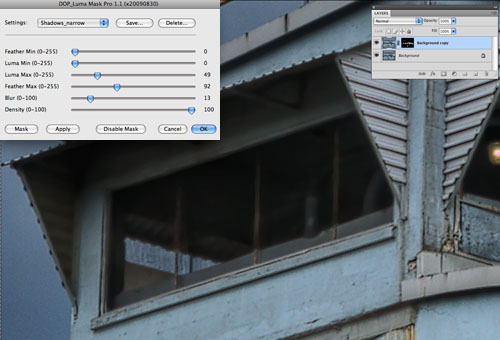
Noise example
Note: We use a very primitive noise removal to show the principle. In reality you use the noise removal tool of your choice.The mask can restrict the effect only to the shadows. We used a Median filter for noise removal (too strong to show the effect on these small images).

Shadow mask applied but disabled
Masked result
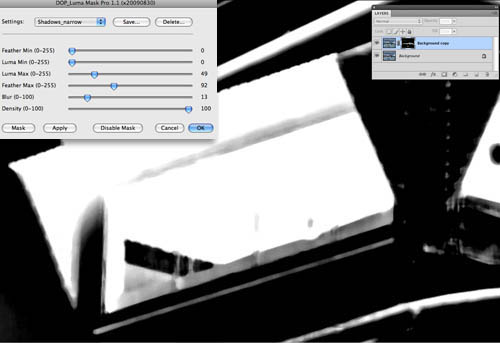
Mask
Possible Errors
In some cases you may get this error message:
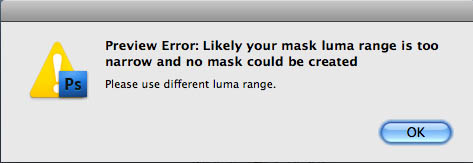
In most cases you may have selected a too narrow luminosity range and the image did not have any pixels in this range. Also check that
Feather Min <= Luma Min <= Luma Max <= Feather Min
holds true. Change your settings and run the script again.
Conclusion
For a long time we planned to create an upgrade for the old and trusted Tonality Tuning Kit. The new Luma Mask Pro gives you more control and allows to create better optimized masks. The preview ("Apply") also makes your life much easier.
As always try before you buy.
|


