Otherwise it feels exactly like the pro version. We
feel that we can live with these limitations. On the other side you
may consider the pro version if you miss the more pro features.
C1 Rebel is what we call a Full Service RAW Converter . That means you can do nearly all operations for your final
picture inside this tool (except retouching like cloning, lens, perspective
corrections and printing).
Note: The C1 Rebel raw conversion is not based on
the Canon SDK. Phase One uses own algorithms used for their high-end
digital backs for many years.
Actually, C1 Rebel is implementing a very productive
workflow for the Canon EOS 300D. C1 is fully color management aware
which is essential for any serious color work.
This section is not a replacement for the manual and
we will only cover the main steps and settings.
Note: We use Capture One DSLR Pro and C1 Rebel for
our work with our 1Ds, 10D and 300D.
Note: When we mention Adobe's Photoshop we actually
mean both the full Photoshop (we use already PS CS/8) or Photoshop
Elements
2.0 (which comes in the box with the EOS 300D)
This Preview of C1 Rebel is based on the
V1.0 RC1 version, there may be some changes in the final version.
Setup
We only cover these settings that we feel are
essential to change for our workflow (the rest stays as is C1 Rebels
default).
Preferences
Develop Settings
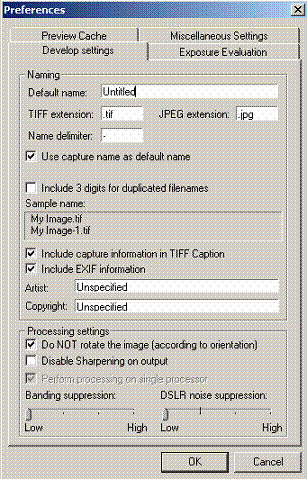
· DSLR
noise Suppression: We would set it to low or medium/low for lower
ISO images
· We
enable sharpening on output if we use the two phase sharpening technique.
Most of the time we do all sharpening in Photoshop and check this
box.
Note: Two phase sharpening use mild sharpening
in the raw converter and then later a final sharpening for printing
in Photoshop. To better understand the sharpening workflow read
our article about the Photokit SHARPENER sharpening workflow.
Exposure Evaluation
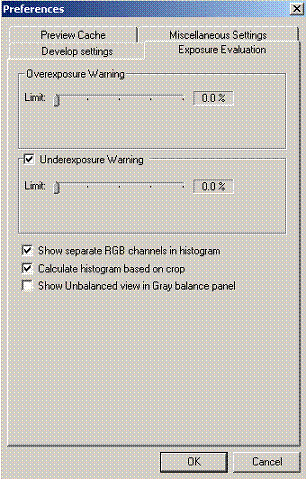
· We
set both values to 0% as we would like to get a warning about any
overexposure (underexposure is important too but not as critical)
· We
always want to see the separate RGB channels in the histogram to
check for overexposures in the single channels
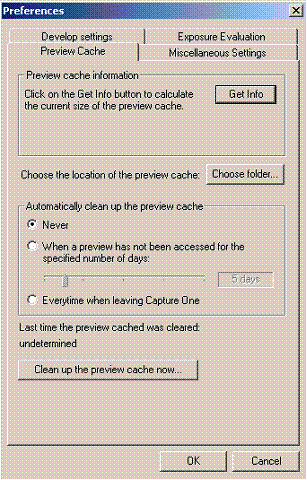
Preview Cache
· One
of the powerful workflow features of C1 is based on the creation
of previews. But the downside is that these previews use up space
on your disk. C1 allows you to manage the preview caching strategy
using these settings
· We
always select a special folder for the C1 preview cache using the Choose
the location for the preview cache as doesnt like to mix software
and data folders.
Miscellaneous Settings
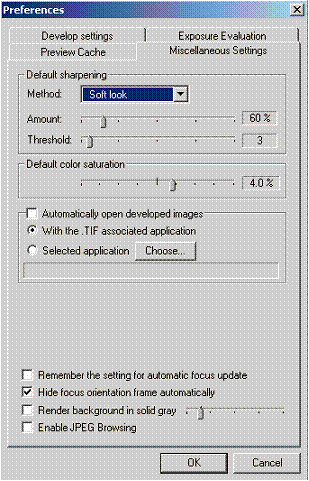
· If
we use the two stage sharpening technique we set the default sharpening
to a very mild sharpening level:
o Method:
Soft Look
o Amount:
60%
o Threshold:
3
· We
like to set the default color saturation to 4% but this is entirely
up to your personal taste. Try to avoid too strong saturation settings.
· We
uncheck Automatically open develop images (would mean mainly in
PS Elements) as we keep the PS Elements File Browser monitoring the
target folder of C1s Develop Folder. This way we have C1 and Elements
open at the same time and work in C1 or Elements whenever we like.
(Develop in C1 and post process in PS Elements)
· We
disable JPEG browsing as we only want to see C1 Rebel supported raw
files (these are in fact only 300D raw files with the extension CRW)
Color
Management Settings
Best you select this dialog while you have a 300D
photo selected in your raw file browser.
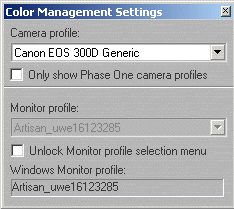
Color Management setup
· Camera
Profile: Capture One offers one generic profiles for the 300D
· Monitor:
Here you need to check that the correct monitor profile is selected
(if not, then check you Windows System profile)
Image
Browser
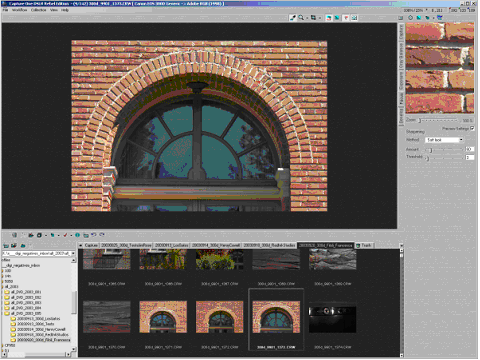
Image Browser in Landscape
Mode
At first, it looks like a nice but quite normal image
browser. There are some major differences.
· With
the function key F8 the browser can be toggled to work in portrait
or landscape mode (to allow the most space for the preview image)
· The
browser and C1 do not use the original RAW files for preview. For preview
C1 creates preview images in the background.
Once these previews are created you can switch from one file to the
other in real-time.
· C1
allows the user to define permanent collections. Each new permanent
collection gets a new tab in the browser. Non permanent collection
show with an italic title in the tab name. Using permanent collections
allow you to get to all your current project folders fast. The preview
images of these permanent folders stay even after cleaning the cache.
Image
Processing
Image processing in C1 is a five step workflow process
(one tab per step):
· Inspect
· Gray
Balance your image
· Correct
exposure and contrast
· Sharpen
(called focus)
· Develop
(Capture)
Inspect
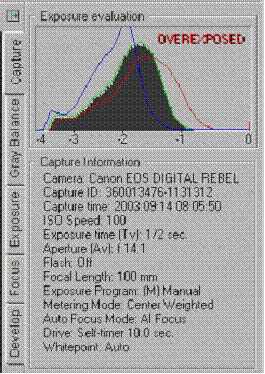
The first thing you might want to do is to look at
the photo and the capture information:
· Histogram
(also the three channel histograms) and the over or underexposure
warnings (in our example you can study a slight overexposure in the
red channel)
· Data
recorded by the camera, like:
o ISO
o Exposure
time and aperture
o Lens
used
o Flash
o Camera
White point (WB method)
Gray/White
Balance (WB)
Correcting the white balance is one of the essential
steps. C1 Rebel provides all the controls you need.

C1s Gray Balance tool
The main tool for gray balancing is the eyedropper.
You select a gray area (actually an area that should be gray/neutral
and is not due to the wrong color temperature setting) inside the
image and click with the eyedropper. C1 even gets you some hints
whether this might be a good spot for gray correction.
If there is no gray/neutrals
in the image things get bit more complicated and you want to use
the color temperature controls.
Best you take a shot with a gray card (we have one
with us all the time) or a GretagMacbeth Color Checker at the same
light you photograph the other photos to make gray balancing easier.
Because you can save/restore WB settings, you can
save some sample settings for the same light conditions.
C1 also provides an automatic correction. As all automatic
corrections, this may not always, what you want but sometimes it
might give you some good results.
Exposure
Next to WB the exposure is the other important correction
tool.
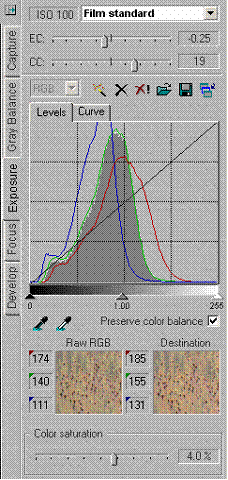
C1 Exposure
Here you can correct +/- 2.5 EV. The histogram and
the preview image (use the Exposure Warning option in the toolbar
and overexposed area will turn red) let you inspect all areas for
over/under exposure. Important are the RGB channel histograms as
there might be overexposures just in one or two channels.
Besides EV, you also can correct the contrast and
also tweak the saturation
In addition, C1 comes with different tone curves:
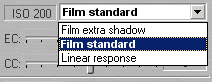
Tone Curves
For most situations the standard tone curve Film
Standard will do. If you need more shadow detail, try Film extra
Shadow. The curve Linear Response is mainly for profiling purposes.
C1 Levels
C1 Levels very much work like Levels
in Photoshop.
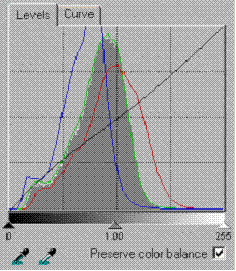
C1 Curves
Because PS Elements does not support a Curves tool
we like to use C1s Curves to open up some shadows:
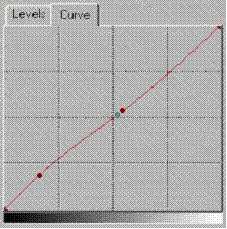
Sample curve to slightly brighten the shadows
Sometimes it is very useful to use the Shift key
while manipulating the curves control points. This way they move
in smaller increments.
Focus/Sharpening
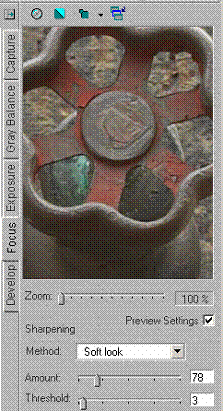
C1 Focus
The C1 sharpening tool is a classic Unsharp Mask (USM)
tool. Do not try to over-sharpen your images. .
Develop
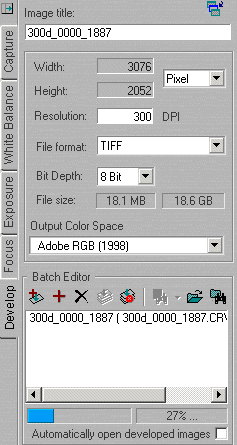
Develop
Important: Select
as Output Color Space as "Adobe RGB (1998)" if you plan for printing.
If you click the develop button (or the Insert key
while you are on any tab) the real
RAW conversion is performed. Again, C1 demonstrates the focus on
workflow. How? The RAW processing is done in the background and C1
is free for the next interactive image corrections.
Note: The C1 Rebel can only have 10 files
for development at any time. We work around this limit by working
on
the developed files in PS Elements. Then we add more to the queue.
If this is a limit, then you are most like a real pro and buying
the C1 Pro version would save you time and money.
Because PS Elements only supports 8 bit files
and we also use layers in our workflow we set the output Bit Depth to 8
Bit. If you work with a full version of Photoshop (especially the
new PS CS/8) use 16
bit.
Additional
Features
Tagging
While you explore your images you can tag files (Ctrl+T)
that you want to convert later.
Tagged Image
Once you have tagged all your winners and improved
their WB and exposure you can select all tagged files (Alt+T)
and add to the development queue (here you have to watch for
the 10 files
limitation).
If you own a Canon EOS 300D (Digital Rebel) you should
start using the RAW file format and C1 Rebel is a first class raw converter
to get the most out of these RAW files.