3/16/2006 Initial review
V1.2
Disclosure: As a photographic advisor to Light Crafts Inc. we
are partly involved in the development of LightZone. Still what
we write is our personal opinion and not the one of Light Crafts. As this review will show LightZone is a new kind of photography
editor. To better understand what we mean let's have a look at
today's imaging tools.
Imaging Editor: The best known tool of this
kind is Photoshop. Photoshop is a top class imaging editor that
also can be used for
powerful photo manipulation. Photoshop has for years a strong focus
on image designers and has many features that are not obvious
to be useful
for normal
photographers.
This also means that many
photographers find Photoshop hard to master. Still Photoshop is
the reference image editor used for the photographic workflow.
RAW Converter: Nearly all RAW converters lack
features that would make them the tool of choice for editing
RAW files ready for a final print. We will show in this article
what their main lacking features are. This means in many cases
the final image tuning has to be performed inside Photoshop (this
is at least true for all of our work).
Photo Editor: A photo editor is a tool that
can bring in many cases a photo from the RAW/JPEG/TIFF camera (or
scans) to the final printable version of this photo. LightZone
is a tool of this kind.
Note: Even the new tools like Aperture or Lightroom
do not belong into this last category because they lack some
essential selective editing capabilities. This does not mean
that quite a few photographers
may not require selective editing on many of their images.
Design Basics
LightZone is based on a few very fundamental ideas:
- Tonality Zones (roughly based
on Ansel Adam's zone system)
- Dodge & Burn (making changes
to selected areas of your photo. None of today's
RAW converters helps here and normally
only Photoshop layers with layer masks provide a solution.
- Non-destructive operations stack (again
no RAW converter helps here if it comes to selective operations
and only Photoshop does similar things with adjustment
layers)
- Easy to learn
Note: LightZone 1.2 is still an
early version of this product. The developers are aware that
they need
to add some essential features and they are working on this.
Sample workflow session
The best way to learn LightZone is to show a
real world sample session.
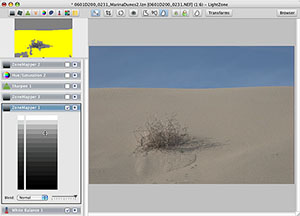
Browse
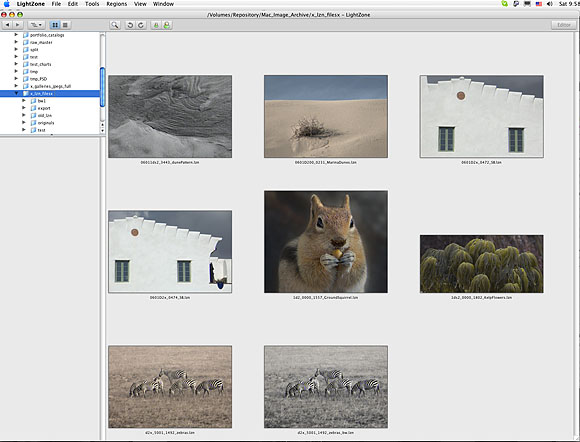
LZ Browser
LZ provides a basic image browsers.
This browser has no ambitions to be a replacement for complete
photo organizers like Apple
Aperture or Adobe
Lightroom. Instead LightZone tries to work well
together with these tools.
White Balance 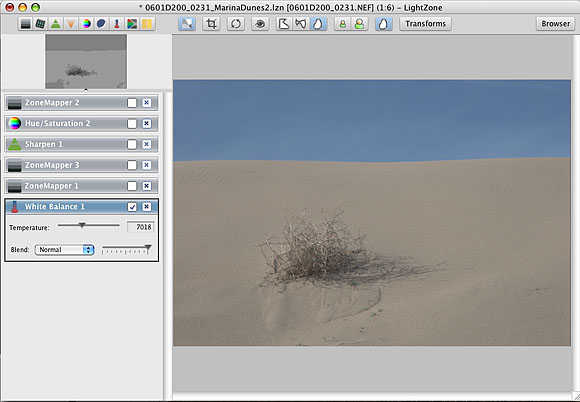
Initial RAW photo with just WB applied
Right now the LZ white balance tool is a standard color temperature
tool and does not have any tool to properly gray balance a photo.
LightZone
correctly
recognizes
the
in-camera
WB settings. We are also missing some WB presets (although in
reality we hardly ever use them).
LZ also features a related tool to remove color casts:
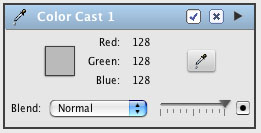
Color Cast Tool
The color cast tool allows to neutralize
colors in a certain range of luminosity. This way you can neutralize
differently in the shadows, midtones and highlights (This tool
is new in V1.2).
Because LZ allows all operations
to operate only on regions (see below) it is easy to have different
WB settings for different regions in your image. This is more
often needed than you may think because many scenes are lit by
different light sources (e.g. sun and sky).
Overall Contrast
Tonality tuning is very different from all the other RAW converters
that feature Levels and/or Curves tools. It is quite obvious that
our sample photo lacks quite a bit of overall contrast. As in
all other editors we first have to adjust the white/black points.
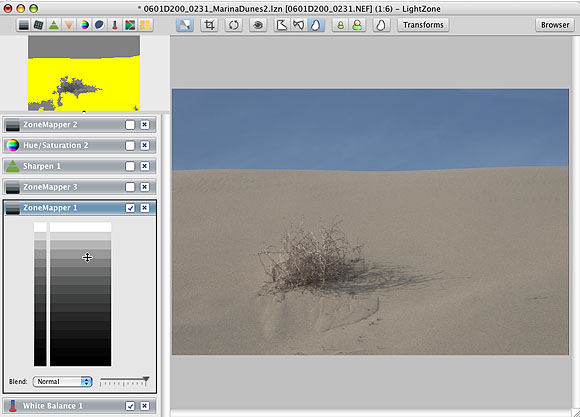
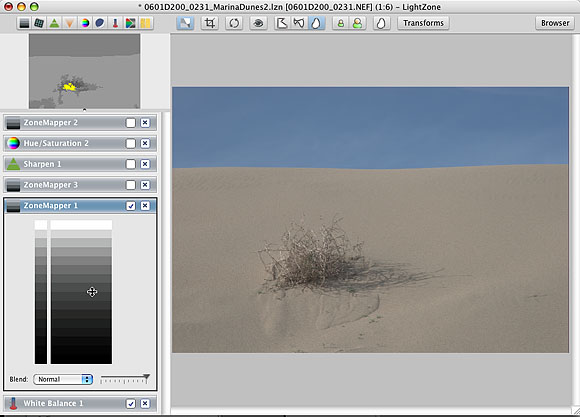
Finding the brightest zone
For this task LZ provides a so
called ZoneMapper tool and ZoneFinder display.
These tools are very new but not hard to master.
Zonemapper and Zonefinder for brightest area
The ZoneMapper has 16 tone regions
from black to white (like 8 f-stops with half f-stop increments).
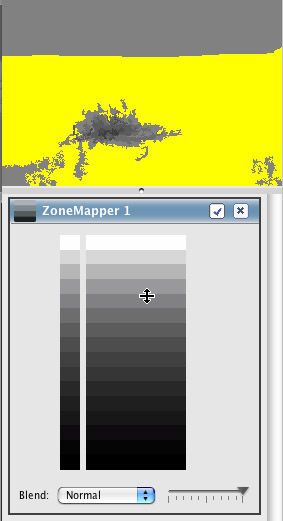
Here is what you need to do:
While
you hover with the cursor over the ZoneMapper zone ramp the
ZoneFinder will display the areas in the image that have a luminosity
of this
zone. This way it is very easy to find the brightest elements
in the image. In our sample photo the brightest elements are
in
zone 4. To make this zone brighter we would push the zone (actually
most of the time zones 1 or 2 stops up) up towards the top.
Then we do the same for the darkest
area.
Finding the darkest zone
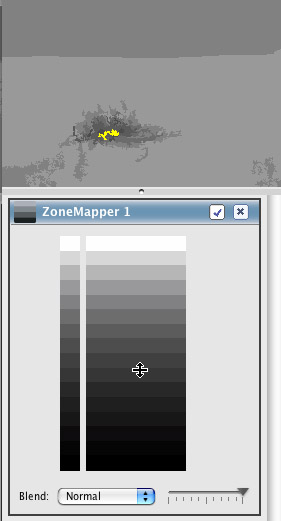
ZoneMapper and ZoneFinder
for darkest zone
The next image shows the corrections
we made:
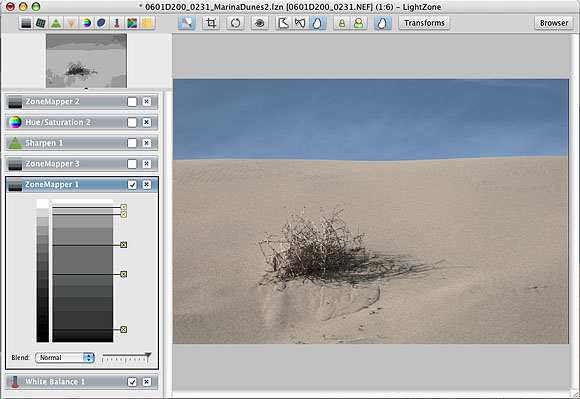
Optimizing overall contrast
It is important to understand
that any of these control point (we used 5 here) is only influencing
the tonal range between the control point above it (or the top)
and the control point below (or the bottom). The best way to learn
this is to download the free full working demo version of LightZone.
So far you can do all this in all
the other editors and RAW converters but we would say that using
Curves is not as intuitive and Levels are not as flexible.
Optimizing contrast in the sand
We now add a second ZoneMapper
on top of the first one:
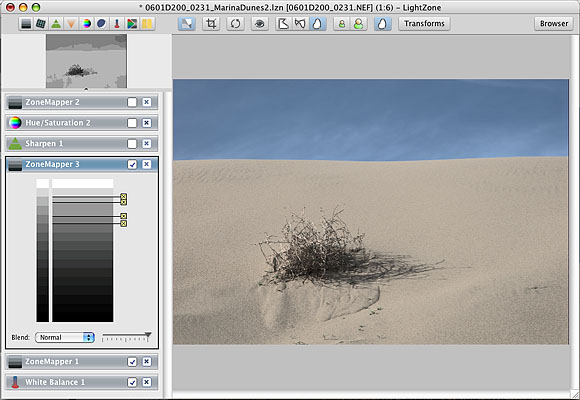
Improving contrast in the sand
With the upper and lower control
points we protect the shadows and highlights from any changes.
Again the ZoneFinder helps us to find the zones we want to change.
In essence we only change the contrast in a small tonal range
of this photo. No other RAW converter has such a feature and we
find curves in Photoshop quite a bit harder to use for this purpose.
Local contrast with sharpen
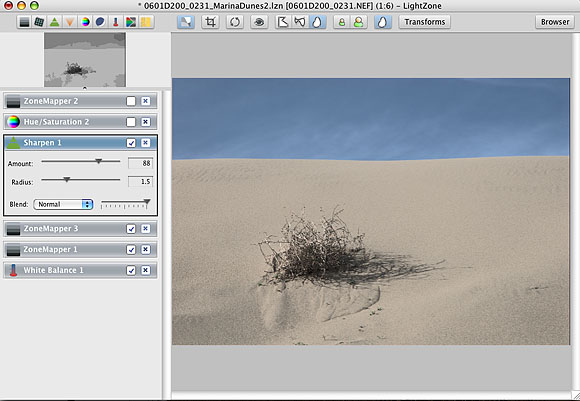
Sharpen in LZ
LZ uses a simple sharpening. But
it works only on the luminance of the image which already makes
it quite useful. We expect that future versions of LZ support a
more refined sharpening. As we will see soon LZ allows all layers
to operate on selective areas of the images. This way you could
also apply the sharpening selectively to certain areas (e.g.
sharpen eyes and eyelashes and not the skin)
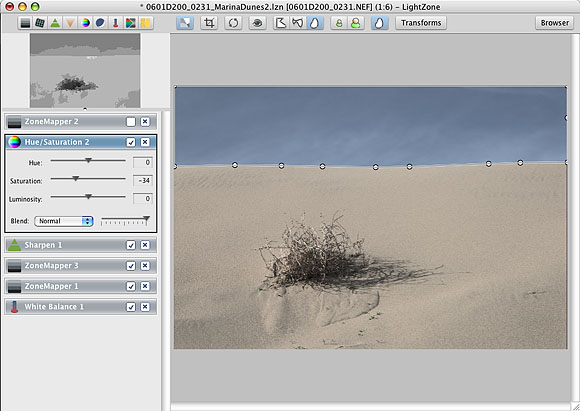
Color corrections for selective
areas
We often change the strong blue
sky to a more grayish blue by simply desaturating the sky.
But this needs to be done on the sky only. Traditionally only
Photoshop
would
be
our
tool
of choice.
But with LZ's RegionMapper we can do the job right in LZ.

LZ Region: inner and outer region
LZ provides three different ways
to select regions: Bezier, Spline and Polygon regions. Each region
is defined by control points (you can add later more to refine
the region). There are always inner and outer regions. The currently
selected tool (in our case the Hue/Saturation tool) is applied
100% to the inner region and 0% outside the outer region. Between
the inner and outer region the effect gets lower and lower towards
the outer region (like a feather in Photoshop). As you can imagine
we cannot use a feather in this situation (selecting the sky).
What we do is drag the inner region that it equals the outer
region:
LZ Region: inner equals outer region
At any time you can hide/show the
regions:
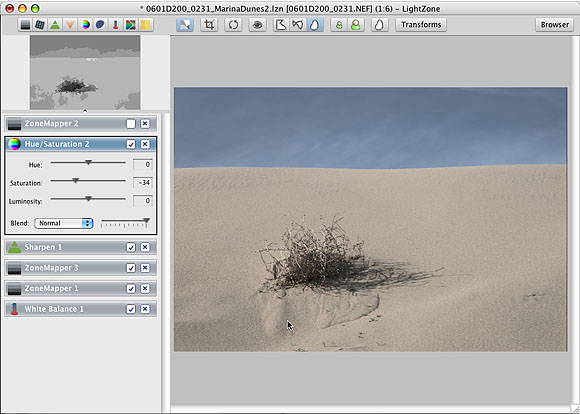
LZ Region: inner and outer region hidden
ZoneMapper for a selective region
We would like to brighten up the
area at the bush.
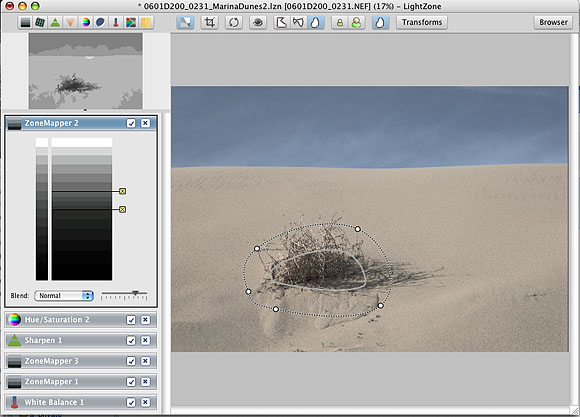
Selective tonal changes
Because the regions have a feather
range the transitions can be made very smooth. Actually this
is one of the most important technique we use with LZ. We did
the
same
with Photoshop layers before. It is actually the digital variant
of dodge and burn in the traditional darkroom.
What makes regions unique in LZ?
- Regions can be fine tuned later (hard if even possible in
Photoshop)
- Feathering can be tuned later too
What makes Photoshop layer masks unique?
- Operate on a pixel level and can be painted which can add
precision at the cost of more work
- More operations on layer masks available (e.g. advanced blending)
What if you like your current RAW converter
better?
As said LightZone is by no means a dedicated RAW converter.
You can convert your images in any RAW converter you like into
16
bit TIFF files and then tune the images in LightZone.
We also do not see LightZone as a Photoshop replacement and
use even the following types of workflow:
Workflow 1:
- Convert your RAW files to 16 bit TIFF in your RAW converter
of choice (ACR/Lightroom, RawShooter Premium, RAW Developer,
Capture One, Silkypix or Bibble)
- Tune in Photoshop
- Healing Brush (LightZone has a nice cloning tool but
this is not always a replacement for the Healing Brush)
- Lens corrections (PTLens/LensFix, PS Lens Distortion
filter)
- Remove noise (Noise Ninja or other plugins)
- Add noise to overlay some digital noise or posterization
- Fine tune the images with LightZone (LightZone's dodge/burn
layers are very easy to use and also easy to tweak
Workflow 2:
- Work from RAW in LightZone
- Perform some final tuning in Photoshop
- Healing Brush (read above)
- Add noise to overlay some digital noise or posterization
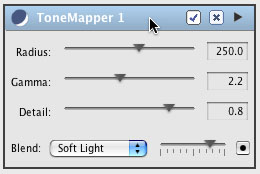
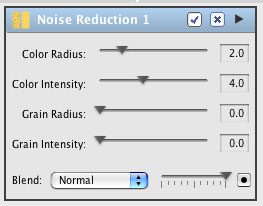
What's more in LightZone?
Additional tools
- Clone tool (remove dust and blemishes, useful but will be
also improved over time)
- Blur (nice to soften regions)
- Contrast Masking (tone down aggressive highlights and open
shadows)
- B&W channel mixer
- Color noise removal
More layer options


More Options for Regions
- Copy regions
- Paste regions to other layers or just link to other regions
(link is a very powerful feature)
- Inverse regions are planned for the next release
Other features
- Printing
- Export to JPEG and TIFF (if you want to work with other programs)
- Show before and after
- Histogram (displayed instead of ZoneFinder)
- Color Sampler (displayed instead of ZoneFinder)
Color Management
LZ is fully color managed. I uses internally a linear color
space and works in 16 bit.
Disk space
LZ saves all changes in small .LZN settings files (200kb is
already a large one and most of this is just the thumbnail for
the browser).
- Average Canon 1Ds Mk. II RAW file is 20MB
- TIFF 16bit (not compressed) 95MB
- TIFF 16bit with one adjustment layer (LZW compressed) 247MB
- RAW plus LZN file 20.2 MB (less than 10% of layered Photoshop
files)
You can save as many settings files per image as you like.
What is missing?
As mentioned this is a version 1.1 of a new product. We just
mention a few features that are also on the list of the
developers.
- Selections via color range
- Printing with black point compensation
- Set the color of the background
- Copy/paste of settings (stacks)
- WB with an select neutral option
- Improved noise removal
- Presets per tool
- Easier integration with 3rd party RAW converters
- Loads images
slow compared to most RAW converters but if you consider
the opening of 16bit layered files in Photoshop
it is very reasonable (sorry we have a Quad Mac :-))
First Conclusion
LightZone is a simple yet powerful image editor. LightZone is
easy to learn and let's you focus on your images. We will follow
the
development of this editor very closely because we see a great
potential using LightZone.
- LightZone provides right now the easiest way to learn and
use a layer based workflow (which we recommend for some years
in our e-books)
- For advanced users LightZone provides a powerful photographic
tool to optimize photos.
- Be aware that LightZone works differently than other editors.
This will require some time to master. Try to experiment with
selective operations in regions because here LZ can make a
difference.
Get a trial version and check it out (always try before you
buy).
Download
Free Trial Version
|