HDR Tone-mapping and the “HDR Look”
Actually HDR images don’t have any look at all. It really matters what you mean by HDR. Often the term is used for a certain look that may or may not be actually related to HDR. As the name suggests HDR means High Dynamic Range images and HDR normally means images that capture a higher dynamic range than most cameras can capture in a single shot. This of course changes with the development of new cameras. If your monitor can display such a high dynamic range (some special monitors can display up to 1:30,000) you would just see a very brilliant image. It is like comparing a slide show in a dark room to a print. The slide show has a brilliance that cannot be matched by any print. But the viewing conditions are also more stressful (sitting in a dark room or looking at the extreme contrast of a HDR monitor).
In general the high dynamic range of HDR images cannot be directly displayed on your monitor and forget on a print. To tone down the contrast and create nice prints you have to reduce the contrast. This process is called tone-mapping.
The Basics of Tone-mapping
Best we show the basic tone-mapping principles using an example:

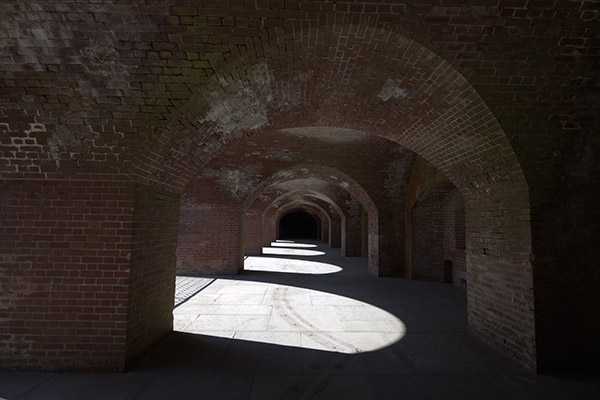
These are dark arcades with bright light shafts at Fort Point in San Francisco and we used 5 shots at 1EV steps to capture the scene. To demonstrate the tone-mapping principles we use Unified Color’s HDR Expose tool as allows us to use the different involved operations in a modular fashion.
Here is the merged HDR file shown without any changes:
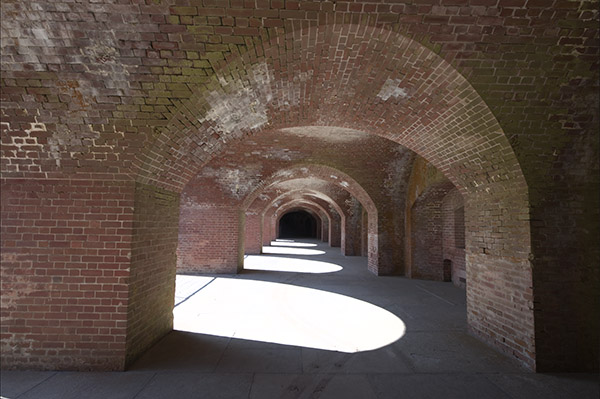
Original HDR
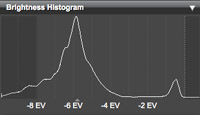
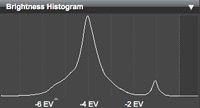
Quite dark in the shadows and also way blown out in the highlights. Lets study the histogram as shown in HDR Expose:
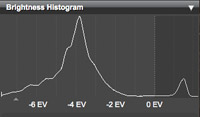
The shadows are no real problem but the highlights are about 2EV clipped. First we try how a -2EV exposure correction would improve the image.
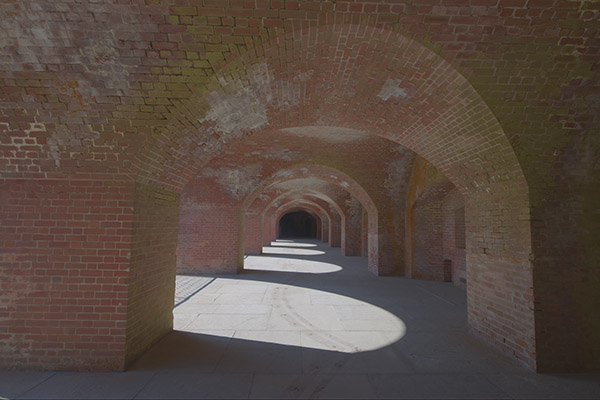
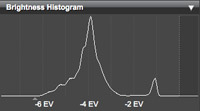
-2 EV Exposure Compensation
Now the highlights seem to be much better but the overall image looks way to dark. What we need is a mix of exposure compensation and lowering the global contrast.
Lower global contrast
The global contrast is now fine. No highlights clipped and the shadows are open. Unfortunately the image looks horrible flat.
A classic solution for such a situation is using a S-Curve in Photoshop:
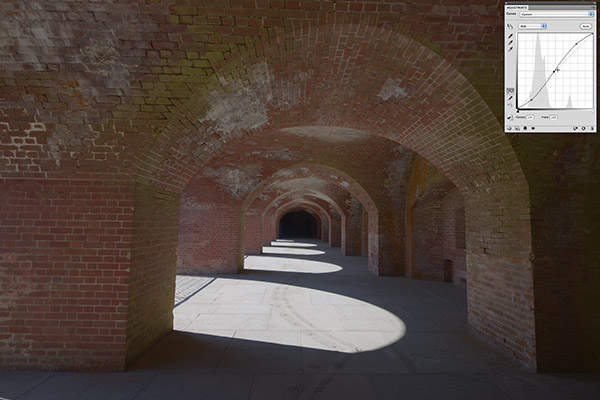
Simple S-Curve
Crafting a good S-Curve would take quite a while and result in compressed highlights/shadows.
That is why most tone-mapping tools take another route. They improve the local contrast.
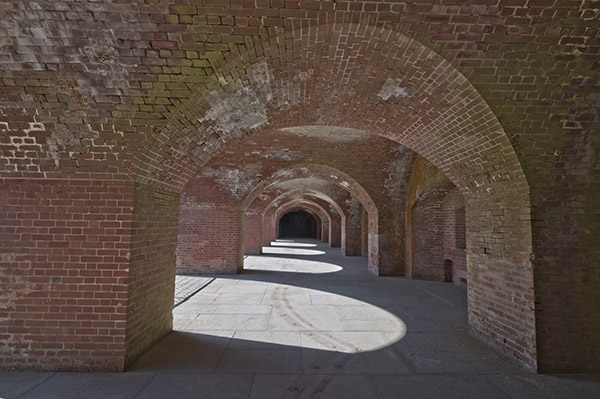
Global and local contrast changed
In this version the highlights show detail, the shadows are not blocked and the flatness is gone. This would be by no means our final version. We always optimize the photo in Photoshop CS5:
Note: In Unified Color’s HDR Expose you actually can control the global and local contrast independently. We like this systematic approach, as we can understand the settings in photographic terms.
What makes the HDR tools different is the algorithms they use to deal with lowering the contrast (e.g. how they deal with what should be “local”). There is no right or wrong it is more up to your own style and what you like.
All the main HDR tools in the market handle also other aspects:
- Detail: Very much related to local contrast and sharpening but not quite the same. Too much detail can make images “grungy”. This can be what you want or just not. We use normally our DOP Detail Extractor V2 script for very strong detail. If you add too much detail the image can get grainy and lose smoothness (always balance smoothness and coarse detail).
- Saturation: Except of HDR Expose and Nik HDR Efex Pro (via U-Points) most HDR tools handle only global saturation (all colors treated the same).
- White Balance (WB): we try to solve this already on the Raw level in Lightroom
- Noise Removal: again we remove the noise in Lightroom 3.x if needed.
- Shadow/Highlight treatments (open shadows and toning down highlights)
- Curves: The Curves in Photoshop CS5 Toning are powerful but require some time to do it right.
Note on Alignment: Optimal aligment is crucial for best image quality. Mis-alignment by one pixel will reduce already your image detail a lot. Here we describe our current optimal alignment process.
“HDR Look”
Let’s go back to the discussion of “HDR Look”. All the HDR tools perform the contrast reduction differently. This means they have a tendency to create different looks. It depends very much on the image and your style what you may like. As we have seen tone-Mapping most of the time involves local contrast enhancement. We think that strong local contrast can cause the images look different from most other images. Some HDR tools also may create visible halos at stronger settings.
Often in the discussion of “HDR Look” people mention the term “natural”. They often assume that standard photos look natural. This is clearly of the mark because 2D images never look like the real thing. On the other side we know the whole world so much more from pictures than real experience. Also while even watching a photo of a scene we know very well our memory cannot really recall the real scene. Even our emotions are very much part of the viewing experience while out in the real world.
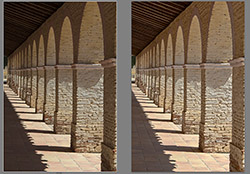
Here is a comparison of two images of the same scene. One image derived from the single middle exposure and the other one from a three-exposure HDR image.
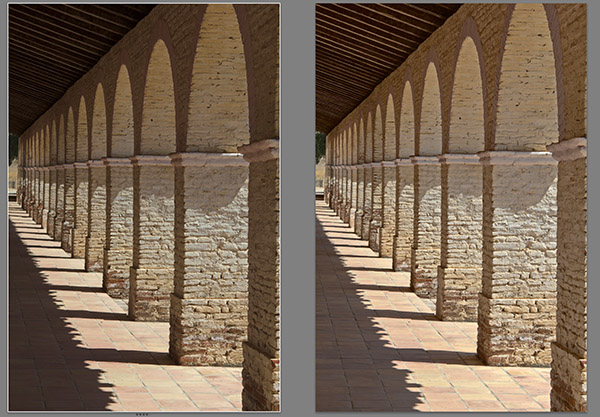
Single shot (left) / HDR right
We like them both although they are quite different. The single shot is more graphic while the HDR version shows more detail in the shadows.
Then there are of course images (may not even be HDR) that have a cartoon like look by using:
- Extreme local contrast with halos
- Very saturated colors
Note: We use the term "cartoon like" not as a negative. We just want to describe the type of image look.
This is often called “Grunging”. Some people like it and others hate it. This means there is nothing wrong with the images. Only the expectations of the viewers differ.
We welcome grunged images but only use this technique sparingly. Here is one of our classic samples and we like it a lot:

Double tone-mapping in Photomatix and DOP Detail Extractor
Conclusion
HDR can be used as a tool to capture scenes with higher contrast. This does not dictate the final look. It is up to the photographer to create the look he wants and different HDR tools assist in different ways. Today we often start with a so called “natural” version and add a certain look later. We also often use for this purpose HDR tools on single images (whether tone-mapped from HDR or single images from Lightroom).
|