| |
|
| |
Digital Outback Photo Contest #004
Raw Conversion Contest #2 using a Nikon
D100 Photo
|
| |
|
| |
|
| |
|
| |
|
| |
Sponsored
by 
&  |
| |
|
| |
There will be no prize this time. |
| |
|
| |
Rational:
This contest is about sharing experience and there are hardly wrong
results. Of course we all have different opinions on how to see a scene
and how to present. Feel free to discuss the merits of the different
entries in our news
group.
In case of some outstanding result we might ask our sponsors for a
special prize, but do not count on it. |
| |
|
| |
See also our "Raw
Conversion Contest #1 (Canon 10D)" |
| |
|
| |
|
| |
These were the early times of raw
conversion for the new generation of digital SLRs. We now have many
cameras at the 6 megapixel (MP) level and even with the Canon 1Ds and
the Kodak 14n above 10MP. We also have now new and improved tools to
perform the raw conversion (Capture One DSLR, Adobe Camera Raw, manufacturer
tools and good old Bibble, dcraw
and Qimage).
To share experience it is not enough just to show the results. We need
precise step-by-step descriptions of all image editing operations that
had been performed. That is why we need to limit the used tools to the
ones that are available at Digital Outback Photo (and they have to be
available for PC or Mac):
- Photoshop (this is the standard image editor we use)
- Capture One DSLR Limited (or full), Adobe Camera Raw (patched),
Nikon Capture, Bibble, dcraw
- Other tools (if the tool author provides a free full working copy
to Digital Outback Photo)
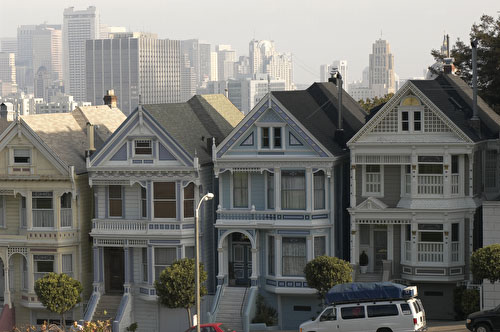
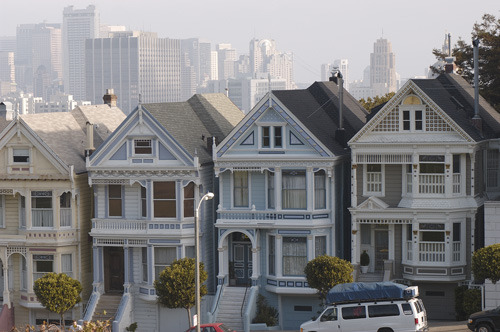
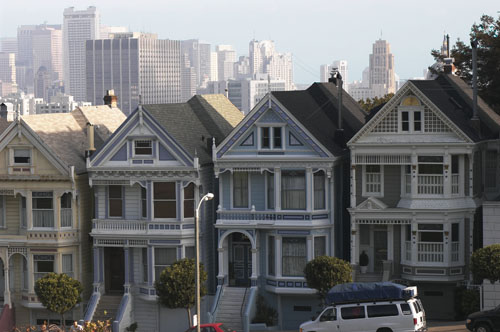
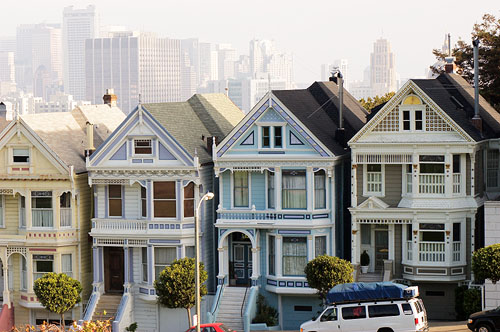
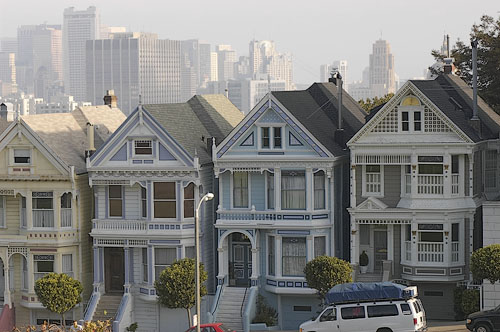
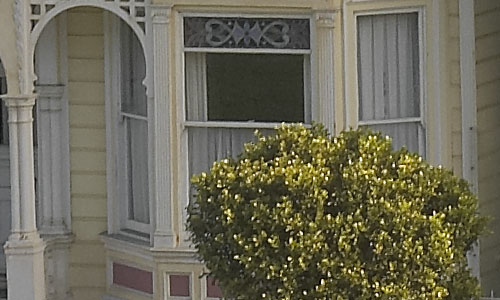
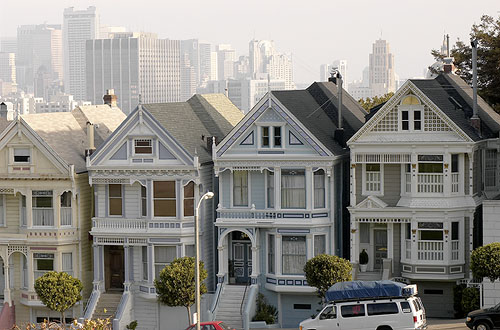
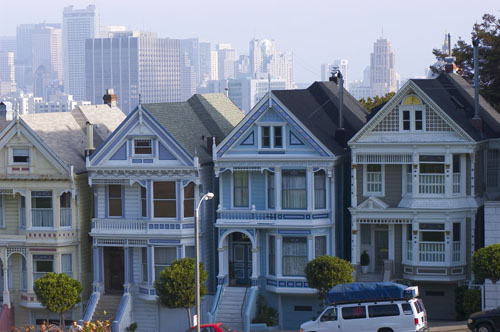
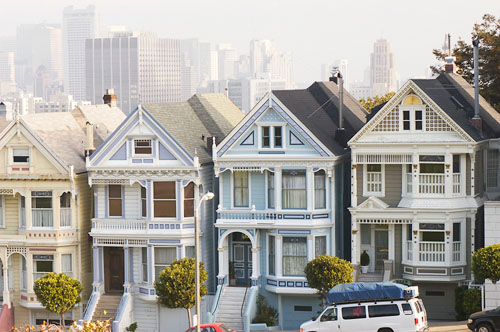
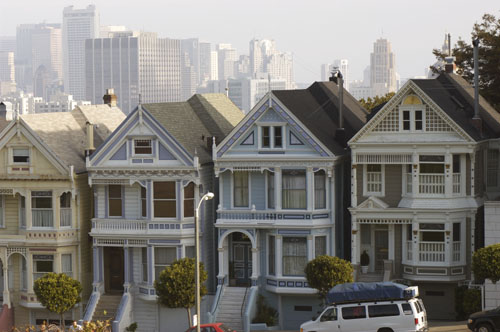
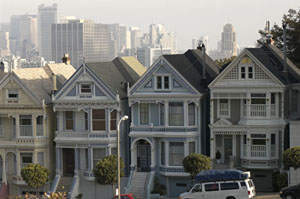
The photo is from San Francisco
and part of the most famous scene. Photo taken with Nikon D100 and Nikon
85PC lens.
Rules:
- Image should not be cropped
- All preparation should be done for a normal inkjet print and not
for web presentation
- Color Space: Adobe RGB
- You load the full raw image (copyright Bettina & Uwe Steinmueller)
(Link
removed)
- You make the best out of it and fully document all steps (try not
to be too complex as this makes our life difficult)
- You then resize the resulting file to 500 pixels wide at JPG 8 compression
in Photoshop
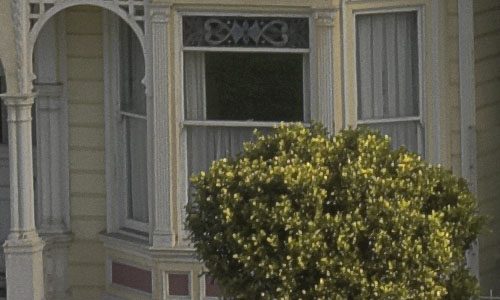
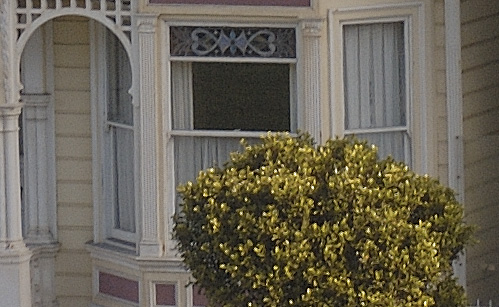
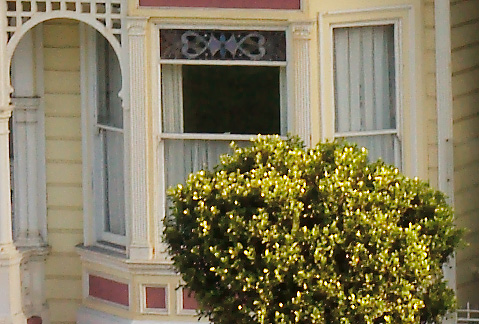
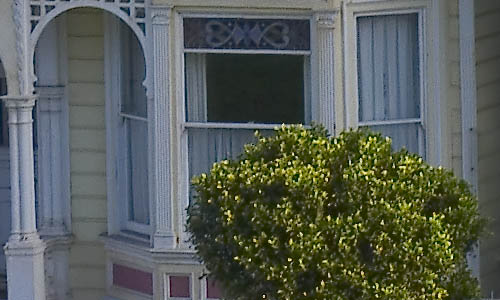
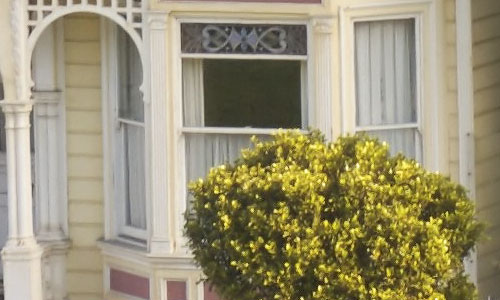
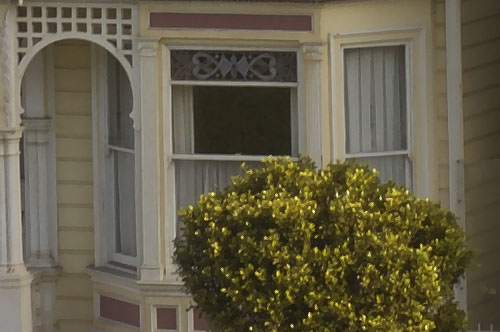
- Also send us the same crop (500x300) at 100% pixel level as shown
below in the sample entry
- Do not forget to include the full instructions
- We need be able to perform all steps ourselves following your instructions
- We may reject entries without any further notice if they get to
complex, the tools are not at hand or we see major quality issues.
- Send images and instructions to: contest@outbackphoto.com
|
| |
|
| |
Note: As all photos should be in the Adobe RGB 1998
color space it is recommended to download interesting samples and view
them in Photoshop on a profiled monitor. |
| |
|
| |
|
| |
Sample Entry (by Uwe Steinmueller) |
| |
|
| |
|
| |
|
| |
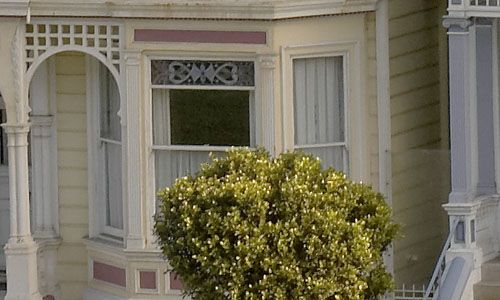
- Converted with Capture One DSLR
- WB on the sky
- No EV or CC correction
- No Sharpening
- Midtone-Sharpening
in Photoshop
|
| |
|
| |
|
| |
|
| |
#1 Ike Tamigian |
| |
|
| |
|
| |
|
| |
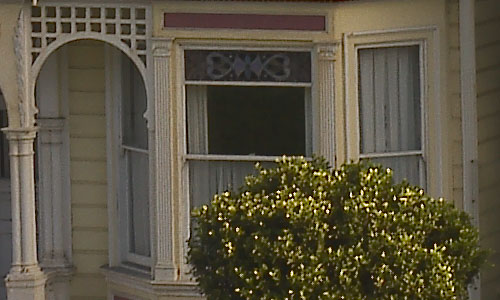
- Converted with Nikon Capture 3
- WB gray point on garage door in shadow near white van
- RGB USM 5%/5%/0
- Saved as TIFF
- Opened in PS7
- Chroma Shadow control Sep/.42 Gamma/1.10 Contrast/255
- +5 Saturation
- For printing NIK Sharpener Pro
- Anna profile (book) Print quality - good
|
| |
|
| |
|
| |
|
| |
#2 Jim Finley |
| |
|
| |
|
| |
|
| |
- Used Capture One Lite
- Used eye dropper to select shaded roof area on the second house
from
the
left to set gray balance.
- Crafted a "S" shaped curve to enhance contrast in
the foreground
areas.
- I used Standard, 66, 1 for sharpening, and then converted.
- In Photoshop I used the Red and Blue Channels and some creative
"maskpainting" to craft two selection areas (I spent about
20 minutes with this which may disqualify me for complexity):
- Mask A Sky and Cityscape area
- Mask B Sky area alone
- I used mask A in a Levels Adjustment layer to darken the cityscape
and sky areas (adjusted the gamma to 0.87
- I used mask B in a Selective Color layer to add some color
to the sky
(White to +16C -19Y +1B and Neutrals to +100C +31B.
- Final sharpening done using Photoshop USM (Amount 91, Radius
2.7,
Threshold 3).
|
| |
|
| |
|
| |
|
| |
#3 Magne Nilsen |
| |
|
| |
|
| |
|
| |
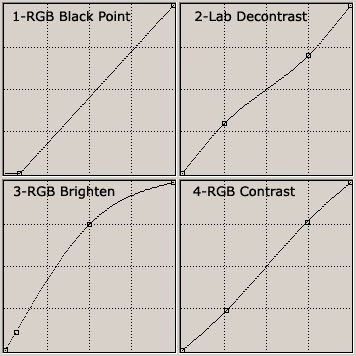
- Converted with Adobe Camera Raw, all defaults, Click WB on the Van
at 7700K
- Curves RGB, Black Point at 22,0
- Convert to Lab mode
- Curves L channel, [ 0,0 25,30 75,70 100,100 ] Luminance decontrast
restores color intensity lost in shadows
- Convert to RGB
- Curves RGB [ 0,0 16,28 128,192 255,255 ] Relifts shadows and brightness
- Curves RGB [ 0,0 67,61 189,195 255,255 ] Adds a little contrast
|
| |
|
| |
|
| |
|
| |
#4 Mathias Vejerslev |
| |
|
| |
|
| |
|
| |
- Converted in Capture One DSLR LE
- Gray balanced on the side of the white car.
- Slight visual cast correction with the colour wheel (219, 3).
- Exposure: +0.25 EC, 2 CC. Shadow boost with Curves. Colour
saturation: + 3.5%
- Exported to 16-bit TIFF (Adobe RGB).
- Levels in Photoshop; Adjusted contrast
- Converted to 8-bit
- Nik Sharpener Pro - Inkjet, good quality (book, Anna)
- Slight Midtone sharpening.
|
| |
|
| |
|
| |
|
| |
#5 Antonio Dias |
| |
|
| |
|
| |
|
| |
- Converter: Capture One DSLR LE V1.2 RC2
- Gray Balance: Picked on white trim of 3rd house from left
- Exposure: EC: 0.20
- Focus: Standard Look, Amount: 34, Threshold: 3
- Develop: Tiff 16-bit
- Loaded into PS7
- Curves: 35-0, 52-40, 139-149, 228-228, 255-255
- USM: 50,0.3,0 (3 times)
|
| |
|
| |
|
| |
|
| |
#6 Tim Augustine |
| |
|
| |
|
| |
|
| |
- Opened in Adobe Camera Raw.
- 16 bit file conversion
- Temp = 8000
- Tint = +5
- Exposure = 0 (d = default)
- Shadows = 0 (d)
- Brightness = +50 (d)
- Contrast = +70
- Saturation = +7
- Sharpeness = 73
- Smoothness = 25 (d)
- Moiree = Off (d)
- In Photoshop:
- Unsharp Mask: Amount = 70%, Radius = 0.9 pixels, Threshold =
0 levels
- Convert to 8 bit
- Select the sky and background buildings using magic wand and
lasso tools, Feather 10 pixels
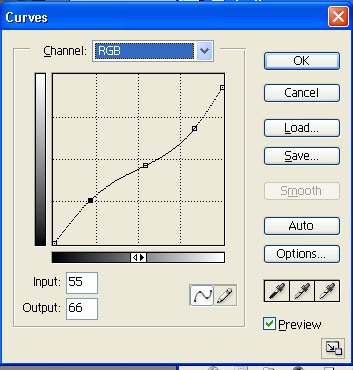
- Apply the following curve with 3 points at
- Input = 55, output = 66, Input = 138, output = 118, Input
= 213, output = 177, Endpoint at Input = 255, output = 237
|
| |
|
| |
|
| |
|
| |
#7 Leon Vick |
| |
|
| |
|
| |
|
| |
- Open the raw image in the Camera Raw plug-in of Photoshop 7
- Apply Camera Raw adjustments as follows:
White Balance: As shot
Tint: 0
Exposure: 0
Shadows: 6
Brightness: 70
Contrast: 50
Saturation: 20
Sharpness: 100
Smoothness: 0
Moiré: On
Size: 3008 x 2000 pixels
Resolution: 300 ppi
Color Space: Adobe RGB (1998)
Depth: 16bits/channel
- Click OK to return to Photoshop 7; save the image as an uncompressed
TIFF file
- Open the TIFF image in Neat Image v2.03 Professional
- Select the Device Noise Profile tab
- Click and drag to select a 100 x 100 pixel area of open sky
- Click on the Rough Noise Analyzer to apply
- Click on the Auto Fine Tuning option to apply
- Select the Output Image tab
- Select the48-bit output image color depth
- Click on Apply to convert the input image to Device Filter settings
- Save the Output Image as a TIFF file
|
| |
|
| |
|
| |
|
| |
#8 Angel Garcia |
| |
|
| |
|
| |
|
| |
- Converted with Capture One DSLR 1.2 RC1 Trial
- WB on blue house stairs
- No EV or CC correction
- Levels and Curve as shown in pic
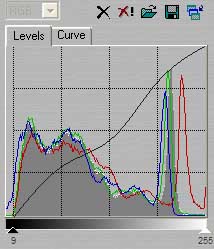
- Color Saturation +20%
- Soft Sharpen +200,3
- Everything with C1, resized, cropped and saved in jpeg medium quality.
|
| |
|
| |
|
| |
|
| |
#9 Hy Murveit |
| |
|
| |
|
| |
|
| |
- Opened with Nikon Capture 3.5
- WB: Set Grey Point, Red: 1.20, Blue 0.84
- Sharpening: none
- Advanced Raw: Exp Comp:0 EV, and open in photoshop
- +1.0EV and open in photoshop
- Switch to Photoshop 6 (we have 2 related images open)
- Make a copy of the light image, change it to 8 bits, and "image->adjust->threshold
(220). Paint so that everything below rooftops and trees at right
is back (except for light pole and parts of van).
- Convert this to a selection, and save the selection.
- Take light image, adjust levels (right slider to 225). Then
convert both images to 8 bits, and make them 2 layers on one image.
Dark on top, and light on bottom.
- The dark top layer gets a layer mask from the saved selection
(hide selection). The mask is tweaked at the boundaries to avoid
funny stuff.
- Add a curves adjustment layer, but no curve. Set mode to hard-light,
and opacity to 38%
- Save to jpeg, use neat-image-demo with defaults (sampled garage
door),
- get back into photoshop as new layer
- Sharpen neat-image output with FM CS Pro v4
|
| |
|
| |
|
| |
|
| |
#10 Carsten Tschach |
| |
|
| |
|
| |
|
| |
- Nikon Capture 3
- WB (Avarage of multiple points) get samples from Roofs of the
houses (left 2 in the shaded areas, right two houses non-shaded
areas)
- Curve - add a decent S-curve
- Colorbalance - red +9, green +5
- Unsharp Mask - RGB, 15%, 5%, 1
- Noice reduction - 5
- Advanced NEF EV +0.19
- Save as 16 Bit Tiff
|
| |
|
| |
|
| |
|
| |
|
| |
|
| |
|
| |
|
| |
|
| |
|
| |
|