| |
| |
| |
| |
| Digital
Outback Fine Art Photography Handbook
© Bettina & Uwe Steinmueller |
| |
| |
| 9 Digital darkroom basics |
| |
| |
9.1 Photoshop Overview
9.2 Color Profiles for Beginners
9.3 The important image formats
9.4 Features of Photoshop used often by digital Photographer
9.5 Selected Photoshop tools
|
| |
| |
| You are probably aware that the topic
digital darkroom can fill many, many books. Sorry but this chapter will
not replace any one of those books. For us clearly the center of the
digital darkroom is Adobe Photoshop. There are many nice image editing
but still Photoshop remains the standard, period. Our book recommendation
are found here.
So if you want to save buying Photoshop think twice. |
| |
| |
| |
| 9.1 Photoshop Overview |
| |
| Getting into Photoshop seems like a
huge task and it is. The only way through the jungle we see is learning
as you go. Try to understand what you need for your task at hand and
go from there.
Fortunately as a photographer you only need most often only parts of
Photoshop and we will mention some of them here. |
| |
| Here is an initial list of things you
will do in Photoshop (as far as this handbook is concerned):
- Setting up color management
- Open files
- Changing contrast (Levels & Curves)
- Correcting & Enhancing color
- Sharpening
- Retouching
- Working with Actions
- Cropping
- Resizing
- Using Plug-ins
- Know the difference between 8 and 16 bit more
- Saving in different formats
- Printing
|
| |
| Before we will get into these topics you
need to understand some basics about color management. |
| |
| |
| |
| 9.2 Color Profiles for Beginners |
| |
| Color correction and color management
is one of the most important and difficult areas in digital photography.
We are not experts on this subject. We want to share what we have learned
and invite all who know better to correct our faults and improve this
chapter for the use of all interested in this subject.
If you have a photo on the web and different people discuss the quality
of the colors of a photo they most of the time have the following problem:
- Different monitors show the same RGB value quite differently
So besides there many opinions on color they actually see different
versions of the same photo.
But the real challenge is to get the right impression on a monitor
how a certain photo would print on a color printer. The new inkjet printers
from Epson (HP, ..) can produce amazing results. But without color management
it remains trial and error. You end up to change the color settings
of the printer for every print without very much being satisfied. So
what does color management mean? In our example it means that the photo
you see on the monitor looks very close to the result you get from your
printer. This is called "soft proofing". With very costly monitors the
match can be very close.
The reason for this dilemma is that every device: monitor, printer,
scanner and digital camera has very different capabilities to render
colors. If there is a fixed RGB value the display of that value on that
device will be different and certain values the device might might not
be even capable to render. The colors a specific device can render describe
a gamut of colors. Color management is based on a standardized description
of that device (so called ICC profiles). You either get these profiles
from the device manufacturer or measure it with special calibration
hardware.
As most people like to use there monitor as there "soft" proofing device.
That is why the first step towards a color management is the calibration
of the monitor. Be aware that very precise calibration also is influenced
by the room and even your clothes. Adobe Photoshop comes with a utility
called Adobe Gamma which lets you calibrate your monitor. Although this
is much better than not doing any calibration at all it is better to
use some hardware calibration device. We uses different tools like Optical/X-Rite,
Optical/Spyder or GretagMacbeth Eye-One. To do the calibration just
follow the instructions of your tool. The monitor should be on for more
than 30 minutes and don't change any monitor settings without any re-calibration,
a re-calibration is anyway recommended about once a month.
Profiling LCD monitors can very tricky and the success depends on the
tool and the monitor brand. We use a LCD monitor not because it is the
best proofing device but we think it helps with our eyesight as we are
also writing a lot using the same monitor.
How to find our which monitor profile Photoshop is using:
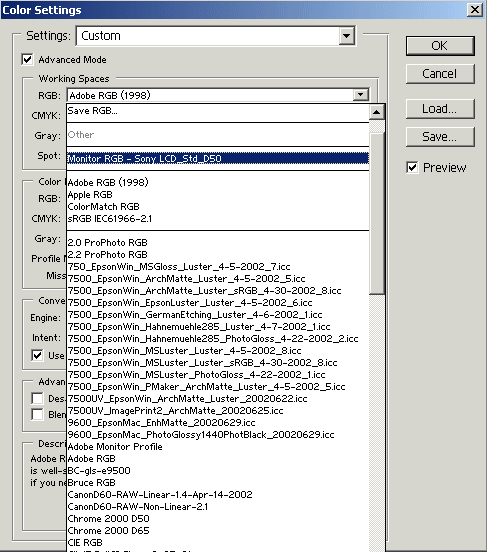
Select "Edit->Color Settings" and use the
drop down list where you can select working spaces and scroll (mostly
up) till you find the entry "Monitor RGB" (above shows Sony_LCD_std_D50).
This entry shows the monitor profile which gets used. Then "cancel"
the "Color Settings" dialog so that you do not change your
working space!
Let's see where we are:
We have some RGB values of the image (YMCK is excluded from this discussion
as we only work in RGB). These values are mapped to the monitor using
some monitor profile and also mapped to the printer by using a printer
profile. This would probably work for this close loop. But what if you
send the image file to an other person. He would need your monitor profile
and then map it to his monitor profile (which is certainly different).
You might envision that this would not work in the real world. Up to
this point we have only discussed about profiles for individual concrete
devices. The ICC solution for this dilemma is the introduction of abstract
standardized color profiles/spaces (e.g. Adobe RGB (1968), sRGB, Apple
RGB, ...).
These are very well defined profiles which might not match any device
in the world. The solution is now as follows (we assume the color space
Adobe RGB -this is the one we use). The image internally stores all
RGB value in relation to the internal (abstract) color space (here Adobe
RGB). Photoshop's ICC engine now translates all these RGB values from
the internal space to the concrete monitor space (using a monitor profile).
The same happens when you print.
Now sending the image to an other person is no problem as the same
happens there again. The information about the profile is stored by
Photoshop (also other applications like Bibble, Qimage,...) within the
image (TIFF, JPEG). The abstract standardized color spaces range from
a narrow gamut to broader gamut. It is quit obvious that if you image
is working with a narrow gamut that some colors get lost as a transformation
which broadens the gamut has to "invent" missing colors and that is
not possible. If the gamut is to wide you deal with colors which probably
none of your target devices will ever be capable of rendering. |
| |
| 9.2.1 Some Standard Color Spaces |
| |
| The following table discusses some of
the most important abstract color spaces:
| NTSC |
This is the space for the US television.
It is even worse than the European PAL standard. It is presented
here that some believe the Nikon D1 uses this space to create the
non RAW/NEF files. It looks as if that is not a very good choice.
As I understand this is not an issue for RAW/NEF files |
| sRGB |
This space is still pretty narrow
but is supported by some printers (Epson 1270) and scanners (Nikon
LS 2000). It might be a good idea to use this for photos on the
WEB. |
| Adobe RGB (1998) |
This is a very popular space among
Photoshop users. It covers most printable colors. This is what I
use. |
| Pro Photo RGB |
Colorspace supported by Kodak (wide
gamut) |
| Apple RGB |
Not as wide as AdobeRGB |
| Bruce RGB |
A space designed by Bruce Fraser which
is a bit wider than the Adobe RGB space |
|
| |
| 9.2.2 Monitor Profiles |
| |
| By now it should be clear that all good
color management starts with a good as possible monitor profile. |
| |
| |
| 9.2.3 Camera Profiles |
| |
| Also profiles for you camera are very important.
We will discuss this later in the chapter "Raw
File Processing". There are two types of profiles: Camera Generic
(used by most RAW conversion tools) and specific profiles for certain
light conditions. This is an important distinction as for an optimal profile
all the parameter have to be constant (light, RAW processing options,
exposure) |
| |
| 9.2.4 Printer Profiles |
| |
| There is actually no profile for a printer.
The profile is always for one paper, the same ink, the same individual
printer and the same printer driver used. Profiles for different papers
can vary significantly.
We will talk about printer profiling in more detail in our chapter
about "Printing".
|
| |
| |
| 9.3 The important image formats |
| |
|
| TIFF |
This is the standard high quality
image format without any loss. It comes in 8 and 16 bit versions |
| JPG |
Important standard compressed file
format. There is a quality loss even at low compression levels.
Mostly used for the web or transmission over slow connections. |
| JPG 2000 |
Newer improved version of JPG. Not
widely used yet |
| STN |
Storage Format of Genuine Fractals
for use in image upsizing (see later chapter) |
| PSD |
Photoshop format which allows to store
some internal information (like layers) with a file. Can be useful
for intermediate files. |
| GIF |
For Web usage as there are only 256
colors available |
| NEF |
Nikon RAW image format (compressed
and uncompressed) |
| CRW |
Canon RAW image format |
| other RAW formats |
There are also RAW formats from Kodak
and Olympus |
|
| |
| For most of our work we use only TIFF to
avoid any quality loss. |
| |
| |
| |
| 9.4 Features of Photoshop used often by
digital Photographers |
| |
| 9.3.1 Setting up color
management |
| |
| Here we recommend reading this
article by Bruce Fraser (a Photoshop authority) about setting up color
management in Photoshop 6.0. |
| |
| 9.3.2 Open files |
| |
| You can open with Photoshop all of the important
standard files. Only the proprietary RAW formats of the digital cameras
can only be used if the vendors provide camera file format plug-ins or
they are supported by third party vendors (e.g .Bibble's Photoshop plug-in)
|
| |
| 9.3.3 Changing brightness and contrast
(Levels & Curves) |
| |
| There are two main operation you really
need to understand.
Levels:
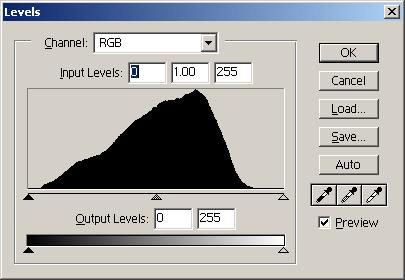
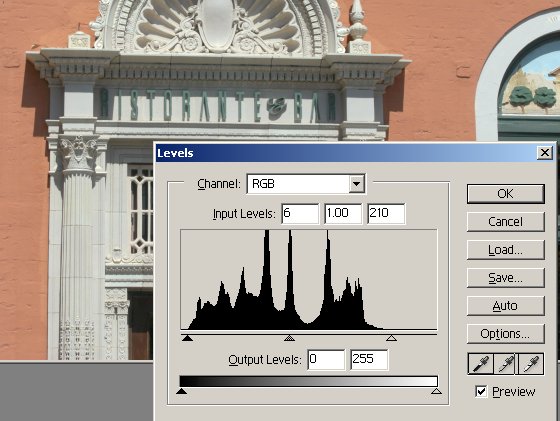
Levels Dialog
|
| |
| The Levels dialog shows in the middle the
histogram of the image. I shows here the gray values from 0 = black to
255 = white in 256 steps. (there are also histograms available for the
color channels (red, green and blue) |
| |
| Best to explain some basics is to have
a short example.
|
| |
| This first histogram indicates that there
is a small gap on the left and a larger on the right. This photo does
not make use of the full range from black to white. |
| |
| |
| |
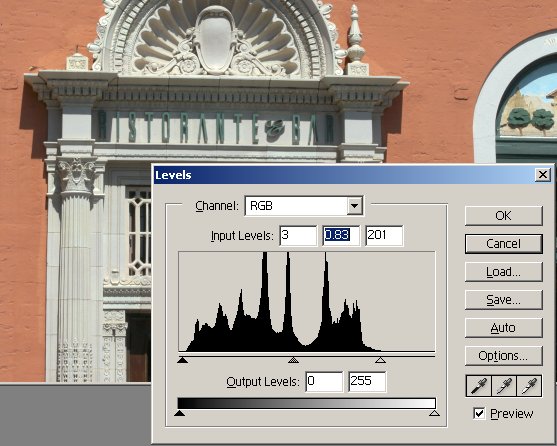
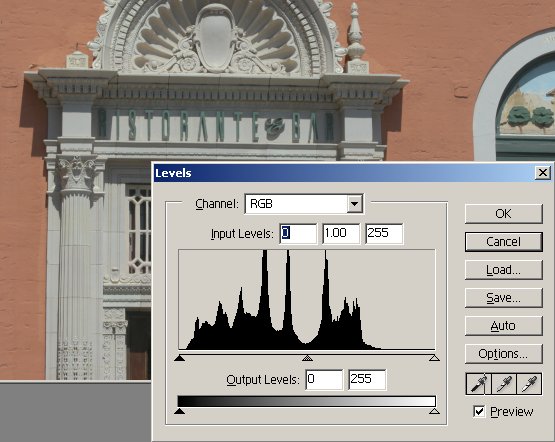
| Shifting the right(white) and left(black)
triangle towards the borders of the histogram we get a more contrasty
yet lighter image. |
| |
| |
| |
| By sliding the middle triangle (gray) to
the right we enhance the contrast and get a slightly darker image. We
hope you can see how this very simple operation improved a flat looking
image significantly. |
| |
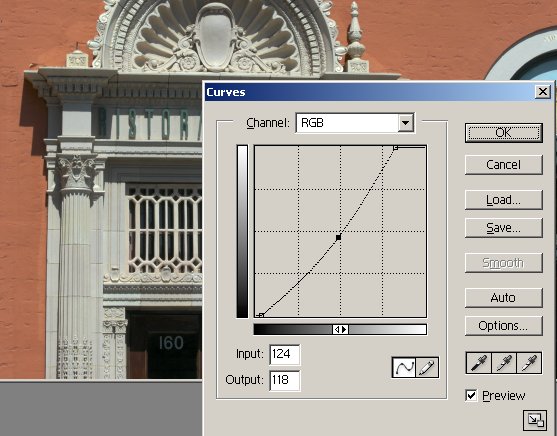
| Curves |
| |
| |
| |
| Curves allow you to do the same corrections
as levels and more. The difference is that levels does simple linear
transformations and you can do with curves much more sophisticated corrections.
You probably need some good Photoshop book to better understand curves.
Here are some basic but important curves:
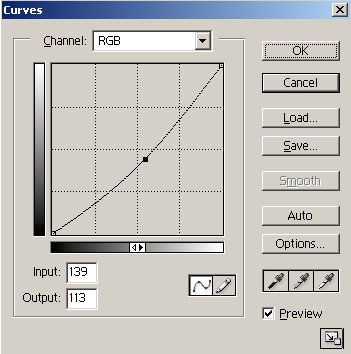
darken the image
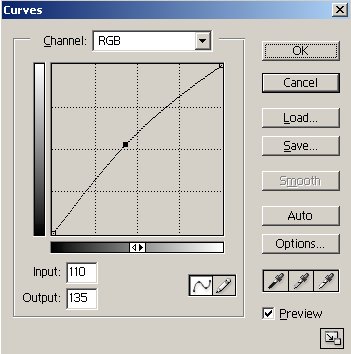
brighten the image
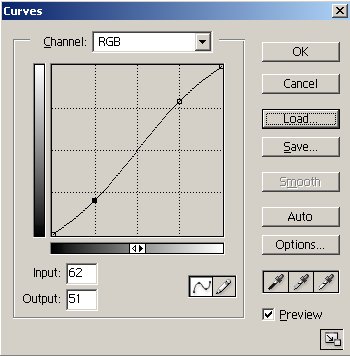
Boost contrast (S-Curve)
|
| |
| 9.3.4 Correcting & Enhancing color
|
| |
| Colors need often to be corrected (see
also White Balance - WB). Some global
corrections can be done also using Levels and Curves (working on selected
color channels). But Photoshop also provides more selective tools to
correct colors.
We try to do as little selective color corrections as possible which
is possible if you use good camera profiles and tools for changing WB
or removing casts. Actually the tools of choice for use are most often
some specialized Photoshop plug-ins (see below) |
| |
| 9.3.5 Sharpening |
| |
| In the next chapter about Raw File Processing
we will also discuss the need for sharpening and mention some methods.
Also here we often use specialized Photoshop plug-ins or Fred Miranda's
sharpening actions to get better results. Sharpening is an endless field
by itself and there is no perfect way. Be sure that your picture is
as sharp as possible to begin with:
- No camera shake
- in Focus
- Right DOF (depth of field)
- Right panning if photographing moving objects
- Use a rigid tripod whenever possible
TIP: Never only judge sharpness on your screen. What counts is the
sharpness of the print. Especially inkjet prints can take a lot of sharpening
(looks over sharpened on the screen) and deliver great prints. Nik
Sharpener does sharpening based on target printers and targeted
resolution. |
| |
| 9.3.6 Retouching |
| |
| We already discussed that sometimes
sensors collect dust and these spots are easily to spot in brighter
parts (e.g. sky) of the image. Here you can use the Photoshop clone
tool to copy over some similar other areas of the image.
With the introduction of Photoshop 7.0 there is a more sophisticated
clone tool available: The "Healing Brush". The healing brush
melts the source and target areas together and gets much more pleasing
results. For us this tool alone was worth the whole upgrade from Photoshop
6.0 to 7.0. |
| |
| |
| |
| The above images are 100% pixel crops
from a real life example (original was 3000x2000 pixels). The area is
shown before and after the use of the Healing Brush. These spots would
also have been easily removed just using the clone tool but there many
situations where the "Healing Brush" is easier to use and
provides much better results.
We also (but really rarely) use the clone tool to remove unwanted parts
from the photo. |
| |
| 9.3.7 Working with Actions |
| |
| Once you have found out how to deal
with certain operations in Photoshop you will do the same sequence over
and over again. Here Photoshop allows to record so called actions which
are exactly the sequences you want to repeat over and over again.
Recording a new action is very easy. You click on  and you get this dialog:
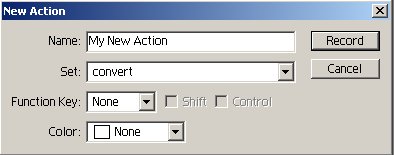
Name the action and select one set (the actions can be
organized in sets) you want this new action be part of. One you click
on "record" all operations will be recorded which is indicated
by the red recording sign:
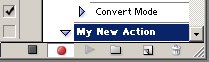
After the last operation you wanted to record hit  and the action is ready to be used. To replay an action select it and
and hit
and the action is ready to be used. To replay an action select it and
and hit  . .
It is also possible to leave out some steps by unselecting
this checkbox  for a certain step. This icon
  indicates
that the action will stop at this step and display the steps dialog.
This allows you to have some default settings recorded but then later
to overide them at the time of playback. indicates
that the action will stop at this step and display the steps dialog.
This allows you to have some default settings recorded but then later
to overide them at the time of playback.
Tip: Learn how to work with actions as soon as
possible. It will save you time and provide a more consistent workflow.
Fred Miranda even developed a market for sophisticated ready to go
actions. You can buy these actions for reasonable price at his site
(e.g. noise removal, linear RAW file processing, enhancing saturation,
..). You can be sure there is a lot of work and knowledge behind each
of his actions. |
| |
| 9.3.8 Cropping |
| |
| Pretty often you might want to crop your
image and Photoshop allows you to perform a rectangular selection and
the crop the image to these dimensions. |
| |
| 9.3.9 Resizing |
| |
| There 2 basic purposes for resizing:
- Downsizing - making the image size smaller - less pixels (mainly
for web usage)
- Upsizing - making the image larger - more pixels -(mainly for printing)
|
| |
| It should be pretty clear that downsizing
is easier as you lose information while upsizing has to invent information
(which can be only done so that the faked information blends in well).
|
| |
| If you downsize an image by some magnitude
you should sharpen it afterwards.
Upsizing will be discussed in full detail in our chapter about "Printing". |
| |
| 9.3.10 Photoshop Plug-ins |
| |
| There is a whole universe of plug-ins
which are all sort of filters and other applications which can be used
inside Photoshop using the Photoshop plug-in API. Some plug-ins might
even cost more than Photoshop itself.
Plug-ins allows Photoshop to grow in all dimensions and we often use
more the plug-ins than Photoshop itself. |
| |
| 9.3.11 Know the difference between 8 and
16 bit data |
| |
| Photoshop knows two data modes:
- 8 bits/channel
- 16 bits/channel
|
| |
| Most digital RAW formats allow to get
12 bits/channel and these then get represented as 16bits/channel in
files (mostly 16bit TIFF).
Why are these 4 more bits so important? If you images came perfect
out of your camera it would not make such a difference as most printers
only use 8 bits anyway. But there is hardly any image which does not
require at minimum minor corrections. But once you start correcting
an image in color, saturation or contrast you reduce the color information
by 1 or more bits. If you start with 8 bits you might end up having
only 6 bits real color information per channel. This loss can be seen
in less smooth color gradients. If you start with 12 bits there is still
enough color information available.
Also sharpening in 8 bits has the tendency to amplify the noise stronger
than proper 16 bit sharpening (Photoshop got 16 bit sharpening in version
6.0) |
| |
| Tip: Stay
as long as possible in the 16 bit mode or even change to 16 bits/channel
for stronger changes. |
| |
| But why would you ever use 8 bits/channel
if it is so much better?
- It takes longer
- Needs more memory
- Creates larger files
- Many Photoshop operations (e.g. layers) are not available for 16
bits/channel
|
| |
| 9.3.12 Saving in different formats |
| |
| Photoshop allows you to save your work
in many different formats. Stay as much as you can with TIFF (8/16 bits)
or use the PSD files for intermediate files.
Reserve JPGs for web work or sending images to friends. |
| |
| |
| 9.3.13 Printing |
| |
| Because of the color management features
built into it Photoshop is also a print processor of choice for fine
art photography.
The support for printing multiple images on one sheet of paper is
pretty primitive.
We get back to printing in our chapter "Printing". |
| |
| 9.3.14 Perspective Correction and Rotating
|
| |
| |
| |
| Photoshop allows you to correct the perspective.
You find some instructions in our primer.
|
| |
| We also have sometimes photos off level
(Uwe more often than Bettina). We correct these faults also by using a
transformation command ('rotate'). |
| |
| Unfortunately these tools only work in 8-bit.
That is why you need to perform these transformation later during your
workflow (after all the steps you can do in 16-bit). |
| |
| |
| |
| |
| 9.5 Selected Photoshop tools |
| |
| This section only looks at some Photoshop
third party tools we would not like to miss. You can also find a lot of
information in the Digital Outback Photo section "Photoshop
Corner". |
| |
| |
| 9.5.1 Plug-ins |
| |
| 9.5.1.1 Selective Color Corrections:
Color Mechanic |
| |
|
|
| |
| 9.5.1.2 Removing Color casts: iCorrect
Editlab |
| |
| iCorrect Editlab by Pictographics is mainly
used by us for sophisticated cast removal. You can find a review by Jim
Collum here.
|
| |
| 9.5.1.3 Sharpening: EasyS
|
| |
| Our best sharopening tool so far.
|
| |
| 9.5.1.4 Resizing |
| |
| Genuine Fractals is the standard tool for
file upsizing. Some swear on it and other think they have better solutions.
We will discuss upsizing later in the printing chapter. |
| |
| 9.5.1.4 PowerRetouche |
| |
| We like the PowerRetouche filters by
Jan Esman which are mostly 16 bit. We regularly use:
- Sharpness (not very fast but with very little sharpening halo and
so worth the wait)
- ColorRetouche (WB filters which uses terms of photographic filters)
- Lens corrector
|
| |
| 9.5.2 Techniques |
| |
| 9.5.2.1 Contrast Masking |
| |
| There is often the situation that the shadows
are too dark and the highlight to bright. Here a technique called contrast
masking can help. We have a short tutorial here.
|
| |
|
| |
| |
| 9.5.2.2 Moire removal |
| |
| Some cameras like the Nikon D1x, Canon
1D or Kodak 760 produce some color aliasing (small colored pixels in
the photo). We remove this the following way (works in 16 bits).
- Convert to LAB mode
- Select both A&B channel
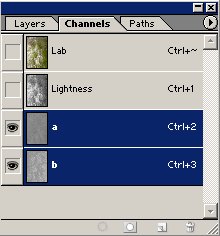
- Use the Dust & Scratches filter (radius 3-7 are good values)
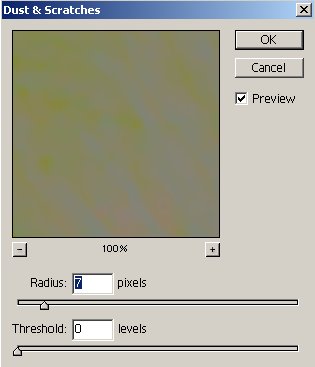
|
| |
| 1.3.3 Actions by Fred Miranda |
| |
| The actions by Fred Miranda deserve a special
mentioning as they allow you to get sophisticated Photoshop operations
and still be able to use them easily (see references) |
| |
| References |
| |
| Digital Outback Photo: Photoshop
Corner |
| |
| |
| |
| © Bettina & Uwe Steinmueller |
| |
| |
| |