Quite a few of our top photos are done in low contrast
light. These images can get lost during our work as they don't look that
good without any major tonal corrections (see
this example).
This time we want to talk about color issues for these low contrast
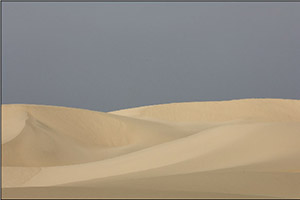
shots. Here is a photograph of beautiful dunes in strong overcast right
in ACR 3.3 and without any corrections (means "auto" was off) :
flat image in ACR
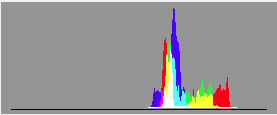
Histogram
The histogram sends a clear message: The black (darkest) point needs
to be adjusted.
Our main focus will be on the dune sand. That is why we will have
the levels restricted to the sand and corrected the sky before:
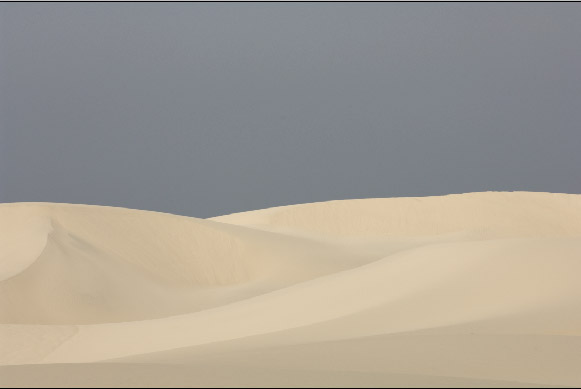
Corrected sky
Now on to fix the sand. This is simple
with levels, right? 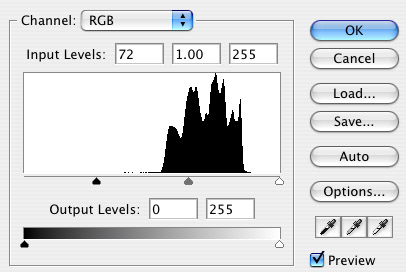
Levels dialog for a new adjustment layer
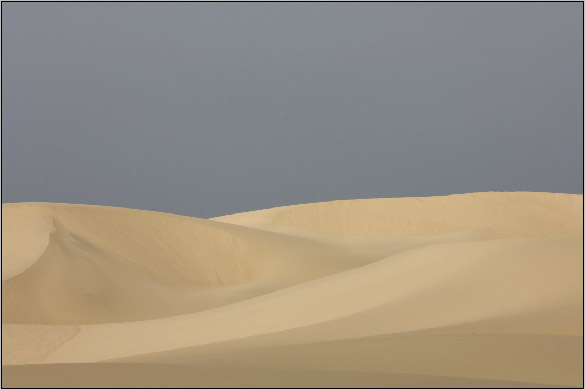
Image after using above levels in "normal" blending mode
Besides a clear contrast boost we also
experience quite a bit of change in saturation and most likely hue.
That is why we change the blending mode from "normal" to "luminosity":
Blending mode to "luminosity"
Best you stop here for a moment and
compare these two pictures. Both enhance the contrast but the colors
look very(!) different. For us the color changes through Levels in
RGB (Curves do the same) are kind of arbitrary to us. Most of the times
we neither want the pure contrast change shown in "luminosity" mode
nor the over the top changes shown in "normal". For us the "truth"
(means our intention) is somewhere in between.
Fortunately Photoshop layers offer a
solution to get exactly this. We duplicate the adjustment layer (the
one which is now in "luminosity" blending mode) and set it to "color"
blending mode. Now we can adjust with the opacity of this layer how
much color shift we want to apply.
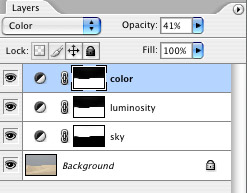
Our layer set
Here is what these layers do:
- Sky: Levels control the brightness of the sky
- Luminosity: Controls the contrast without changing
hues
- Color: Here at opacity 41% controls the accepted hue/saturation
change
Note: Blending mode Color changes Hue and Saturation.
Best you also try to use the Hue and Saturation blending modes.
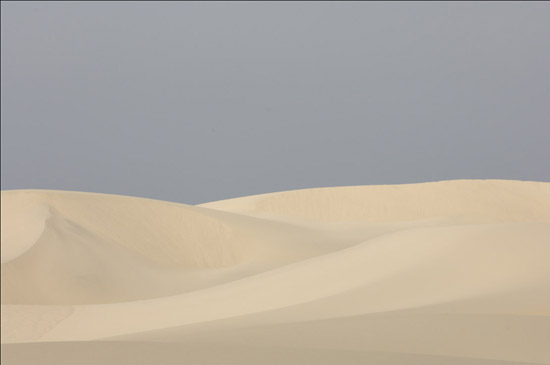
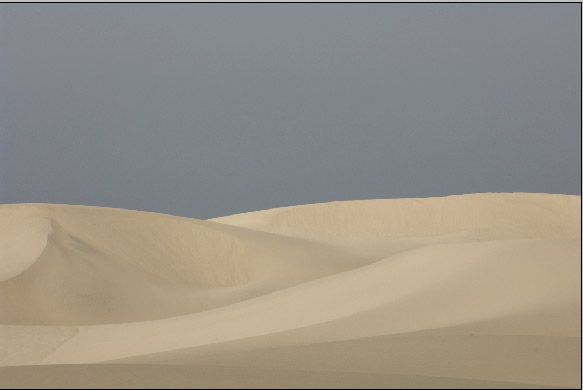
Here is a final version:

Final version
As I wrote in this
article the outcome
of this picture will be very subjective. You are the judge to get
the image the way you like it. This whole article is about the possible
control to set the image exactly how you like it. With just Levels/Curves
(RGB and not in different channels) in "normal" mode you won't be
able to have enough control.
What about RAW Converters?
Normally we would do all the tonality
control in the RAW converter. Unfortunately most of the RAW Converters
act more
like Photoshop levels in "normal" mode. We know two exceptions:
- RAW
Developer: RAW Developer allows Curves in LAB mode
and this way only to control the luminosity. Actually comparing
images from RAW Developer with other converters made us write this
article. We do all tonality control in RAW Developer with LAB luminosity
curves.
- LightZone: Tonality changes mostly only change the luminosity
We recommend in cases like this ( low contrast images) not to perform
any tonality control inside the RAW converter. Save the file as 16
bit
TIFF and
finally
tune the image in Photoshop. Of course if you like what you see in
your RAW converter all is fine.
Colors in the RAW converter are also influenced by:
- White balance settings
- Camera color calibrations in the RAW converter
Final Note
Images like this dune photo are of course especially tricky because
many different variations would work fine and it is even a matter of
your mood how you like the outcome. Having a series of these images
makes things even worse (and we have quite a few). Check out our latest
dune
portfolio.
Lobster
There
is also a commercial tool called "Lobster" which works in
Photoshop to accurately separate images into tonality and
color. We recommend to look at the Lobster tutorials
and manuals. Lobster is more precise than our approach
but also introduces some more layers for your images.
This is one of the many techniques we will teach during the 2006 Summit.
We will also work with you 1 on 1 and help you with your own images
and with how to use this technique, and many others, in your own work.
Click here to read a detailed description of the 2006 Digital Fine
Art Summit.
|