DOP Advanced Tonemapping
Note: This script requires that you own Photomatix Pro
DOP Advanced Tonemapping script implements an efficient and new HDR tonemapping workflow.
Motivation
We recently published some articles on Advanced Tonemapping:
Advanced Tonemappping with our DOP Luminosity Color Tuning script
These scripts streamline this workflow to make it easier to use and get even better results (because we added some new contrast improvement directly into the script).
Installation
The DOP Advanced Tonemapping tools come as a Javascript files for Photoshop CS3/CS4 (we only support CS3/CS4).
- Full version is named: DOP_AdvancedTonemappingDE.jsx and DOP_AdvancedTonemappingPM.jsx
- The demo versions have a "_Demo" suffix.
- Helper script: DOP_MergedLayers.jsx (see below)
Installing the script
The script needs to be copied to the Photoshop CS3/CS4 folder and here to Presets/Scripts (or to the equivalent locations for other languages). After restarting CS3/CS4 you should find the script under File->Scripts. If you do not find it there you did not put the script into the proper location.
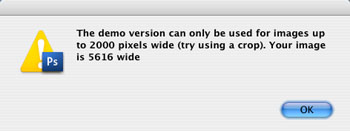
Note: The free demo version can only handle images up to 2000 pixels wide. The commercial version does not have this restriction. You will get this warning message if you use larger images with the demo version:
Helper script: DOP_MergedLayers.jsx
If you have found your preferred settings you may want to merge the Layer Group to save disk space. Because using “Merge Group” in CS3/CS4 can show a different result than what you are seeing using the Layer Group we provide a helper script that creates a new layer with the merged result.
- Make sure the Layer Group is the top layer
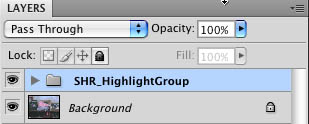
- Run the DOP_MergedLayers script and it creates a new merged layer with the same effect as the original Layer Group.
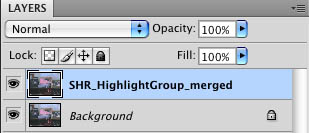
You still can lower the effect by tuning down the opacity of this layer.
Using the DOP Advanced Tonemapping
Using the script
As mentioned before you need to have Photomatix Pro to use these scripts. They come in two flavours:
- DOP_AdvancedTonemappingDE.jsx for use with the Photomatix Photoshop plugin
- DOP_AdvancedTonemappingPM.jsx for use with the Photomatix Pro application
Both ways you get close to the same results.
Using the plugin for Photoshop or the Photomatix Pro application have both pro and cons:
Advantage of using the plugin:
- Plugin allows a well integrated and streamlined workflow
Advantage of using the Photomatix Pro application:
- The Details Enhancer of the Photomatix Pro application is slightly improved (can mater with some images)
- The application maybe better in handling larger images (we use 24 MP images in the plugin but have also lots of memory)
In the ideal world the plugin would be identical to the application. We expect this to happen some time in the near future. In the meantime we support both.
1. Creating HDR image
We create the HDR image in Photomatix Pro (in our case nearly always directly from Lightroom). This is not a tutorial about how to use the different HDR creation option from Photomatix (but it is also pretty easy to use).
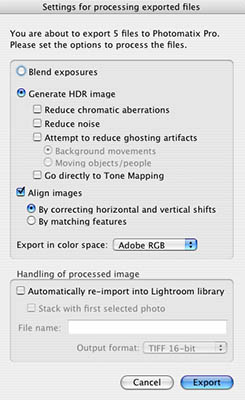
Once Photomatix Pro has created the HDR file we save it as Radience HDR in some folder for HDR images on our disks.
Note: Remember which color working space you have defined in Photomatix and as you TIFF output in Lightroom (we use AdobeRGB).
2. Using the DOP Advanced Tonemapping script
Open the HDR image into Photoshop CS3/CS4. During open Photoshop CS4 (not CS3) asks for the right profile to assign. HDR files don't have color profiles attached (at least not in a standardized way). That is why we need to re-assign the color space we used in Photomatix. Actually only the color primaries are used here because HDR images are linear and have no tone curves like they are used in normal color spaces.
Opening the HDR image
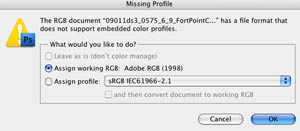
Assign the Color Profile
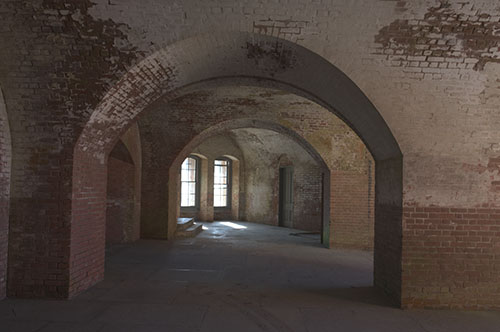
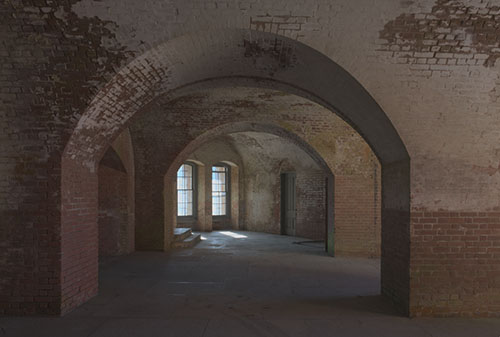
HDR image
Running the Script
Now we run the DOP Advanced Tonemapping script from File->Scripts:
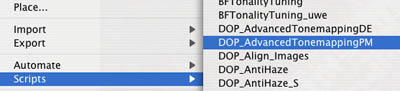
- use DOP_AdvancedTonemappingDE.jsx for use with the Photomatix Photoshop plugin
- use DOP_AdvancedTonemappingPM.jsx for use with the Photomatix Pro application
Important Processing Step
Setting Exposure and Gamma
This is a very critical step and has to be done properly. Once you start the script the following dialog will show:
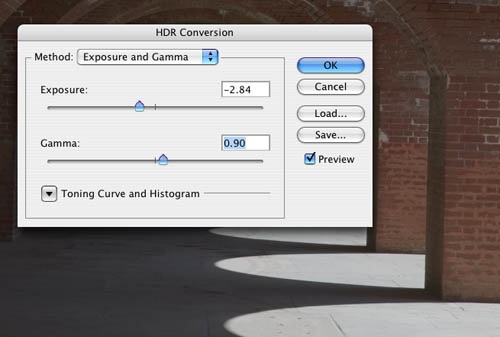
Exposure and Gamma in Photoshop
Adjust the Exposure so that the highlights show detail. Unfortunately Photoshop does not show a 16 bit histogram to help. If you make the highlights slightly too dark this is not problem but clipping the highlights would result in not so optimal highlights in the final result. You also can adjust the Gamma a bit (not much important though).
Performing the Tonemapping in Photomatix
Now the workflow differs for the Photomatix Photoshop plugin and the using the full application. Path A and B are clearly alternative ways to perform the tonemapping in Photomatix. Use one way or the other.
Path A: Workflow using the plugin (DOP_AdvancedTonemappingDE.jsx)
The script opens the Photomatix Tonemapping plugin like here:
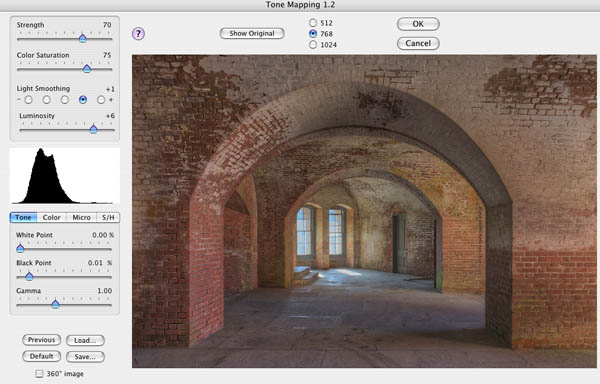
Photomatix Photoshop plugin
The default settings will be good starting point. We discuss some parameters later in more detail.
Once you like the result hit OK and the script will finish its work. Continue at the section Tuning the Tonemapping Parameters.
Path B: Using the Photomatix Pro for tonemapping (DOP_AdvancedTonemappingPM.jsx)
This is slightly more complicated and you really have to follow our description. We are using Photomatix as some sort of pseudo plugin.
(a) We create a folder on one of our disks that is ment to hold just the temporary tonemapped files. This is a one time step. From time to time we remove old files from this folder to preserve disk space.
(b) The script will stop and show a "Save As" dialog for your OS:
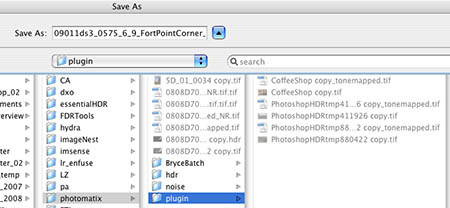
Navigate to the folder that you created in step (a). The script will remember this location for future use and you won't need to navigate again the next time (unless you change the folder location).
Confirm the next dialog as is:
IMPORTANT: Photoshop will right away go to a new Open dialog because the script continues to get the tonemapped image. Leave Photshop alone and continue when we say so. Photoshop cannot be used during this time for other operations. If you need to do other work you can cancel the dialog. You then have to restart this process later again. Yes, it requires some discipline but it works fine for us. If this is too much of a hassle please consider to buy the Photomatix plugin (which we recommend anyway) and use Path A.
(c) We have Bridge open and set to the folder defined in (a). Once the image shows up in Bridge we drag&drop the image to the Photomatix Pro application:
- Mac: Drag onto the Dock icon
- PC: Drag into the opened application
Once the HDR is open in Photomatix Pro:
HDR in Photomatix Pro
Call the Tonemapping (Details Enhancer)
- Mac: Command T
- PC: CTRL T
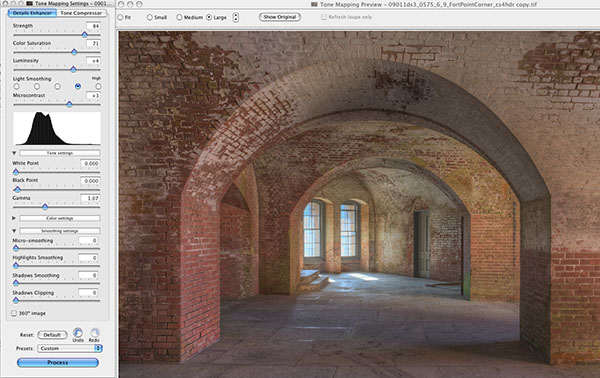
Photomatix Pro Details Enhancer
We talk about the most important settings in the next section.
If you have the settings you like you hit "Process". Once Photomatix has done the processing you close the file but don't forget to save the result into the same folder where you got the input image:
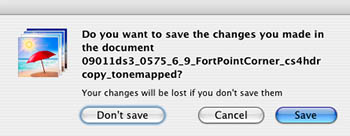
Click "Save"
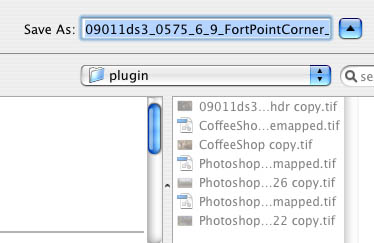
Save into the same folder as in (a)
Note: As long as you do not change the target folder in Photomatix Pro it will also remember this location.
(d) Now return to Photoshop and its waiting Open dialog:
Select the image that you have saved from Photomatix Pro and hit open.
Now Path A and B meet and the rest is now the same.
Tuning the Tonemapping Parameters
But before we continue we will talk a bit about the different settings you need to watch in the Details Enhancer (slightly differently organized in the application and the plugin).
- Strength: about 50-80 works here
- Color Saturation: Slightly too strong (this is of course personal taste, we later can tone down saturation but not up)
- Luminosity: +2 to +4 seems ok
- Light Smoothing: high (lower can produce halos)
- Microcontrast: -3 to +4 (higher values get more detail but also can make bright surfaces more dirty)
- White Point: no clipping!!
- Black Point: no clipping either
- Gamma: at a value that the image does not look too dark to you
- Micro-smoothing: Normally 0 but can be useful if skies get too grainy. In these case we often use maks for the sky (read more here: using masks)
Tuning the layers created by the scripts
Once the script has finished you find the following image and layer stack:

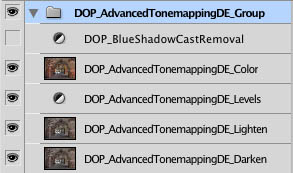
Photoshop Layer Group “DOP_AdvancedTonemappingDE_Group” with 5 layers:
- DOP_BlueShadowCastRemoval: This layer is by default disabled.
- DOP_AdvancedTonemappingDE_Color: Blending mode set to Color: don’t change this blending mode
- DOP_AdvancedTonemappingDE_Levels is set by default to no changes at all and is only provided as a convenience
- DOP_AdvancedTonemappingDE_Lighten: Blending mode set to Lighten: don’t change this blending mode
- DOP_AdvancedTonemappingDE_Darken: Blending mode set to Darken: don’t change this blending mode
By changing the opacity of the Color, Lighten and Darken layers you can fine tune the result. Often images that are tonemapped can show a strong blue shadows cast. If you want to tone it down enable the BlueShadowCastRemoval layer and tune the opacity. Finally the Levels layer is for your convenience to tune the Black and White points as well as the Gamma (brightness).
Further Processing
Working with 16 bit images
These scripts also work with 16 bit images. The first step converting 32 to 16 bit is skipped. We use it often to open shadows and get back also great colors in the shadows.
We hope you like our new workflow. We tried to make it as easy and powerful as possible but there is some leaning needed. Try the demo versions before you buy.
Get a demo or order DOP Advanced Tonemapping
|