9/1/2006 Getting Started
At PMA 2006 HP announced it's first pigment ink based A3 fine art
printer. As we understand it should be now for sale in September.
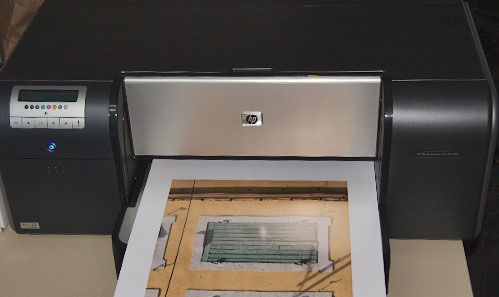
The 9180
features 8 inks:
- Cyan
- Light Cyan
- Magenta
- Light Magenta
- Yellow
- Photo Black (as we understand also used on matte papers)
- Matte black (not used for glossy media)
- Light Gray (note: gets used most)
There is no need to switch inks when mixing prints on matte and glossy
media.
Installation
The installation is not complicated and takes about
an hour. This sounds long but during this time the 9180 auto aligns
the heads and also calibrates the printer (this is unique in this class
of printers, we think this is a color linearization).
Printer impressions
- Very solid build quality
- Clean form (nice design)
- Single sheet feeding excellent (best in
its class)
- Printing via network included
- Lower price than same kind of pigment printers from the competition
- Print speed good even at MaxDPI
Printing from Photoshop
Printing from Photoshop can be done in two ways:
- Normal OS driver
- HP Photosmart Pro print plugin (see below)
Color printing via driver 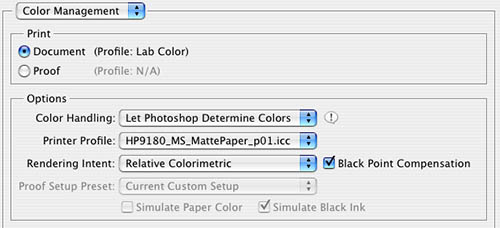
Normal Photoshop print dialog
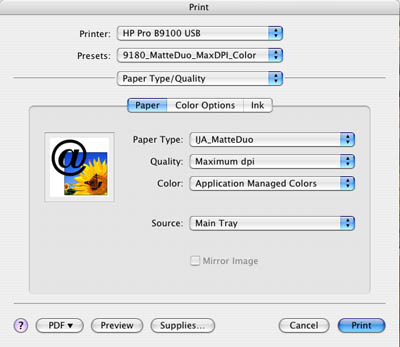
Driver setup for Color (color managed by Photoshop)
B&W printing via driver
The 9180 also provides a B&W
only mode. In this case you need to select in Photoshop "Let Printer
Determine Color" otherwise the driver won't allow you to select the
Grayscale mode.
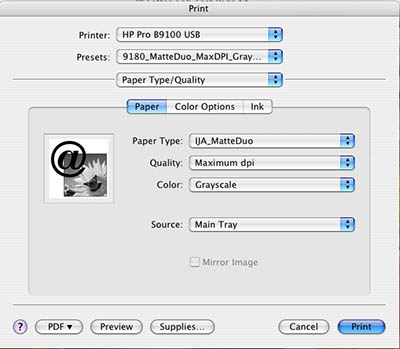
Driver Grayscale mode
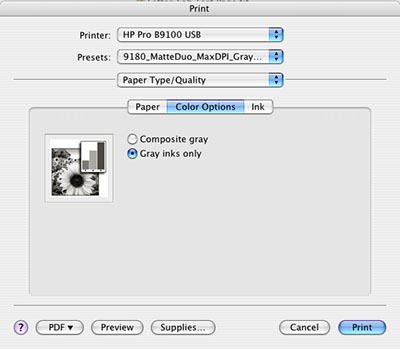
Grayscale Options
There are two options for grayscale
images. "Gray inks only" presents a more neutral rendering while "Composite
Gray" shows some metamerism.
Note: On glossy media
we experienced some banding in dark areas if using the "Gray inks only"
option even on original HP papers.
On real matte papers (not the slightly
glossy semi-matte type of paper) we would only use the "Gray inks
only" mode.
Because there are no advanced B&W option provided in the HP driver
we needed to use the Photoshop Transfer Curves to get better blacks:
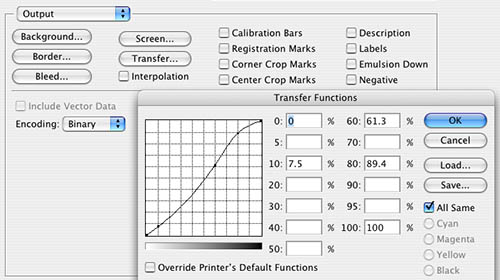
Sample Transfer Curve in Photoshop
HP
Photosmart Pro print plugin
The 9180 software comes
with an extra Photoshop Automation plugin to ease printing. If
you use other applications you may need to use the normal drivers.
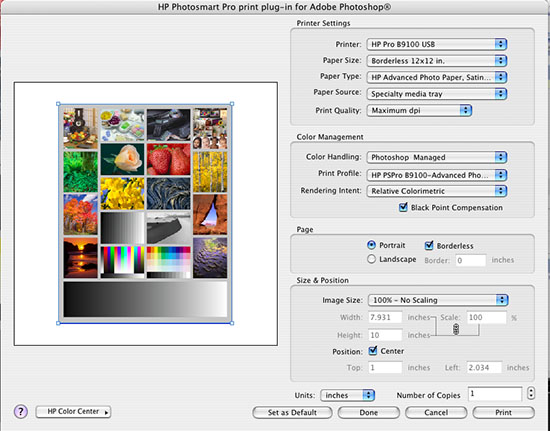
HP Photosmart Pro print plugin
What is so special about this Photoshop plugin?
Printing from Photoshop is no real pleasure. You
have at least three dialogs to synchronize to get a proper print:
- Photoshop Print dialog
- Print Size dialog
- Driver dialog
If something does not match you wasted time, ink and paper (and
may even spill inks in the printer). The new HP automation plugin
is a one stop printer control.
In principle this plugin is way more easy to use than Photoshop
using the normal driver.
We would like to see some improvements for the plugin though:
• Does not allow to control all parameters that can be
set in the driver (e.g. the different B&W modes)
• How to add custom paper sizes?
• Missing feature to save more than one preset pre printer
Setting up for 3rd party papers
We like the way that HP allows to add new papers to the driver
and plugin.
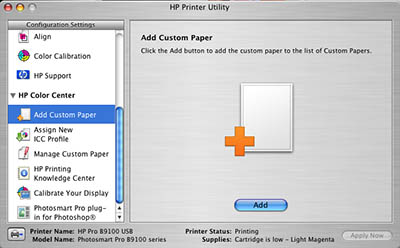
Add Custom Paper in HP Printer Utility
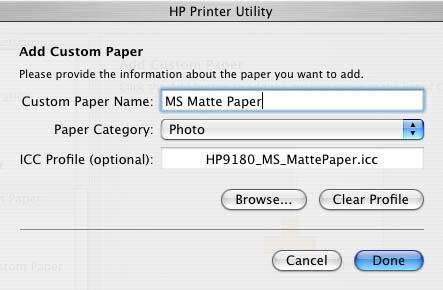
Add paper
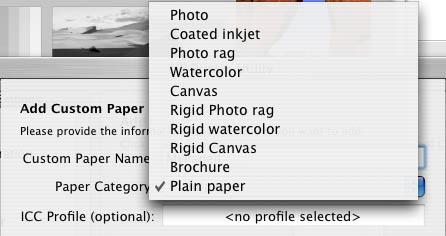
Select Paper types
Once the paper is added you can
select the paper in the driver. We use for all glossy papers papers
so far the type "Photo" and for really matte papers the
type "Photo Rag". Likely it would be more helpful if HP would provide
additional paper types types
like these and more (the key it to optimize the printer/paper combination
as much as possible).
- Glossy (high gloss)
- Satin, Luster, Semigloss
- Matte papers (like e.g. Epson Enhanced Matte or Inkjet Art
Matte Duo)
Ink Consumption
As of now we have made about 200 prints (mainly 9x6 inch prints
on letter sized paper but also some A3). The Light gray needed
replacement (is most needed) but
still
all other colors are on the first cartridge.
Note: The system will give you warnings about
low ink very early (got the last warning for light gray at 39%
of the cartridge). Don't get worried by these warnings (except
for getting some replacement
inks) you can often print still many, many prints without any problem.
Wait till the ink is fully out and the 9180 request you to switch
inks.
Some Speed Test
We printed from LightZone at
600 PPI a 9" x 6" on letter sized paper. We did not measure the
time the application rendered the file and the OS had the file
in the system queue.
- Setting at "Best": 20 seconds feeding from cassette, 2:25 print
time
- Setting at "MaxDPI": 20 seconds feeding from cassette, 3:05
print time
Print Quality
Here are some observations:
- Generic profiles coming with the printer are very good
- In most cases the "Best" setting is all you need. If you have
larger continuous tone area using
"MaxDPI" (highest quality) printing may give you a slight edge.
- Color images on matte and glossy are very good
- Print show excellent detail
- B&W prints on matte papers look nice using the "Gray
inks only"
option (for optimizing your results read our note about the Photoshop
Transfer Curves above)
- B&W print on a luster/soft gloss paper shows some minor
bronzing and can show either minor banding ( visible only on
larger uniform dark areas, we are very picky here) using "Gray
inks only" or
slight metamerism if we use "Composite Gray".
Clogging
- We keep the printer on all the time. If powered on the 9180
performs regular head cleaning cycles. We did not experience
any clogging
so far (2 weeks).
Media Choice
- The HP glossy media (we like the HP Advanced Photo Paper Soft
Gloss a lot) are an excellent match because all printer settings
are optimized for these papers (there are many parameters that
come into play to get an optimal paper, ink & printer match).
We are not that happy with the HP logo on the back of these papers
(e.g. for open portfolios and binders).
- For third party papers you have to do your own tests. The 9180
worked fine on some papers but we did not have that great results
with the Innova Fiba Gloss paper (which
prints very well on the Epson
2400/4800 and also also Canon
IPF 5000). We are in contact with HP to check for
this. You have to understand
that it is hard for a printer manufacturer to be compatible with
all papers on the market and the 9180 seems to be
picky with some of them.
- For third party glossy and satin media we recommend to use
the paper settings for HP Advanced Photo Paper Gloss paper. third
party matte papers are better adopted using the Photo Rag settings.
Preliminary Conclusion
Color photos the 9180 show very good quality
on both matte and glossy papers. B&W printing on
matte papers is best done using the in "Gray inks only" mode. For
B&W on glossy media we would avoid using the "Gray inks only" mode
because
of some minor banding (visible only on larger uniform dark areas).
The HP 9160 is a solid A3 fine art printer at
an attractive price point.
9/5/2006 Select the
right HP paper for the 9180
You need to use micro porous papers for the 9180
and not swellable media.
- HP Premium and Premium Plus papers are swellable media (not
the right choice)
- HP Advanced papers are micro porous (this is the right paper)
Be careful because the paper boxes look very much alike. Only
select the HP Advanced papers for the 9180.
11/5/2006 B&W printing using split toning
Since a couple of weeks we print B&W images
in color mode but first split tone them in LightZone
2.0. Check
out our article about converting to B&W in LightZone
and also split toning.
|